
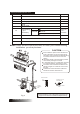
Installation Instructions
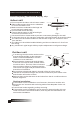


Bar
Copper pipe
Clamp handle
Red arrow mark
Cone
Yoke
Handle
Bar
"A"
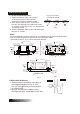
C: Putting nut on
Remove flare nuts attached to indoor and
outdoor unit, then put them on pipe/tube
having completed burr removal.(not possible
to put them on after flaring work)
Flare nut
Copper tube
Fig.16
Fig.17
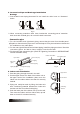
D: Flaring work
Firmly hold copper pipe in a die in the
dimension shown in the table below.
CAUTION
Align the center of the pipes..
Sufficiently tighten the flare
nut with fingers, and then tighten
it with a spanner and torque wrench
as shown.
Tightening Connection
Excessive torque can break nut
depending on installation conditions.
Outer
diam.
Tightening
torque(N.cm)
Additional tightening
torque(N.cm)
6.35
1570
(160kgf.cm)
1960
(200kgf.cm)
4900
(500kgf.cm)
5390
(550kgf.cm)
12.7
Outer diam.
(mm)
A(mm)
Max.
Min.
6.35 1.3
0.7
9.53
1.6 1.0
12.7
1.8
1.0
9.53
2940
(300kgf.cm)
3430
(350kgf.cm)
Fig.19
Indoor unit tubing Flare nut Pipings
Fig.18
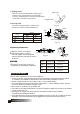
ELECTRICAL WORK
Electric safety regulations for the initial Installation
1. If there is serious safety problem about the power supply, the technicians should refuse
to install the air conditioner and explain to the client until the problem is solved.
2. Power voltage should be in the range of 90%~110%of rated voltage.
3. The creepage protector and main power switch with a 1.5 times capacity of Max. Current
of the unit should be installed in power circuit.
4. Ensure the air conditioner is grounded well.
7. An individual branch circuit and single receptacle used only for this air conditioner must be
available. See the following table for suggested wire sizes and fuse specifications:
5. According to the attached Electrical Connection Diagram located on the panel of the outdoor
unit to connect the wire.
6. All wiring must comply with local and national electrical codes and be installed
by qualified and skilled electricians.
9
Electrical work
12.7
1.8
1.0