
Installation Instructions


4
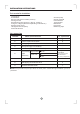
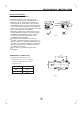
Accessories
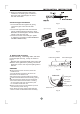
INSTALLATION INSTRUCTIONS
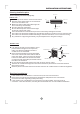
Note: Except the above parts provided, the other parts needed during installation you must
purchase.
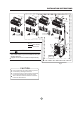
Parts you must
purchase
(The minimum pipe
wall-thickness
of 0.7mm is required. )
6.35
9.53
12.7
8
2
Self-tapping Screw B ST2.9X10
Remote controller
Installation Plate
Name of Accessories
Self-tapping Screw A ST3.9X25
Seal (See Page 8 for details)
Drain Joint
Connecting
pipe
Assembly
Liquid side
Plastic Expansion Sheath
Number
Q ty/one unit’
Gas side
9
Remote controller holder
1
( 12000Btu/h model)<
( 12000Btu/h model)≥
(See page 8 for details)
1
8
8
1
1
1
7
6
5
4
3
2
1
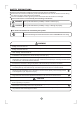
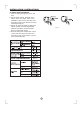
Level gauge
Screwdriver
Electric drill,Hole core drill ( 65φ mm)
Flaring tool set
Specified torque wrenches: 1.8kgf.m, 4.2kgf.m,
5.5kgf.m, 6.6kgf.m(different depending on model No.)
Spanner (half union)
Hexagonal wrench (4mm)
Gas-leak detector
Tools needed for installation:
Vacuum pump
Gauge manifold
Users manual
Thermometer
Multimeter
Pipe cutter
Measuring tape