
Installation Instructions


8
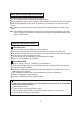
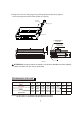
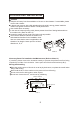
>30cm
>60cm
>30cm
>
2
00c
m
Chart 13
(Wall or obstacle)
Maintain channel
Air outlet
Air inlet
Air inlet
A
C
B
Necessary Room For Installation And Maintenance (Refer to Chart 13)
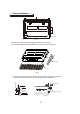
Moving And Installing
If possible, please remove the obstacles nearby to prevent the performance from being
impeded by too little of air circulation. Leave open two of the three directions(A,B,C).
Since the gravity center of this unit is not at its physical center, so please be careful when
lifting it with a sling.
Never hold the air-in of the outdoor unit to prevent it from deforming.
Do not touch the fan with hands or other objects.
o
Do not lean it more than 45 , and do not lay it sidelong.
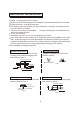
OUTDOOR UNIT INSTALLATION
Keep this unit away from direct radiation of the sun or other heaters. If unavoidable, please
cover it with a shelter.
In places near coast or with a high attitude where the wind is strong, please install the
outdoor unit against the wall to ensure normal performance.
Use a baffle when necessary.
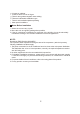
In the case of extremely strong wind, please prevent the air from flowing backwards into
the outdoor unit. (Refer to chart 12)
Locate the outdoor unit as close to the indoor unit as possible.
The minimum distance between the outdoor unit
and obstacles described in the installation chart
does not mean that the same is applicable to the
situation of an airtight. Leave open two of three
directions A , B, C.
Caution
Strong wind
X
O
Chart 12