MICROWAVE SAFETY Your safety and the safety of others are very important. We have provided many important safety messages in this manual and on your appliance. Always read and obey all safety messages. This is the safety alert symbol. This symbol alerts you to potential hazards that can kill or hurt you and others. All safety messages will follow the safety alert symbol and either the word “DANGER,” “WARNING” or “CAUTION.” These words mean: DANGER An imminently hazardous situation.
PRECAUTIONS TO AVOID POSSIBLE EXPOSURE TO EXCESSIVE MICROWAVE ENERGY (a) Do not attempt to operate this oven with the door open since open door operation can result in harmful exposure to microwave energy.It is important not to defeat or tamper with the safety interlocks. (b) Do not place any object between the oven front face and the door or allow soil or cleaner residue to accumulate on sealing surfaces. (c) Do not operate the oven if it is damaged.
1. The turntable and turntable roller rest must be in the oven during cooking. Place the cookware gently on the turntable and handle it carefully to avoid possible breakage. 2. Incorrect use of browning dish may cause the turntable to break. Browning dish sold separately. 3. Use only the specified bag size when using Direct Access Popcorn. 4. The oven has several built-in safety switches to ensure that the power remains off when the door is open. Do not tamper with these switches. 5.
IMPORTANT SAFETY INSTRUCTIONS WARNING To reduce the risk of fire, electric shock, injury to persons or exposure to excessive microwave oven energy when using your appliance, follow basic precautions, including the following: 1. Read all instructions before using the 10. Use this appliance only for its intended appliance. uses as described in this manual. Do 2. Read and follow the specific: "PRECAUnot use corrosive chemicals or vapors in this appliance.
21. Liquids, such as water, coffee, or tea are able to be overheated beyond the boiling point without appearing to be boiling. Visible bubbling or boiling when the container is removed from the microwave oven is not always present. THIS COULD RESULT IN VERY HOT LIQUIDS SUDDENLY BOILING OVER WHEN THE CONTAINER IS DISTURBED OR A SPOON OR OTHER UTENSIL IS INSERTED INTO THE LIQUID. i) Do not overheat the liquid. ii) Stir the liquid both before and halfway through heating it.
COOKWARE REQUIREMENTS UTENSILS CAUTION Personal Injury Hazard Tightly-closed utensils could explode. Closed containers should be opened and plastic pouches should be pierced before cooking. See the instructions on "Materials you can use in microwave oven or to be avoided in microwave oven." There may be certain non-metallic utensils that are not safe to use for microwaving. If in doubt, you can test the utensil in question following the procedure below. Utensil Test: 1.
Materials to be avoided in microwave oven Utensils Remarks Aluminum tray Food carton with metal handle Metal or metaltrimmed utensils Metal twist ties Paper bags Plastic foam Wood May cause arcing. Transfer food into microwave-safe dish. May cause arcing. Transfer food into microwave-safe dish. Metal shields the food from microwave energy. Metal trim may cause arcing. May cause arcing and could cause a fire in the oven. May cause a fire in the oven.
SETTING UP YOUR OVEN Names of Oven Parts and Accessories Remove the oven and all materials from the carton and oven cavity. Your oven comes with the following accessories: Glass tray 1 Turntable ring assembly 1 Instruction Manual 1 9 BOTTOM VIEW 8 FRONT VIEW Front 1 2 7 3 4 5 10 6 1. Window 2. Interlock System 3. Door Assembly 4. Turntable R ing Assembly 5. Turntable Shaft Rear 6. Turntable Glass Tray 7. Control Panel 8. Ventilation Openings (on top) 9. Surface Lights 10.
MICROWAVE USE Control Panel and Features (14) (10) (5) (8) (3) (2) (6) (9) (7) (11) (13) (12) (15) (1) (2) (3) ( (4) (1) Display Screen Sensor Cook Popcorn Number Keys (5) Power Level (6) Stop/Cancel (7) Start/+30Sec.
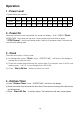
Operation 1 . Power Level 11 power levels are available. Level 10 9 8 7 6 5 4 3 2 1 90% 80% 70% 60% 50% 40% 30% 20% 10% 0 Power 100% Display PL-HI PL-90 PL-80 PL-70 PL-60 PL-50 PL-40 PL-30 PL-20 PL-10 PL0 0% 2 . Power On When the microwave oven is electrified, the screen will display " 12:00 PRESS " Clock " ENTER TIME . The buzzer will ring once. Press number keys to set clock or press " STOP/Cancel " to exit clock setting mode.
5 . Time Cook 1) In waiting state, press the number keys to set the cooking time.(The maximum cooking time is 99 minutes and 99 seconds) 2) Press " Power Level " repeatedly to adjust the power level. The default power is PL-HI. 3) Press " Start/+30 Sec " to start microwave cooking. 6 . Multi-stage Cooking Two stages can be maximumly set. If one stages is defrosting, it will be put in the first stage. The buzzer will ring once after each stage and the next stage will begin.
8. Popcorn 1) Press " Popcorn " repeatedly until the number you wish appears in the display. "1"SET: approximate 3.2 ounces 2"SET: approximate 1.75 ounces For example, press " Popcorn " once , "3.2" appears in the screen. 2) Press" START/+30SEC " to cook. 9. Auto Defrost 1) Press " Auto Defrost " once, the screen will display "MEAT". 2) Press " Auto Defrost " repeatedly to choose the desired function. And "MEAT", "POULTRY" , "FISH" or "BREAD" will display in turn .
10. Sensor Reheat 1) Press " Sensor Reheat " once , the screen will display "BEVERAGE". 2) Press " Sensor Reheat " repeatedly until the menu you wish appears in the display. 3) Press " START/+30SEC " to start sensor cook mode. The appliance starts sensing. The microwave is operating during sensing. When sensing is complete, beeps will sound and the calculated cook time will start to count down. Note: Do not open the door during the sensing process, or the program will be cancelled.
Sensor Cook programs Program no. Menu 1 Baked Potato 1 - 4 potatoes 2 Fresh Vegetable 2 cups 3 Frozen Vegetable 2 cups 4 Bacon 1 - 3 slices 5 Fish 5 oz, 10 oz, 15 oz, 20 oz 6 Frozen Dinner 10/20oz 7 Rice 1- 2 cups 8 Frozen Breakfast 8-12 oz 9 Frozen Pizza 12 oz 10 Meat 9-19 oz Quantity 12 .Operating the Ventilation Fan 1) Press " Vent Hi-Lo-Off " once to start ventilation fan, the screen will display "HIGH" . The oven will return to waiting state after 2 seconds.
14 .Turning the turntable on / off For best cooking results, leave the turntable on. It can be turned off for large dishes. To turn the turntable off, press" Turntable On/Off " once. The screen will display "OFF" for 2 seconds. Press" Turntable On/Off " again to turn the turntable on. The screen will display " ON " for 2 seconds.
MICROWAVE CARE Disconnect the power cord before cleaning or leave the door open to deactivate the oven during cleaning. CLEANING THE EXHAUST FILTERS The oven ventilation exhaust filters should be removed and cleaned often; generally at least once every month. ! CAUTION To avoid risk of personal injury or property damage, do not operate oven hood without filters properly in place. 1) To remove the exhaust ventilation filters, slide the filter to the rear.
SURFACE LIGHT REPLACEMENT ! CAUTION To avoid risk of personal injury or property damage, weargloves when replacing the light bulbs. 1) Unplug the microwave oven or turn off power at the main circuit breaker. 2) Remove the bulb cover mounting screws at both light positions under the microwave. 3) Replace bulb with max. 30 watt appliance bulb. 4) Re-install bulb cover and mounting screw. 5) Plug the microwave back into the power supply or turn the power back on at the main circuit breaker.
OVEN LIGHT REPLACEMENT Remove the vent grill per instructions 1-4 above and charcoal filter, if used. 2) Remove old light bulb and replace only with equivalent Max. 30 W appliance bulb available at most hardware stores or lighting centers. 1) Open light cover located behind filter mounting by carefully pulling up on the front edge. Note: DO NOT USE BULBS LARGER THAN 30 WATTS. 3) Replace the microwave oven light cover by carefully pushing into place. Replace the charcoal filter.
CLEANING SUGGESTIONS for best performance and for safety reasons, keep the oven clean inside and outside. Take special care to keep the inner door panel and oven door frame free of food and grease build-up. Never use rough scouring powder or pads on the microwave. Wipe the microwave oven inside and out with a soft cloth and and warm (not hot) mild detergent solution. Then rinse and wipe completely dry.
TROUBLESHOOTING First try the solutions suggested here to possibly avoid the cost of a service call. PROBLEM POSSIBLE CAUSE SOLUTION a. Electrical cord for oven is not plugged in. Oven will not start b. Door is open. c. Wrong operation is set. a. Plug into the outlet. b. Close the door and try again. c. Check instruction. a.Materials to be avoided in microwave oven are used. b.The oven is operated when Arcing or sparking empty. c.Spilled food remains in the cavity. a.