75-440 UHF Handheld GMRS Transceiver User’s Manual Copyright © 2003 by Midland Radio; all rights reserved.
75-440 User manual In this book… IN THIS BOOK…................................................................................................................................................. 2 INTRODUCTION .................................................................................................................................................... 4 WARNING NOTES ...........................................................................................................................................
75-440 User manual LIMITED WARRANTY .................................................................................................................................... 28 Page.
75-440 User manual Introduction Congratulations. 75-440 is an advanced GMRS (General Mobile Radio Service) Professional Radio. Its rugged design allows it to be your reliable partner even during hard working days. Its LCD as well as user friendly controls make the 75-440 easy to use. To extend the flexibility of the radio, a “VOX” (Voice Operated Transmit) function has been added which allows switching the transmission just by talking in full hands free condition (with optional headset).
75-440 User manual • Be sure the “PTT” key is not pressed when you do not need to transmit. • Do not operate the radio near unshielded electrical blasting caps or in an explosive atmosphere. • Do not transmit without the antenna fitted on the radio. Though it is provided with a protection, it may damage the TX output final stage. • Respect the environment conditions.
75-440 User manual Conventions and Symbols in this Book This symbol marks a ‘note’. Notes are hints or tips which offer additional information to help you. , This symbol marks a ‘caution’. Cautions are special notices, which you should read and follow carefully to avoid possible damage to your equipment and to avoid potential danger to yourself or other people. Key names will be highlighted in bold. Important sentences and words are highlighted in Italic. Page.
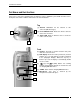
5-440 User manual Part Names and their functions Please have a look at the following parts description in order to familiarize yourself with the transceiver’s main parts and controls. Numbers in brackets refer to the illustration. Top [1] Antenna connector. Fit the connector (MX thread type). 2 1 antenna to this [2] Power ON/OFF knob. Rotate this knob to turn the transceiver on and off. [3] Status LED. Glows in different colors to show the radio’s current status. 3 Front [4] Speaker.
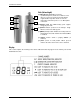
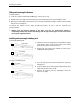
75-440 User manual Side (left and right) 12 14 11 9 [9] Microphone connector. For remote speaker/microphone, headsets for VOX use and other accessories. It must be protected with the supplied rubber cap when not in use. For the related pin connections please see to “Microphone connection”. [10] Battery pack. This NiMH battery pack supplies energy to your radio. 13 10 [11] Release button (located on the battery’s body). Allows to remove the battery pack [12] MON (monitor) button.
75-440 User manual Setup Unpacking The following items are in the package: (a) Transceiver’s main body (b) Flexible antenna (c) Battery pack NiMH 1,300 mA/h (d) Belt clip (e) Users guide (this book!) If something is missing please promptly advise your supplier. Page.
75-440 User manual Fitting and removing the Antenna To fit the antenna: 1) Locate the antenna terminal (thread MX type) on transceiver’s top. 2) Hold the transceiver with one hand and the base (the thicker part) of the antenna with the other. 3) Attach the included rubber duck antenna to the antenna terminal by turning it clockwise until it is firmly locked. Do not overtighten. To remove the antenna do the same described procedure. At step 3 turn the antenna base counterclockwise.
75-440 User manual Installing/removing the belt clip The supplied belt clip allows you to hang the transceiver on your belt or jacket when you are not using the radio. 1 To fit the belt clip onto the transceiver’s body: SLIDE DOWN 1) Gently slide the clip into the appropriate guides located on the transceiver’s battery pack until it firmly locks.
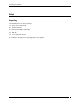
75-440 User manual Basic Operations Switching the radio ON and OFF To switch the radio on: 1) Rotate the “PWR/VOL” knob clockwise until the radio is switched on. The CPU will start an auto test as follows: • • • LED will glow GREEN, then RED and turn OFF. LCD will display all segments and icons. The letters "PS"("PASS") will be displayed followed by a long beep. LCD will display the last operating mode. The self-test goes very fast.
75-440 User manual Channel selection Each channel is identified by 2 numeric digits. The FCC assigned GMRS channel frequencies are programmed into your radio as shown in the table below. Channels 1 through 7 are shared with FRS radios. Channel Freq. MHz. Channel Freq. MHz. (FRS Ch.) Channel Freq. MHz. (Duplex) Tx/Rx 1 2 462.5625 462.5875 8 9 462.5750 462.6250 16 17 467/462.5750 467/462.6250 3 462.6125 10 * 462.6750 18 467/462.6750 4 462.6375 11 462.5500 19 467/462.5500 5 462.
75-440 User manual 2) To Disable “GROUP MODE”. Press the “MON” button: “SAT” icon is not displayed. You are now working in “Open Traffic”. NOTE: if “SAT” icon is never displayed, “CTCSS/DCS” tone is not programmed. “GROUP MODE” function is not available. See ‘Setting “Group Mode” codes’. 3) Press and Hold “MON” button for three seconds, internal squelch will be disabled and your speaker is un-muted. Press and release the “MON” button to restore the squelch to normal operating condition.
75-440 User manual Scanning channels Your 75-440 has three types of scanning available. The most used is Normal Scan. This allows you to scan all the channels you have designated in your scan list (see Creating Scan List). The next is scan with a Priority channel (channel 1). This scan allows you to monitor channel 1 more often than the other channels while scanning (for this scan to work properly you must have at least 6 channels in the scan list). The third scan type is Dual Watch.
75-440 User manual 2) Deactivate scan by pressing “Call” + stop the scan. to remove the Priority channel then press “Call” + to Selecting Dual Watch key to activate the Priority 1. Choose the second channel you wish to use. Press the “CALL” + channel. A "P" will be displayed in the lower right corner of the display to confirm your selection. 2. The radio will scan the chosen channel and the priority channel (usually channel 1).
75-440 User manual Advanced Operations In this section we’ll describe some advanced operation which you can do with your handheld transceiver: Handsfree Transmit (VOX) VOX (Voice Operated Transmit) is an automatic system, which allows you to automatically switch the transmission in hands free mode just by speaking in the built-in microphone of a headset (not provided with the unit). Please ensure that the handset is suitable for your transceiver as reported in the paragraph “Microphone connection”.
75-440 User manual Roger Beep A roger beep will be heard by the other party when “PTT” button is released. To enable or disable Roger Beep “FUNC”: Press the "FUNC" + CALL” keys. Key Beep A beep is heard by the user when any key is pressed with the exception of the “PTT” button. To enable or disable Key Beep: Press the “FUNC” key + “MON” button. Setting “GROUP MODE” (CTCSS/DCS) codes To SET CODES”: Turn off the radio. Press and hold the “ and keys. Turn the radio on. • • and keys.
75-440 User manual 47 48 49 50 51 52 53 54 55 56 57 58 59 60 61 62 63 64 65 66 67 68 69 70 71 72 73 74 75 76 77 78 79 80 81 82 83 84 85 86 87 88 89 90 91 92 93 94 95 96 97 98 99 100 101 2F 30 31 32 33 34 35 36 37 38 39 3A 3b 3C 3d 3E 3F 40 41 42 43 44 45 46 47 48 49 4A 4b 4C 4d 4E 4F 50 51 52 53 54 55 56 57 58 59 5A 5b 5C 5d 5E 5F 60 61 62 63 64 65 199.5 Hz 206.5 Hz 229.1 Hz 254.
75-440 User manual Battery Packs Information on rechargeable batteries • When the battery pack is new it will not provide 100% of its efficiency. To reach the full battery run time you have to “run-in” the battery with at least 3-4 deep charging/discharging cycles. After that it will reach its maximum capacity. Please see “Proper charging of battery packs” for further details. • When you properly use the battery pack, you will obtain about 400 charge/discharge cycles (300 with the optional rapid charger).
75-440 User manual , Use only authorized batteries and chargers. The use of non-authorized accessories may cause burns, fire or explosions causing serious damages to the radio/battery or serious injuries to people. , Battery chargers are for indoor use only. , Be certain that your power source matches the rating listed for the supplied battery charger (AC Adapter). If you are not sure, check with your dealer or with your local power company.
75-440 User manual Optional accessories These optional accessories can be used to improve the transceiver’s performances: • Spare battery pack number 81B02. It extends the duty time. • Rapid charger number 18-388. Recharges the battery packs in 1 hour and provides trickle charge when they reached their full charge. • Carrying case. Protects your radio against small shocks and scratches the best for use in hard environments.
75-440 User manual • The suggested speaker input impedance is 8 Ohms • The microphone should be condenser low-impedance type. • All accessories should be hi-quality suitable for professional use. , Please do not connect any accessory that you are not sure meet the above stated requirements. You could cause serious damage to your radio. In if your not sure please contact your authorized dealer. Page.
75-440 User manual Quick reference Operation reference 1) Output Power: Press the “FUNC” key to set High or Low Power output. “LOW” icon is displayed to show that you set Low Power output. (high output has no indication) 2) Group Mode: Press the “MON” button to enable/disable GROUP MODE. “SAT” icon is displayed. 3) Squelch: Press and Hold “MON” button to enable/disable the squelch. 4) Scan: Press the “CALL” button + the key to enter the SCAN.
75-440 User manual SERVICE: If it ever becomes necessary to return your unit for service: 1. Pack the unit in its original box and packing. 2. Pack the original box in a suitable shipping carton. Improper packing will result in damage during shipment. 3. Include a photocopy of the bill of sale showing the date of purchase. 4. Include a brief description of the problem you are having. 5. Include a DAYTIME telephone number. 6. Include a money order or Visa or Master Card credit card number for $7.
75-440 User manual Index A Adjusting Transmission Power Volume Antenna fitting/removing 14 13 10 B Battery charger rapid (optional) standard Battery pack Charging Battery packs cleaning Information on rechargeable batteries Proper changing Warnings for battery and chargers use Belt clip 22 11 11 21 20 20 20 11 C Carrying case Channel selection Charger Cleaning the radio Connectors Conventions and Symbols 22 13 see Battery charger 21 21 6 D Display 8 H Handsfree transmission (VOX) 17 K KEY BEEP 1
75-440 User manual P PAGING Power button ON/OFF TX output adjustment 17 12 12 14 Q Quick reference Operation resume 24 24 R Radio lock Radio maintenance Rapid charger Reception ROGER BEEP 16 21 22 13, 14 18 S Safety Scanning channels Setup Battery pack Belt clip Charging the battery pack Fitting antenna Package contents Unpacking Switching the radio ON/OFF 4 15 10 11 11 10 9 9 12 T Transmission Transmission Power 14 14 V VOX 17 W Warning notes Warnings for battery and chargers use 4 20 Page.
75-440 User manual LIMITED WARRANTY Midland Radio Corporation will repair or replace, at its option without charge, any Midland FRS or GMRS transceiver which fails due to a defect in material or workmanship within ONE YEAR following the initial consumer purchase. This warranty does not include any carrying cases, earphones, or antennas, which may be a part of or included with the warranted product.