M-Mini USB > RICETRASMETTITORE VEICOLARE CB AM/FM > AM/FM CB MOBILE TRANSCEIVER > AM/FM CB MOBILFUNKGERÄT > TRANSCEPTOR MÓVIL CB AM/FM > EMETTEUR-RÉCEPTEUR MOBILE CB AM/FM > RADIO CB AM/FM > STATIE RADIO CB AM/FM
ITALIANO ENGLISH DEUTSCH ESPAÑOL FRANÇAIS POLSKI ROMANA
Sommario Caratteristiche 2 Descrizione e comandi 3 Display 4 Pannello posteriore 4 Microfono 5 Installazione 5 Alimentazione 5 Collegamento dell’antenna 5 Funzionamento 6 Accensione/spegnimento della radio 6 Controllo volume 6 Selezione del canale 6 Controllo livello squelch (28 livelli e spento) 6 Controllo squelch DS (9 livelli) 7 Tipo di modulazione 7 Controllo guadagno RF 7 Canale di emergenza 7 Blocco tasti 8 Funzione scansione 8 Specifiche tecniche M-Mini-USB Man
Caratteristiche • • • • • • • • • • • • • • 2| Ricetrasmettitore multistandard Presa USB per ricarica Cavo d’alimentazione con presa accendisigari incluso Microfono removibile con connettore RJ45 e tasti Up/Down Scansione canali Display LCD con S/meter Doppia modalita di squelch (9 e 28 livelli) Attenuatore ricezione (RF gain) regolabile Canale emergenza 9/19 Presa altoparlante esterno Dimensioni: 110x120x25mm M-Mini-USB Manuale d’uso
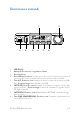
Descrizione e comandi 1 A/F 3 4 5 2 SQ RFG 6 7 EMG 8 EXT SP 1. 2. 3. 4. 5. 6. 7. 8. ANT LCD Display Manopola di accensione e regolazione volume Presa microfono Presa USB per la ricarica. Se il dispositivo da ricaricare richiede una corrente di carica elevata, la radio potrebbe subire un decremento della sensibilità.
Display DOWN 11 14 UP 12 15 10 9 13 9. Numero canale selezionato 10. Indicatore S-METER di intensità del segnale ricevuto e di potenza di segnale trasmesso 11. AM/FM: indicatore del modo di emissione 12. RX/TX: indicatore ricezione (RX) e trasmissione (TX) 13. SC: indicatore funzione SCAN attivata 14. AQ: indicatore attivazione digital squelch 15. R: Indicatore RFGAIN attivo A/F SQ RFG EMG Pannello posteriore 18 17 EXT SP ANT 16 16. 17. 18.
Microfono 19. Tasto PTT 20. Tasto UP 21. Tasto Down 21 DOWN 20 UP 19 Installazione Selezionare il luogo di installazione in modo che il dispositivo non pregiudichi la sicurezza e non metta a rischio l’incolumità in caso di incidente. Accertarsi che il display sia ben visibile ed i comandi siano facilmente accessibili. Alimentazione Collegare il cavo accendisigari alla presa della vostra vettura. Assicuratevi che il vostro mezzo fornisca un’alimentazione a 12V e non a 24V.
Nota: L’antenna radio deve essere montata il più lontano possibile da altre antenne, oggetti metallici e fonti di interferenze. Di solito le antenne CB devono essere installate nella parte più alta del veicolo e su superfici metalliche. Una superficie metallica sufficientemente grande è essenziale per il buon funzionamento dell’antenna.
Controllo squelch DS (9 livelli) Tenere premuto il tasto SQ, fino a quando il display LCD visualizza l’indicazione AQ (nella parte alta del display); l’LCD mostrerà inoltre per circa cinque secondi il livello di DS corrente. A.1 A.9 Livello DS più basso Livello DS più alto Quando il display mostra il livello di DS corrente è possibile modificare il livello premendo brevemente i tasti UP o DOWN sul microfono. Tenere premuti i tasti UP o DOWN sul microfono per modificare il livello di DS rapidamente.
Blocco tasti Tenere premuto il tasto EMG per più di 2 secondi per bloccare i tasti, il display LCD visualizza “LC” ad indicare il blocco tasti attivato. Tenere premuto nuovamente il tasto EMG per più di due secondi per disattivare il blocco tasti, il display LCD visualizza la scritta ‘OF’. Nota: in modalità blocco tasti tutti i tasti sono disabilitati ad eccezione del tasto PTT.
Altoparlante esterno E’ possibile collegare un altoparlante esterno (8 Ohm) alla presa mono da 3,5 mm sul retro della radio. L’altoparlante interno della radio viene automaticamente escluso quando viene inserito lo spinotto dell’altoparlante esterno. Ripristino impostazioni di fabbrica Spegnere la radio; poi tenere premuto il tasto SQ ed accendere nuovamente la radio; il display della radio mostrerà per un attimo l’indicazione “rt”.
Specifiche tecniche Gamma di frequenza*................................................................. 26.565-27.99125 mhz Dimensioni......................................................................................... 110 x 120 x 25 mm Peso......................................................................................................................... 450 gr Tensione di alimentazione.......................................................................................13,2 V Consumo .........
Index Features 2 Descriptions and commands 3 Display 4 Back panel 4 Microphone 5 Installation 5 Power supply 5 Antenna connection 5 Operation 6 Power On/Off the radio 6 Volume control 6 Channel Selection 6 Squelch level control (28 level and off) 6 DS control (9 levels) 6 Modulation Type 7 RF Gain control 7 Emergency Channel 7 Key Lock 7 Scan function 7 Changing the CB-Standard 8 External Speaker 8 Restore factory default 8 Specifications 9 M-Mini-USB Instructio
Features • • • • • • • • • • • • 2| Multi-standard device USB port to recharge your devices Power cord with cigarette lighter plug included Removable microphone with RJ45 connector and Up/Down controls Channel Scan LCD display, S-Meter Double squelch mode (9 and 28 levels) RF Gain Emergency channel 9/19 Socket for external loudspeaker Dimensions: 110x120x25mm M-Mini-USB Instruction Guide
Descriptions and commands 1 A/F 3 4 5 2 SQ RFG 6 7 EMG 8 EXT SP ANT 1. 2. 3. 4. 5. 6. 7. 8. LCD display Power On/Off Volume Microphone jack USB charging jack. If the device that must be recharged requires a high current, the sensitivity of the radio could decrease.
Display DOWN 11 14 UP 12 15 10 9. 10. 11. 12. 13. 14. 15. 9 13 Selected channel Received signal strength indicator and trasmission power signal AM/FM mode RX/TX: reception (RX) and trasmission (TX) indicator SC: SCAN function activated AQ: Digital squelch activated R: RFGAIN activated A/F SQ RFG EMG Back panel 18 17 EXT SP ANT 16 16. 17. 18.
Microphone 19. PTT key: trasmission button 20. UP key 21. DOWN key 21 DOWN 20 UP 19 Installation Select the mounting location so that road safety is not affected by the device, or additional risk of injury in an accident arises. Check that the display can be seen, and the controls can easily accessed. Power supply Connect the cigarette lighter power cable to the proper plug of your vehicle. Be sure your car has a power supply of 12V and not 24V.
Operation Power On/Off the radio Turn VOL switch clockwise to power on the radio, the LCD displays the CB standard followed by the channel number. Turn the VOL knob counterclockwise, until it clicks. The radio is powered off. Volume control Turn clockwise to increase volume and turn counterclockwise to decrease volume. Channel Selection Shortly press microphone UP or DOWN to change working channel. Hold microphone UP or DOWN to change the working channel fast.
Note: Higher DS level require a stronger signal to open the speaker and hear the spokesman. Modulation Type Shortly press A/F key to switch between AM /FM mode. The LCD displays the selected mode. RF Gain control Shortly press RFG key, LCD displays R and the present RF gain level flashes. Shortly press microphone UP or DOWN to change the level of attenuation. Shortly press RFG key to exit RF gain level control.
Changing the CB-Standard Switch off the radio, press A/F and then swich on your radio. Display shows the current frequencies. Press microphone UP or DOWN to choose wanted norms. Power off and power on again.
Specifications Frequency band*................................................................................. 26.565-27.99125 Dimensions........................................................................................110 x 120 x 25 mm³ Weight..................................................................................................................... 450 gr Supply Voltage.........................................................................................................
Inhalt Eigenschaften 2 Bedienungselemente 3 Display 4 Rückseite 4 Mikrofon 5 Installation 5 Stromversorgung 5 ANSCHLUSS DER ANTENNE 5 Bedienung 6 Ein- / Ausschalten des Geräts 6 Lautstärke 6 Kanalwahl 6 Rauschsperren-Pegel (28 Stufen und Aus) 6 DS Einstellung (9 Stufen) 6 Modulationsart 7 RF Gain Einstellung 7 Kanal 9/19 7 Tastensperre 7 Kanalsuchlauf 7 Wechsel des CB-Standards 8 Externer Lautsprecher 8 Werkseinstellungen wiederherstellen 8 Technische Daten 9 M-
Eigenschaften • • • • • • • • • • • • • 2| Multistandard CB-Funkgerat USB Buchse zum Laden Ihrer Gerate Stromkabel mit Zigarettenanzunder Stecker Abnehmbares Mikrofon mit RJ45 Anschluss und Up/Down Tasten Kanalsuchlauf LCD Anzeige mit S-Meter 2 Squelcheinstellungen (9 oder 28 Stufen) RF Gain (Empfangsempfindlichkeit) Notrufkanal 9/19 Anschluss fur externen Lautsprecher Abmessungen: 110x120x25mm M-Mini-USB Bedienungsanleitung
Bedienungselemente 1 A/F 3 4 2 SQ RFG 6 7 5 EMG 8 EXT SP ANT 1. 2. 3. 4. 5. 6. 7. 8. LCD Display An/Aus Lautstärke Mikrofonbuchse USB Buchse. Wenn das aufzuladende Gerät viel Strom zieht, könnte die Empfindlichkeit des Radios abnehmen.
Display DOWN 11 14 UP 12 15 10 9. 10. 11. 12. 13. 14. 15. 9 13 Gewählter Kanal S-Meter und Anzeige der Sendeleistung AM/FM Modulation RX/TX Anzeige: Empfangen (RX) und Senden (TX) SC: SCAN Suchlauft aktiviert AQ: Automatische Rauschsperre aktiviert R: RFGAIN aktiviert A/F SQ RFG EMG Rückseite 18 17 EXT SP ANT 16 16. 17. 18.
Mikrofon 19. PTT: Sendetaste 20. UP Aufwärts-Taste 21. DOWN Abwärts-Taste 21 DOWN 20 UP 19 Installation Wählen Sie den Montageort so aus, dass durch das Gerät nicht die Verkehrssicherheit beeinträchtigt wird oder ein zusätzliches Verletzungsrisiko bei einem Unfall entsteht. Überprüfen Sie, ob das Display gut sichtbar ist und die Bedienelemente leicht zugänglich sind. Stromversorgung Verbinden Sie den Zigarettenanzunder-Stecker mit dem 12 Volt Zigarattenanzunder im Fahrzeug.
Bedienung Ein- / Ausschalten des Geräts Zum Einschalten des Geräts den VOL-Knopf im Uhrzeigersinn drehen. Das Display zeigt kurz den CB-Standard an, gefolgt von der Kanalnummer. Den VOL-Knopf gegen den Uhrzeigersinn drehen, bis es klickt. Das Gerät ist ausgeschaltet. Lautstärke VOL-Knopf im Uhrzeigersinn drehen, um die Lautstärke zu erhöhen und gegen den Uhrzeigersinn drehen, um die Lautstärke zu verringern. Kanalwahl UP- oder DOWN-Taste am Mikrofon kurz drücken, um den Arbeitskanal zu wechseln.
Die UP- oder DOWN-Taste am Mikrofon drücken, um den DS-Pegel zu ändern. Die UP- oder DOWN-Taste gedrückt halten, um den DS-Pegel schnell zu ändern. Zum Speichern und Beenden die SQ-Taste erneut drücken oder 3 Sekunden warten. Hinweis: Höhere DS-Einstellungen erfordern ein stärkeres Signal, um den Lautsprecher zu öffnen und die Gegenstation zu hören. Modulationsart Kurz die A/F-Taste drücken, um zwischen dem AM- und FM-Modus zu wechseln. Das Display zeigt den ausgewählten Modus an.
Wechsel des CB-Standards Gerät ausschalten, mit gedrückter A/F-Taste wieder einschalten. Das Display zeigt den aktuellen CB-Standard. Den gewünschten CB-Standard mit der UP- oder DOWN-Taste am Mikrofon wählen. Gerät ausschalten und wieder einschalten.
Technische Daten Frequenzbereich*................................................................................26,565-27,99125 Abmessungen.....................................................................................110 x 120 x 25 mm Gewicht...................................................................................................................450 gr Betriebsspannung................................................................................................... 13,2 V Stromaufnahme....
Índice Características 2 Descripción y controles 3 Pantalla 4 Panel trasero 4 Micrófono 5 Instalación 5 Alimentación 5 Conexión de la antena 5 Funcionamiento 6 Encender/apagar la radio 6 Control de volumen 6 Selección de canales 6 Control del nivel del squelch (28 niveles y apagado) 6 Control DS (9 niveles) 6 Tipo de modulación 7 Control de ganancia de RF 7 Canal de emergencia 7 Bloqueo del teclado 7 Función Scan 7 Cambiando el estándar de CB 8 Altavoz externo 8 Res
Características Dispositivo multiestandar Puerto USB para cargar tus dispositivos Cable de alimentacion con toma de encendedor incluido Microfono extraible con conector RJ45 y botones Arriba/Abajo Busqueda de canales Pantalla LCD, S-Meter Modo Doble Squelch (9 y 28 niveles) Ganancia de RF Canal de emergencia 9/19 Toma para altavoz externo Dimensiones: 110x120x25mm 2| M-Mini-USB Manual de Instrucciones
Descripción y controles 1 A/F 3 4 5 2 SQ RFG 6 7 EMG 8 EXT SP ANT 1. 2. 3. 4. 5. 6. 7. 8. Pantalla LCD Encendido / Apagado / Volumen Toma para el micrófono Puerto USB para la recarga. Si el dispositivo a recargar requiere una corriente alta, la sensibilidad de la radio podría disminuir.
Pantalla DOWN 11 14 UP 12 15 10 9. 10. 11. 12. 13. 14. 15. 9 13 Canal seleccionado Indicador de fuerza de la señal recibida y señal de potencia de la transmisión Modo AM/FM RX/TX: indicador de recepción (RX) y transmisión (TX) SC: función SCAN activada AQ: squelch automáticoA/F digital activado SQ RFG EMG R: ganancia de RF activada Panel trasero 18 17 EXT SP ANT 16 16. 17. 18.
Micrófono 19. Botón PTT: botón para transmisión 20. Tecla ARRIBA 21. Tecla ABAJO 21 DOWN 20 UP 19 Instalación Seleccione la ubicación de montaje, de forma que la seguridad vial no se vea afectada por el dispositivo, o que no se incremente el riesgo de lesiones en caso de accidente. Compruebe que se puede ver la pantalla, y se puede acceder fácilmente a los controles. Alimentación Conecte el cable de alimentación con toma de encendedor al enchufe adecuado de su vehículo.
Funcionamiento Encender/apagar la radio Gire el interruptor VOL en sentido horario para encender la radio, la pantalla muestra el estándar CB seguido del número de canal. Gire el interruptor VOL en sentido antihorario hasta que haga clic. La radio se apaga. Control de volumen Gírelo en sentido horario para aumentar el volumen y en sentido antihorario para bajar el volumen. Selección de canales Pulse brevemente UP o DOWN en el micrófono para cambiar el canal de trabajo.
Presione brevemente UP o DOWN en el micrófono para cambiar el nivel DS, mantenga presionado UP o DOWN en el micrófono para cambiar el nivel DS rápidamente. Mantenga presionado SQ o espere 3 segundos para guardar y salir. Nota: el nivel más alto de DS requiere una señal fuerte para abrir el altavoz y oír al interlocutor. Tipo de modulación Presione brevemente A/F para cambiar entre los modos AM y FM. La pantalla muestra el modo seleccionado.
Cambiando el estándar de CB Apague la radio, presione A/F y después encienda la radio. La pantalla muestra las frecuencias actuales. Presione UP o DOWN en el micrófono para escoger las normas deseadas. Apague la radio y enciéndala de nuevo.
Especificaciones Rango de frecuencias*........................................................................ 26.565-27.99125 Dimensiones .....................................................................................110 x 120 x 25 mm³ Peso ........................................................................................................................ 450 gr Tensión de corriente ...............................................................................................
Index Caractéristiques 2 Description et commandes 3 Display 4 Panneau arriére 4 Microphone 5 Installation 5 Alimentation 5 Connectique de l’antenne 5 Utilisation 6 Allumage de la radio 6 Volume 6 Sélection des canaux 6 Contrôle du niveau de Squelch (28 niveaux et 0) 6 Contrôle du DS (9 niveaux) 6 Type de Modulation 7 Contrôle de Gain RF 7 Canal d’urgence 7 Vérrouillage 7 Fonction SCAN 7 Haut-parleur externe 8 Restauration des paramètre d’usine 8 Specifications 9 M
Caractéristiques • • • • • • • • • • • • • • • 2| Dispositif multi-standard Sortie USB pour la recharge Cable d’alimentation avec allume cigare en dotation Microphone amovible avec connecteur RJ45 et touches Up/Down SCAN des canaux Ecran LCD avec S-Meter Double mode du Squelch (9 et 28 niveaux) RF Gain Canal d‘urgence 9/19 Prise pour haut-parleur externe Dimensions: 110x120x25mm M-Mini-USB Instruction Guide
Description et commandes 1 A/F 3 4 5 2 SQ RFG 6 7 EMG 8 EXT SP ANT 1. 2. 3. 4. 5. 6. 7. 8. Ecran LCD On/Off et Volume Connecteur microphone Sortie USB pour la recharge. Si le dispositif que doit être chargé exige une courant de recharge élevée, la sensibilité de la radio pourrait diminuer.
Display DOWN 11 14 UP 12 15 10 9. 10. 11. 12. 13. 14. 15. 9 13 Canal sélectionné Indicateur de force du signal reçu et puissance de transmission du signal AM / FM mode RX / TX: Indicateur réception (RX) et transmission (TX) SC: fonction SCAN activé AQ: squelch automatique digital activé R: RFGAIN activée Panneau arriére A/F SQ RFG EMG 18 17 EXT SP ANT 16 16. 17. 18.
Microphone 19. Bouton PTT: Bouton de transmission 20. Bouton Haut 21. Bouton Bas 21 DOWN 20 UP 19 Installation Sélectionnez l’emplacement de montage afin que la sécurité routière ne soit pas affectée par l’appareil, ou risque supplémentaire de blessure en cas d’accident. Vérifiez que l’écran peut être vu et que les commandes peuvent être facilement accessibles. Alimentation Branchez votre cordon d’alimentation 12V a la prise appropriee de votre vehicule.
Utilisation Allumage de la radio Tournez le bouton Volume pour allumer la radio, l’écran LCD affiche la norme CB suivie du numéro de canal. Pour éteindre, tournez le bouton VOL dans le sens inverse des aiguilles d’une montre, jusqu’à ce que l’on entende un cliquètement. Volume Tournez dans le sens horaire pour augmenter le volume et tournez dans le sens inverse pour diminuer le volume. Sélection des canaux Appuyez brièvement sur le bouton HAUT ou BAS pour changer de canal de travail.
Appuyez brièvement sur le bouton HAUT ou BAS pour changer le niveau DS, maintenez le micro HAUT ou BAS enfoncé pour changer rapidement le niveau DS. Maintenez SQ et attendez 3 secondes pour mémoriser et quitter. Remarque: Un niveau DS plus élevé requiert un signal plus fort pour ouvrir le hautparleur et entendre le témoin. Type de Modulation Appuyez brièvement sur la touche A/F pour basculer entre le mode AM/FM.
Modification de la norme CB Commutateur de la radio, appuyez sur A / F, puis allumez votre radio. L’écran affiche les fréquences actuelles. Appuyez sur le bouton HAUT ou BAS pour sélectionner les normes souhaitées. Mise hors tension et mise sous tension.
Specifications Bande de fréquence *............................................................... 26.565-27.99125 MHz Dimensions.......................................................................................................................... ............................................................................................................. 110 x 120 x 25 mm Poids........................................................................................................................
Spis treści Funkcje 2 Elementy sterowania 3 Wyświetlacz 4 Panel tylny 4 Mikrofonie 5 Instalacja 5 Zasilanie 5 Podłączenie anteny 5 Obsługa 6 Właczanie/wyłączanie 6 Głośność 6 Wybór kanału 6 Blokada szumów Squelch (28 poziomów i off-wyłączenie) 6 DS Automatyczna blokada szumów (9 poziomów) 6 Typ modulacji 7 Czulość odbiornika RF Gain 7 Kanał ratunkowy 7 Blokada klawiatury 7 Skaner 7 Zmiana standardu 7 Głośnik zewnętrzny 8 Przywracanie ustawień fabrycznych 8 Dane te
Funkcje • • • • • • • • • • • • • • 2| Multistandard Gniazdo USB do ładowania twoich urządzeń Kabel zasilający z wtykiem do zapalniczki Odłączany mikrofon z wtykiem RJ45 i zmianą kanałow Gora/Doł Zmiana kanałow w mikrofonie Skaner Wyświetlacz LCD i S-metr Podwojna blokada szumow (9 i 28 poziomow) Regulowana czułość odbioru Kanał ratunkowy 9/19 Gniazdo zewnętrznego głośnika Wymiary: 110x120x25mm M-Mini-USB Instrukcja obsługi
Elementy sterowania 1 A/F 3 4 5 2 SQ RFG 6 7 EMG 8 EXT SP ANT 1. 2. 3. 4. 5. 6. 7. 8. Wyświetlacz LCD Włącznik ON/OFF/GŁOŚNOŚĆ Gniazdo mikrofonowe Gniazdo USB. Jeżeli urządzenie, które jest ładowane pobiera duży prąd, czułość radia może się chwilowo zmniejszyć. Włącznik A/F: Krótkie wciśnięcie przełączenie AM/FM - Długie wciśnięcie włączenie skanera Blokada szumów DOWN UP Manualna i automat.
Wyświetlacz DOWN 11 14 UP 12 15 10 9. 10. 11. 12. 13. 14. 15. 9 13 Wybrany kanał Siła sygnału odbieranego/transmitowanego Modulacja AM/FM RX/TX: wskazanie odbioru(RX) i nadawania (TX) SC: włączony skaner AQ: włączona automatyczna blokada szumów. A/F SQ RFG EMG R: włączona regulacja czułości odbiornika Panel tylny 18 17 EXT SP ANT 16 16. 17. 18.
Mikrofonie 19. PTT: przycisk nadawania 20. UP: zmiana kanałów w górę 21. DOWN: zmiana kanałów w dół 21 DOWN 20 UP 19 Instalacja Przy instalacji radia w samochodzie należy kierować zarówno komfortem obsługi jak i względami bezpieczeństwa. Zamontowany radiotelefon nie może w żaden sposób ograniczać możliwości kierowania samochodem ani utrudniać prawidłowego funkcjonowania jego podzespołów np. poduszek powietrznych. Wyświetlacz powinien być dobrze widoczny, a elementy starowania łatwo dostępne.
Obsługa Właczanie/wyłączanie Przekręć pokrętło VOL w prawo, pokonując lekki, początkowy opór. Wyświetlacz pokaże aktualnie wybrany standard, a za nim numer ostatnio używanego kanału. Chcąc wyłączyć kręć w lewo aż po pokonaniu lekkiego oporu usłyszysz kliknięcie i dalsze przekręcanie nie będzie możliwe. Głośność Obracanie pokrętła VOL w prawo zwiększa, a w lewo zmniejsza siłę głosu. Wybór kanału Krótkie wciśnięcie jednego z przycisków zmiany kanałów w mikrofonie zmienia kanał o jeden w górę lub w dół.
Typ modulacji Wciskanie przycisku A/F powoduje zmianę sposobu modulowania fali nośnej z AM na FM i powrotnie. Wyświetlacz LCD pokazuje symbol aktualnie wybranej modulacji. Czulość odbiornika RF Gain Wciśnij krótko przycisk RFG, wyświetlacz pokaże „R” i aktualny numer poziomu czułości odbiornika. Przyciskami zmiany kanałów w mikrofonie zmień poziom. Naciśnij znowu RFG, aby opuścić tryb zmiany czułości odbiornika.
Tabela standardów Wyświetlany symbol I I2 de EU CE PL UK In Państwo Włochy 40 kanałów AM/FM 4 waty Włochy 34 kanały AM/FM 4 waty Niemcy 80 kanałów FM 4 waty/40 kanałów AM 4 waty Europa 40 kanałów FM 4 waty/40 kanałów AM 1 wat CEPT 40 kanałów FM 4 waty Polska 40 kanałów AM/FM 4 waty Anglia 40 kanałów 4 waty angielskie częstotliwości + I (Wlochy) 40 kanałów FM 4 waty częstotliwości CEPT International 27 CH AM/FM 4 Watt Głośnik zewnętrzny Zewnętrzny głośnik podłącza się do gniazda typy jack 3,5mm umieszczony
Dane techniczne Zakres częstotliwości*................................................................25.565-27.99125 MHz Wymiary.............................................................................................. 110 x 120 x 25 mm Waga...........................................................................................................................450g Zasilanie.....................................................................................................................
Cuprins Caracteristici 2 Descriere produs 3 Ecran 4 Back panel 4 Microfon 5 Instalare Alimentare Instructiuni de utilizare 5 5 6 Pornire/oprire statie 6 Control volumului 6 Selectare canal 6 Control squelch (28 nivele si o =dezactivat) 6 Control DS (9 nivele) 6 Selectare modulatie AM/FM 7 Control RF Gain 7 Canale de urgenta 7 Blocare butoane 7 Functie scanare 7 Schimbarea normei CB 7 Difuzor extern 8 Revenirea la setarile din fabrica 8 Specificatii tehnice 9 M-Mini-
Caracteristici • • • • • • • • • • • • • 2| Dispozitiv multi-standard Mufa USB Cablu de alimentare cu bricheta Microfon detașabie cu conector RJ45 si butoane UP/DOWN Butoane Up/Down pe microfon Scanare canale Ecran LCD, S-Metru DS - squelch automat digital ajustabil RF Gain Canale de urgenta 9/19 Lesire audio pentru difuzor extern • Dimensiuni: 110x120x25mm M-Mini-USB Manual de utilizare
Descriere produs 1 A/F 3 4 5 2 SQ RFG 6 7 EMG 8 EXT SP ANT 1. 2. 3. 4. 5. 6. 7. 8. Ecran LCD Buton Pornire/Oprire/ajustare Volum Mufa microfon Mufa USB. Daca dispozitivul conectat pentru incarcare la portul USB necesita o intensitate mai ridicata a curentului, este posibi ca sensibilitatea statiei sa scada.
Ecran DOWN 11 14 UP 12 15 10 9. 10. 11. 12. 13. 14. 15. 9 13 Canal selectat Indicator semnal receptionat/putere semnal transmis Mod AM/FM RX/TX: indicator receptie (RX) si transmisie (TX) SC: functie SCAN activa AQ: squelch automat digital A/F activ SQ RFG EMG R: RFGAIN activ Back panel 18 17 EXT SP ANT 16 16. 17. 18.
Microfon 19. Buton PTT: apasati pentru a transmite 20. Buton UP 21. Buton DOWN 21 DOWN 20 UP 19 Instalare Selectati locatia pentru montaj astfel incat siguranta in trafic sa nu fie afectata de statie, sau sa prezinte riscuri suplimentare de lovire sau accident. Asigurati-va ca ecranul este vizibil si butoanele usor accesibile. Alimentare Alimentati mufa de bricheta la mufa dedicata din autoturismul Dvs. Asigurati-va ca autoturismul Dvs. ofera o alimentare de 12V si nu de 24V.
Instructiuni de utilizare Pornire/oprire statie Rotiti butonul de volum spre dreapta pentru a porni statia, ecranul LCD va afisa norma CB curenta urmata de numarul canalului selectat. Rotiti butonul de volum spre stanga pentru a inchide statia. Control volumului Rotiti butonul de volum spre dreapta pentru a mari volumul sau spre stanga pentru al micsora. Selectare canal Apasati scurt butoanele UP/DOWN de pe microfon pentru a schimba canalul unul cate unul.
Selectare modulatie AM/FM Apasati scurt butonul A/F pentru a schimba intre modulatia AM si cea FM. Pe ecran va fi afisat modul selectat. Control RF Gain Apasati scurt butonul RFG, pe ecran va fi afisata litera R si nivelul curent. Apasati butoanele UP/DOWN de pe microfon pentru a schimba nivelul atenuarii. Apasati din nou butonul RFG pentru a salva setarea. Cand functia RFG este activa receptia este atenuata si unele semnale mai slabe e posibil sa nu le receptionati.
Tabel frecvente Pe ecran Tara si canale I Italia 40 canale AM/FM 4W I2 Italia 34 canale AM/FM 4W de Germania 80 canale FM 4W / 40 canale AM 4W EU Europa 40 canale FM 4W / 40 canale AM 1W CE CEPT 40 canale FM 4W PL Polonia 40 canale AM/FM 4W UK Anglia 40 canale FM 4 W frecvente engleze + I Italia) 40 canale FM 4W frecvente CEPT In International 27 CH AM/FM 4 Watt Nota: Banda de frecvente permisa in Europa este 40 canale FM 4W (CE).
Specificatii tehnice Frecventa*................................................................................... 26.565-27.99125 mhz Dimensiuni ........................................................................................110 x 120 x 25 mm Greutate .................................................................................................................450 gr Tensiune alimentare................................................................................................ 13,2 V Consum..
• • • • • • • INFORMAZIONE AGLI UTENTI: Ai sensi dell’art. 13 del decreto legislativo 25 luglio 2005, n.151 “Attuazione delle Direttive 2002/95/CE, 2002/96/CE e 2003/108/ CE, relative alla riduzione dell’uso di sostanze pericolose nelle apparecchiature elettriche ed elettroniche, nonché allo smaltimento dei rifiuti”. Il simbolo del cassonetto barrato riportato sull’apparecchiatura indica che il prodotto alla fine della propria vita utile deve essere raccolto separatamente dagli altri rifiuti.
Prodotto o importato da/Produced or imported by: CTE INTERNATIONAL srl Via. R.Sevardi 7 - 42124 Reggio Emilia, Italy www.midlandeurope.com In Italia l’uso è soggetto a dichiarazione. Prima dell’uso leggere attentamente le istruzioni. Importé par: ALAN FRANCE S.A.R.L. 5, Rue Ferrie, Zac les Portes du Vexin 95300 Ennery, France - www.alan-midland.fr L’utilisation de cet appareil peut être sujet à des restrictions nationales. Avant l’utilisation, lire les instructions.