For help with the Classic or Classic SL, please see our how-to videos and extended documentation at www.midnitesolar.com/documentIndex.php . Before calling Tech Support, we recommend visiting this website for some of the most common issues. WARNING: Arc Fault protection is not ON by default. NOTE: The National Electrical Code Article 690.11 requires Arc Fault protection. The Classic has this built-in as standard equipment and will need to be enabled, if so desired.
Classic Manual Classic 150 1|Page (Firmware 2193) Classic 200 Classic 250 10 -001-1 REV TG
Classic Manual (Firmware 2193) Table of Contents Introduction ..................................................................................................................................................... 5 Safety Instructions............................................................................................................................................ 6 Standards and Requirements ...........................................................................................................
Classic Manual (Firmware 2193) Static IP .................................................................................................................................................................... 24 IP Address ................................................................................................................................................................ 25 Subnet / Gateway / DNS 1 .....................................................................................................
Classic Manual (Firmware 2193) Preparing Classic for Update ................................................................................................................................... 52 HyperVoc ....................................................................................................................................................... 54 Troubleshooting / FAQs ................................................................................................................................
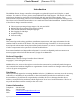
Classic Manual (Firmware 2193) Introduction The MidNite Classic charge controller is designed to regulate DC input from PV, hydro, or wind turbines. For other DC sources, please contact MidNite Solar Tech Support. The Classic 150, 200, and 250 are designed to work with 12V, 24V, 36V, 48V, 60V, and 72V battery banks. Voice annunciations of operating values are now available in English (French and Spanish coming soon). The Classic can be installed stand-alone or as a multi-unit networked installation.
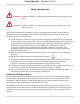
Classic Manual (Firmware 2193) Safety Instructions WARNING: Identifies conditions or practices that could result in personal injury or loss of life. CAUTION: Identifies conditions or practices that could result in damage to the unit or other equipment. This product is intended to be installed as part of a permanently grounded electrical system as shown in the system configuration sections.
Classic Manual (Firmware 2193) DC and Battery-Related Installation Requirements ❖ ❖ ❖ ❖ ❖ ❖ ❖ ❖ ❖ ❖ All DC cables must meet local and national codes (Reference NEC Article 480). Shut off all DC breakers before connecting any wiring. Torque all Classic wire lugs and ground terminals to the specs found on Page 14. Copper wire ONLY with a rating of 75° C or higher. Keep cables close together (e.g., using a tie-wrap) as much as possible to reduce inductance.
Classic Manual (Firmware 2193) ❖ Not watching the charge voltages or verifying you are charging to the voltage supplied by the battery manufacturer. ❖ Not verifying the temperature compensation neutral point (typically 25° C) and the milli volts per degree C per cell (typically -5mV). ❖ Not watching to verify the Absorb or EQ time is set properly and that the equipment actually charges for that period of time.
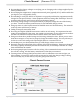
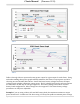
Classic Manual (Firmware 2193) Table 2 Table 3 Tables 1 through 3 above represent the max power output for a given input for each Classic. Using and understanding these power graphs will help maximize the Classic’s output power and aid in selecting wire and breaker/disconnects. Notice that lower battery voltages and lower PV input voltages result in higher continuous output power. The PV voltages listed are for reference and are not intended to be the only PV voltages supported.
Classic Manual (Firmware 2193) of 180V. The same set-up using higher voltage modules that result in a 200V maximum power voltage will result in only 53A. Although 55A to 53A is not a significant change, it does indicate that a lower input voltage is more productive. Design your system to achieve an ideal input voltage, or a “sweet spot,” in terms of sufficient Voc for MPPT operations: not too low, not too high.
Classic Manual (Firmware 2193) To remove the front cover of the Classic in preparation for installation, remove the four Phillip’s head screws with a #2 Phillip’s screwdriver. Lift the front half of the Classic casting off. You will need to unplug the display cable. It works the same as any phone cable. When installing the cover for the final time, squeeze a small amount of silicone grease (included in the parts bag) onto the metal pins of the male jacks on the display cable before plugging them in.
Classic Manual (Firmware 2193) IMPORTANT! Do not mount in a zero-clearance compartment. Overheating may result. The Classic produces heat in normal operation. Airflow around the Classic is required to prevent overheating and shutdown. This is especially true in hot environments. Figure 3 – Classic mounting bracket Figure 4 – Classic mounted to E-Panel Figure 6 Figure 5 – Nipple, locknuts, and bushings Install locknut here to act as a spacer.
Classic Manual (Firmware 2193) Sealed or Vented The Classic can be sealed for protection from salt air or dust. It comes from the factory vented. If you live in a dusty or salt air environment, you may wish to seal the Classic. Sealing the Classic does not make the unit water resistant. To seal the Classic, install the solid plastic knock-out covers into any unused knock-outs and snap the upper vent cover onto the Classic as seen in Figures 7 and 8.
Classic Manual (Firmware 2193) #4 AWG welding cable will not easily fit into the terminal block). ❖ The Classic’s AUX 1 and AUX 2 terminal connectors will accept wire up to #18 AWG. To Connect Wiring to the Classic: ❖ ❖ ❖ ❖ ❖ ❖ ❖ ❖ Ensure the DC source and battery are disconnected. Connect a grounding conductor between the Classic and system ground. Ensure the breaker between the battery and Classic meets UL489 standards. Ensure the breaker between the DC source and Classic meets UL1077 standards.
Classic Manual (Firmware 2193) Diagram 1 – Overall System Wiring 15 | P a g e TG 10 -001-1 REV
Classic Manual (Firmware 2193) DC Terminal Connector The Classic's DC terminal connector is located on the circuit board as shown in Figure 9. The connector is rated for copper conductors and will take up to a #4 AWG wire (THHN). #4 AWG THHN when installed in the Classic and MidNite E-Panel is rated for over 100A and is therefore suitable for the highest power available from the Classic 150. After installing the wires for the last time, snap in the blue cover that is included in the parts bag.
Classic Manual (Firmware 2193) Long Distance Wire Runs The Classic offers some unique opportunities if you are faced with longer than normal wire runs between the DC source and the Classic. The Classic comes in three input voltage ranges letting you design a DC source at a higher voltage if it is beneficial. For example, let’s say you have a 300-foot run from a PV array to the Classic. You could wire for an open circuit voltage close to 250V accounting for the coldest temperature you will encounter.
Classic Manual (Firmware 2193) Grounding Chassis Grounding In all installations the Classic chassis should be connected to ground. For systems with a battery breaker sized 60A and smaller, #10 AWG (6 mm2) copper is generally sufficient. For systems with a battery breaker sized 100A and smaller, #8 AWG (10 mm2) copper is required. For grounding conductor requirements on your specific installation, please consult your local electrical code.
Classic Manual (Firmware 2193) this PTC and disable the charging when it opens. When the fault is cleared the Classic will restore charging. To disable the internal ground fault protection function, the jumper labeled GFP needs to be removed and the GFP function needs to be disabled in the TWEAKS menu. See “Disabling GFP” for instructions. Disabling GFP The GFP feature should only be disabled to operate the Classic in an ungrounded power system or in systems where GFP is not required.
Classic Manual (Firmware 2193) of time and will not be considered under warranty. Please verify the proper operation of Follow-Me during the initial set-up. WARNING: If using Follow-Me on multiple Classics in a positive-grounded system, contact MidNite Tech Support for information on modifying the Follow-Me cables. The Follow-Me function basically is just what it is called. The Classic will simply ask the Classic to its right, “What do I do now?” and this propagates around the loop continually.
Classic Manual (Firmware 2193) Ground Fault Sharing (in Follow-Me configuration) To share ground fault, you need to remove the GFP jumpers on all except one Classic. You then need to make sure Ground Fault is enabled in the Tweaks menu for any of the networked Classics you want to shut down on detection of ground fault. For example, say you have three solar Classics and one wind Classic and you do not want the wind Classic to shut down for GFP.
Classic Manual (Firmware 2193) Connecting the Classic to Two MNGPs/Network Cable The Classic can be controlled with two MNGPs at the same time. This will help when the Classic is in a shop and there is a considerable distance between the Classic and the controlling point (office, inside house, garage etc.). Instead of going to the Classic to check status or to change a setting, the user can run a cable to the controlling point and see the Classic in a second MNGP. The cable is a 6wire phone cable.
Classic Manual (Firmware 2193) 4-Port Switch / Router Example 1 - Local network through switch. We do NOT recommend direct-connect between Classic and computer.
Classic Manual (Firmware 2193) the descriptions from the MNGP’s small screen. Mode Long-hand IP address configuration mode: DHCP/Static IP IP Address SN Subnet GW Gateway Address D1 Primary DNS Address D2 Web Access A DI DNS override MAC Address Device ID Description The Classic supports both static and dynamically (DHCP) allocated IP addresses. If you are unsure which to choose, try DHCP first. If you have trouble, refer to the troubleshooting section.
Classic Manual (Firmware 2193) NOTE: Static settings span two menu screens. You may use the soft keys to navigate between the two menus. Depressing the ENTER key in either menu saves all settings. For convenience when you manually set the device’s IP address, the Gateway and Primary DNS addresses follow the change. See the following sections for details on each of these fields. IP Address This is the local network address of your Classic. It usually takes the form “192.169.0/1.x” or “10.0.0.
Classic Manual (Firmware 2193) All communications between the Classic and MidNite Solar’s server are encrypted using a strong session-based algorithm. To respect your privacy, however, it is required that you manually enable this feature if you’d like to use it. In order to enable the web access feature: ❖ ❖ ❖ ❖ ❖ ❖ Depress MAIN MENU key. Scroll to NET menu and depress ENTER. Using the soft keys, navigate to the ADVANCED menu (NET→ NEXT→ ADVANCED). The WEB ACCESS option should be highlighted.
Classic Manual (Firmware 2193) WARNING - RISK OF INJURY: To reduce the risk of injury, charge only properly rated (such as 6V, 12V, and 24V) lead-acid (GEL, AGM, Flooded, or Nickel Cadmium) or Lithium (with a Battery Management System, BMS) rechargeable batteries. Other battery types may burst, causing personal injury and damage. WARNING - EXPLOSION HAZARD: Flooded, lead-acid batteries generate explosive gases during the Equalization cycle. Follow all battery safety precautions listed in this guide.
Classic Manual (Firmware 2193) is the primary interface to the Classic. Communication & Error Indicator Screen Name Menu Name Menu Description Float Indicator Current Limit Indicator Right Soft Key Speaker Right Arrow Key Up Arrow Key Left Soft Key Main Menu Key Left Arrow Key Status Screen Key Screenshot 1 Down Arrow Key Enter Key Most settings can be accessed and modified. Navigate using the LEFT & RIGHT arrows. Pressing ENTER takes you into that menu.
Classic Manual (Firmware 2193) buttons will enable you to see all the main menus provided. Inside some of these main menus will be sub-menus to adjust the parameters of the selected feature. Menu Overview: << CHARGE — MODE — AUX — MISC — LOGS — TWEAKS — TEMPS — NET >> Below each of the menu names is a row with a description of the menu inside. To enter a menu, the name of the menu has to be highlighted. Pushing ENTER will show the submenus. The up and down arrow keys are enabled for easier navigation.
Classic Manual (Firmware 2193) A Float cycle follows the Absorb cycle. Battery voltage is held at the Float voltage set point. Equalize The Equalization function can be manually initiated or can be set up to Auto Equalize. The intent of an Equalization charge is to bring all battery cells to an equal voltage by a controller’s deliberate overcharge. The goal is to return each battery cell to its optimum condition through a series of voltage-controlled chemical reactions inside the batteries.
Classic Manual (Firmware 2193) most likely the current limit set point is too low. To check this, follow these steps: ❖ ❖ ❖ ❖ ❖ Depress MAIN MENU key. Highlight the CHARGE menu and depress the ENTER key. Scroll to LIMITS and depress ENTER. Depress the right arrow key to highlight “Output Amps” or “Input Amps” column. Use the up/down arrow keys to change the current limit; depress ENTER to save this data.
Classic Manual (Firmware 2193) ❖ Depress ENTER to save. Battery voltage adjust Input voltage adjust Input voltage offset Battery voltage offset Displayed battery voltage Screenshot 2 – TWEAKS Menu Displayed Input voltage Configuring DC Input Source To select the Classic’s mode of operation, follow the steps below: ❖ Depress the MAIN MENU key. ❖ Scroll left or right until MODE is highlighted, depress ENTER.
Classic Manual (Firmware 2193) especially if there is partial shading at times during the day. SOLAR mode is best suited for shaded or un-shaded PV arrays that are at least one nominal voltage above the actual battery voltage. For severe partial shading or PV arrays with nominal voltage equal to battery voltage, you may want to try Legacy P&O (Perturb and Observe) MPPT mode.
Classic Manual (Firmware 2193) ❖ Depress the RIGHT SOFT key again, set the absolute maximum voltage you want the Clipper to allow before clipping occurs. ❖ Depress ENTER to save this data. ❖ Depress MAIN MENU until you get back to the AUX 1 and AUX 2 screen. ❖ Set the text under AUX 2 to read Clipper Control, depress ENTER. ❖ Press STATUS to return to the home screen. NOTE: See our instructional videos at www.midnitesolar.com. CAUTION: Connecting a DC Clipper with this set to AC can damage the Clipper.
Classic Manual (Firmware 2193) To build a custom wind curve, it is easiest to load a pre-built curve, then modify as follows: ❖ Follow steps above to load a pre-built wind curve (Do not save yet). ❖ Notice in upper right corner of MNGP, it reads X=, Y=, and Step XX. Below Step XX is AMPS or VOLTS. ❖ Curve should load at Step 01. If not, use left/right arrows to reach Step 01. ❖ Since Step 01 will always be at 0A, depress the RIGHT SOFT key to change to VOLTS. ❖ Use up/down arrows to change Step 01 volts.
Classic Manual (Firmware 2193) Figure 127 – AUTO EQ Menu Auto EQ The Classic can be set up to automatically equalize your batteries periodically, programmed as days between Equalization and the number of days the Classic will try to finish the programmed equalization charge cycle. To set up Auto EQ, go into the CHARGE menu and highlight EQ and depress ENTER. Now depress the SOFT RIGHT key labeled "AUTO EQ." Depressing the AUTO EQ soft key enters the AUTO EQ setup menu screen.
Classic Manual (Firmware 2193) every Classic. The Classic is the first charge controller in the world to successfully stop a series arc. The Classic can detect an arc in less than 100ms. From low power arcing to devastating high power arcing, the Classic will detect then shut down with an audible and visible alert to announce that there is a problem in the PV side of the system. When an arc is detected, the Classic has to be manually cleared.
Classic Manual (Firmware 2193) Depress the Right Soft button under the word “More.” Hold the Left Arrow button and depress the Right Soft button 2 times. (See Figure 19) The number under ADDRESS should be highlighted. Scroll up or down to 4289. Use the Right Arrow button to scroll over and highlight the value under VALUE. Change the VALUE to 5. After setting the current limit to the value you desire, hold the Left Soft button and depress Enter. You will see “DATA SENT AND SAVED.
Classic Manual (Firmware 2193) Re-bulk is useful for Lithium batteries as a “stop charge” mechanism. EXAMPLE: 1. You want the Classic to charge when the battery’s voltage is less than 51.9V and rest when at 52V. a. Set Absorb volts = 52V b. Set Absorb time = 3 minutes. c. Set Float volts = 40V d. Set REBULK = (Voltage you want to start back charging, must be > 40 Volts < 52 Volts. 2. The Classic will report BATTERY OVER VOLTAGE and will stop charging (RESTING) until Re-bulk voltage is reached.
Classic Manual ❖ ❖ ❖ ❖ ❖ ❖ ❖ ❖ ❖ (Firmware 2193) Scroll left or right to highlight AUX and depress ENTER. Scroll left or right to highlight either AUX 1 or AUX 2. Depress the RIGHT SOFT key labeled SETUP. Scroll up or down to change the mode of the AUX terminal. Depress the RIGHT SOFT key to set the parameters of the function. When finished, depress ENTER to save the changes.
Classic Manual (Firmware 2193) DUSK: Point in time when your PV voltage falls below your battery voltage, the Classic will mark this as DUSK. This is not a time factor. WIDTH: Is the voltage range (usually 1.0V) above or below the target set point, depending on active high or active low, that the PWM goes from full OFF to full ON. The Classic has a voltage resolution of 0.1V. A WIDTH setting of 1.0V therefore is divided into 10 different PWM possibilities. Every 0.
Classic Manual (Firmware 2193) Once battery voltage rises above set point voltage, AUX 1 will turn OFF with no DELAY. When battery voltage falls below set point voltage, AUX 1 will turn ON after a 30-second HOLD. Vent Fan High Once battery voltage raises above set point voltage, AUX 1 will turn ON with no HOLD. When battery voltage falls below set point voltage, AUX 1 will turn OFF after a 30-second DELAY. Float Low When the Classic is in Float Mode, AUX 1 will turn OFF.
Classic Manual (Firmware 2193) Waste Not Lo This mode will turn AUX 1 OFF when the Classic gets within a certain range of the voltage set point (V HIGH) for each charging stage (Absorb, Float, EQ) and turn AUX 1 ON when it gets to a low set point (V LOW). This mode will allow maximum diversion while maintaining 3-stage charging.
Classic Manual (Firmware 2193) AUX 2 Modes Wizbang Junior (WBJr) For use with WBJr. There are no settings to configure from this menu. Force Float In When AUX 2 detects less than 6V, the Classic will change its charging mode to Float until the voltage goes above 6V. Logic Input 1 When AUX 2 detects less than 6V in Resting Mode OR AUX 2 detects greater than 2V in charging mode (Bulk, Absorb, of Float), a PWM signal will turn ON.
Classic Manual (Firmware 2193) PV V on High When PV voltage is higher than set point volts, a PWM signal is turned ON. It will automatically turn OFF if PV voltage falls below set point volts. Toggle Test AUX 2 cycles in 1-second intervals between ON and OFF. Waste Not Lo This mode will turn AUX 2 ON when the Classic reaches a certain voltage set point (V LOW) for each charging stage (Absorb, Float, EQ) and turn AUX 2 OFF when battery voltage exceeds the set point.
Classic Manual (Firmware 2193) When battery voltage drops below set point volts, a PWM signal will turn ON. It will automatically turn OFF if battery voltage rises above set point volts. Set WIDTH to 1.0V. AUX 1 and AUX 2 Jumpers Figure 20 shows the two AUX port terminals with their respective polarities. These terminals are located at the bottom of the Power Board, below the battery temperature jack. Use a mini flat head screwdriver to tighten the screws. The jumpers are described in the section below.
Classic Manual (Firmware 2193) 1 terminals; it acts more like an isolated switch (to the ratings of the relay). AUX 1 Volts/Time Graph Diagram 8 is the AUX 1 Function Graph showing the relationship between voltage and time. The axis labeled VOLTAGE could be battery, PV, wind input voltage, etc., depending on the function selected by the user.
Classic Manual (Firmware 2193) Logged Data The Classic logs 380 days’ of data in its memory. The data logging in the Classic has two modes and frequency of data capture: Daily and Hourly. Figure 22 Daily History Is captured once each day and is saved at night, after 2 hours of no activity when the PV input voltage is below battery voltage for solar, or in modes that do not necessarily rest at night, like wind or hydro, the capture will happen once every 24 hours.
Classic Manual (Firmware 2193) Pressing the LEFT SOFT key enters the DAILY history data viewing menu. Similarly, pressing the RIGHT SOFT key enters the HOURLY recent history data viewing menu. Figure 23 Figure 24 In the DAILY menu, the left side category of information displayed can be changed by pressing the UP or DOWN arrow keys. Switching over to the right side of the screen by pressing the RIGHT arrow key highlights the DAY change key.
Classic Manual (Firmware 2193) in the MISC/TIME menu. For night logging (logs when Classic is Resting), set NITELOG to ON in the TWEAKS menu. Graphical Logging Display Modes Both DAILY and HOURLY logging can also be viewed in a graphical manner. While in the text viewing log screen, pressing the RIGHT SOFT key labeled "GRAPH" will bring up this view screen. The HOURLY view is also available in the main status cycle of screens, changed by repeatedly pressing the STATUS key, just after STATUS TWO screen.
Classic Manual (Firmware 2193) Figure 25 The date of the particular selected cursor positioned data point is shown on the bottom middle of the graphic screen. Moving the cursor left or right using the LEFT and RIGHT ARROW keys, selects the next data points to the left or to the right of the present cursor position. The flashing cursor is short and may be hard to detect at first, so you may have to look for it. The cursor aligns and centers itself right on the dot that is selected.
Classic Manual (Firmware 2193) ❖ Verbose - Menu help messages the first time the menus are accessed. Information messages such as status, charge stage and all warnings and errors. ❖ Chatty Cathy - Menu help messages every time the menus are accessed, all the warnings, errors and status info as described above, plus random hidden messages. Programming Classic Voice Depress MAIN MENU key until CHARGE is highlighted; this is the beginning of the menu tree.
Classic Manual (Firmware 2193) device. Care must be taken that a computer connected to the Classic's USB port is either isolated from ground and the Classic's negative or that the computer's USB negative is common with the Classic's negative and ground. WARNING: You cannot turn a Classic 150 into a Classic 200 by using new software; the internal components are different. Screenshot 3 Preparing Classic for Update Go to your electrical panel and identify the input and output breakers for the Classic.
Classic Manual (Firmware 2193) Figure 27 Holding the front cover with one hand, place a screw in the top left hole of the front cover and screw it into the top right hole of the back casting (see Figures 28 & 29). Figure 28 Figure 29 Use any Standard-to-Mini B USB cable to connect the Classic to the PC. The smaller terminal connects to the USB port on the Classic. The USB port is located on the right side of the Ethernet jack in the lower part of the Classic (see Figure 30).
Classic Manual (Firmware 2193) comes back down below 150V (or the rated operating voltage of the Classic, depending on model) the Classic will wake up and start charging again automatically. This could happen in a really cold morning with a system that has a Voc (open circuit voltage) close to the maximum operating input voltage. NOTE: A HyperVOC message will be displayed on the bottom right side of the Status screen. NOTE: The maximum nominal battery voltage to be added is 48V.
Classic Manual (Firmware 2193) WARNING: You must get the battery charging voltages from the battery manufacturer and it is VERY important you do this and do not just leave it at the default settings, as it is likely this will undercharge and slowly destroy your batteries. WARNING: The Clock is a 24-hr clock. Setting it off by 12 hours will cause it to reset to a new day at noon. How do I do a HARDWARE factory restore? WARNING: Reset will erase ALL settings.
Classic Manual but the Classic is on • • Classic says “Resting” but the sun is out • • • • Classic switches between Resting and Bulk MPPT repeatedly but produces 0 watts • • • The MNGP shows 0V IN (or really close) but shows battery voltage correctly • The MNGP is showing all 0s and/or “Got Comm?” • The MNGP is showing “Mode is OFF” • • • • Stuck in the Quick Start or “VMM” The MNGP is fuzzy or 57 | P a g e TG (Firmware 2193) the main circuit board and the display.
Classic Manual has odd characters (Firmware 2193) running down over the 2 big yellow inductors on the left-hand side of the circuit board. Multiple charge controllers and one or more is showing 0W and Absorb or Float • This is normal as the battery is almost full and the extra power is not needed so the controller throttles back to prevent over charging of the battery.
Classic Manual (Firmware 2193) connect a wire to a terminal block or a battery, the connection will likely be too dirty for the boot loader. Install the proper breakers. Classic goes to Absorb at too low or too high of a voltage • • • Classic goes to Float too early • • Verify this is not normal operation due to the battery being warmer than the neutral point. You can verify the battery temperature by going into the Main Menu and selecting the TEMPS Menu.
Classic Manual (Firmware 2193) assistance. Classic has an orange LED on the display lit up and/or says “Amp Limit” • • This indicates the Classic is current limiting. Either because it has reached the current limit you have set in the Charge/Limits Menu or because it is too hot and it is backing its current down to prevent overheating. Go to the Charge/Limits Menu and verify the amp limits for In and Out are set to what you desire.
Classic Manual • • • • I have a WBJr and the SOC% is not showing on the main status screen • • • • • (Firmware 2193) Verify the “Remove” paper was removed out of the coin battery in the MNGP. Check coin battery for voltage; replace the battery if less than 2.5V. Check the coin battery for glue residue from the remove tag. With coin battery removed, press in on the 2 tabs to bend them in a little tighter and add more spring pressure to the battery.
Classic Manual (Firmware 2193) • This also can be caused by some AC loads powered off the inverter, such as pumps or motors. Adjust the Arc Fault sensitivity settings as required. Classic keeps going back to address 10 after I readdress it to something else • There was a bug in older firmware that would cause this. We recommend updating the firmware and doing a factory restore. The firmware can be found on our website under the “Software” tab.
Classic Manual I hear a singing sound coming from my Classic, sort of a high pitched whine that varies • I have a Classic that came with a grey “Magnum” battery temp sensor. Can I replace it with a MidNite blue one? How can I verify that all my fans work on my Classic? • • • (Firmware 2193) This is the inductors “Singing” when the input voltage is really low.
Classic Manual (Firmware 2193) Classic is not making the same amount of wattage as I have for solar panels • My label is gone or I mixed up my covers. How do I know what model Classic I have? • I can’t read my serial # sticker. How can I find my serial # • Depress the Status key several times and a screen will come up showing “Classic XXX.” In the bottom right corner is the serial number, it will start with a CL.
Classic Manual (Firmware 2193) weekend cabin. Set for number of days to skip charging. For example, set to 3 will start Bulk charging on the 4th day.
Classic Manual (Firmware 2193) Electrical Specifications Model Classic150 Classic200 Classic250 Operating Volts in 150VDC 200VDC 250VDC Max Hyper VOC 150 + Batt V* 200 + Batt V* 250 + Batt V* *Battery Charge Volts 12-93 volts 12-93 volts 12-93 volts **Absolute Current Output at 25°C 96a at 12v battery 94a at 24v battery 83a at 48v battery 74a at 12v battery 70a at 24v battery 65a at 48v battery 60a at 12v battery 62a at 24v battery 55a at 48v battery 80 amperes 66 amperes 52 amperes
Classic Manual (Firmware 2193) Regulatory Approval The MidNite Solar Classic charge controller conforms to UL 1741, Safety for Inverters, Converters, Controllers and Interconnection System Equipment for Use with Distributed Energy Resources, Second Edition, May 7, 1999 with revisions through January 28, 2010 and CAN/CSA C22.2 No. 107.
Classic Manual (Firmware 2193) Classic Breaker Sizing Table 8 68 | P a g e TG 10 -001-1 REV
Classic Manual 69 | P a g e TG (Firmware 2193) 10 -001-1 REV
Classic Manual 70 | P a g e TG (Firmware 2193) 10 -001-1 REV
Classic Manual 71 | P a g e TG (Firmware 2193) 10 -001-1 REV
Classic Manual 72 | P a g e TG (Firmware 2193) 10 -001-1 REV
Classic Manual (Firmware 2193) Classic Label Set 73 | P a g e TG 10 -001-1 REV
Classic Manual (Firmware 2193) Glossary of Terms Absorb – Constant voltage charge stage to fill the batteries. The Classic is regulating so maximum power will not be seen at this time. The Absorb timer is also counting down to the switch to Float. A-EQ-R – This will reload the Auto Equalize counters, basically it will start the counters from day 1. AF – Arc Fault. Arc Adjust – This menu is where you adjust the Arc Fault sensitivity. A-RST – Auto reset of the Classic.
Classic Manual (Firmware 2193) Got Comm? – Indicates a lack of communication between the MNGP and the Classic. Insomnia – When enabled, will keep the Classic from going to Resting. This is intended for hydro mode only where you may need time to open water valves and do not want to wait for the Classic to wake up. LED-MODE – This selection lets you pick the function of the six visible LEDs on a standard Classic. LMX – LoMax.
Classic Manual (Firmware 2193) Web Access – Allows the Classic to send data over the Internet to My MidNite’s server. MIDNITE SOLAR INC. LIMITED WARRANTY MidNite Solar Power electronics, sheet metal enclosures and accessories MidNite Solar Inc. warrants to the original customer that its products shall be free from defects in materials and workmanship.
Classic Manual (Firmware 2193) Email: info@midnitesolar.com PH: 360.403.7207 FAX: 360.691.6862 New Turbo Fan Assembly Removal Step 1: Remove front cover to the Classic. Step 2: Remove turbo fan wire harness from power board. Step 3: Turn Classic over, remove two screws on the back of the Classic that secures the fan assembly to the Classic’s chassis. Step 4: Gently separate fan assembly from the Classic. Once the fan assembly is off, it can be discarded.
Classic Manual (Firmware 2193) Step 3: Insert one matt on top of the fan. Step 4: Place the fan assembly cover on top of the base and fan. Step 5: Line up the four screws. Ensure the fan wires are not pinched or crushed, and that they are routed as shown in the picture. Tighten the screws. Step 6: Pop the top vent into place.