
Quick Start Guide


Just the Facts for the Classic (continued)
7 | P a g e 10- 2 0 9 - 1 R E V : D
Wiring the Classic
Figure 4
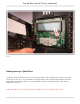
Above is a basic wiring diagram for installing the Classic on an E Panel. Some installations may vary. Please
consult the Classic Owner’s Manual for other diagrams. There are 2 jumpers and a 4 position terminal strip (Seen in
the yellow oval above) for Aux 1 and 2 please refer to the Classic owner’s manual for details on how to connect and
use these.
Mode is Off
The Classic is unique, it has multiple charging algorithms for just about any DC input. Because we support such a
wide variety of DC inputs we have also added a software “ON” and “OFF” feature. This software “Switch”
basically turns the relay off effectively disconnecting the input source so the Classic will not charge the battery. If
you see “Mode is Off” in the bottom right corner of the display then the Mode may have got turned off. To turn the
mode back “ON” push the Main Menu button several times until “Charge” is highlighted. Scroll to the right until
“Mode” is highlighted and press “Enter”. On this screen “OFF” should be highlighted use the up or down arrow to
change it to “ON” and press “Enter”. Press the Status button once to return to the main status screen.
Note: This is the same menu you would use to change between Charging algorithms IE Solar, Hydro etc.