
E-Panel Manual


E-Panel Instructions (continued)
13 | P a g e 1 0 - 0 0 3 - 1 R E V : J
Mounting the inverter
The 6 x 20mm pan head Philips screws for mounting the inverter are taptite
(thread forming). Use one of these 6mm screws to pre-tap threads into the
steel doors extruded funnel holes. Aluminum doors have press nuts and do
not require tapping. Make sure to install all ¼” star washers to bite through
the powder coating.
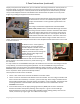
One of the best features of the MidNite E-Panel is that one person can do all the lifting.
Slip Tab A into Slot B
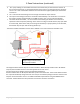
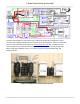
Install inverter cables
Install the 3.5” bushing as shown protruding up into the inverter side of the
door before routing the inverter cables through
the door.
3.5” grommet protruding outward
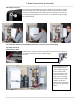
The left Magnum inverter
is all wired and the DC
cover installed using four
10-32 x 7/16” taptite
screws and #10 internal
tooth star washers. The
upper shield is installed
using three 10-32 x 3/8”
machine screws and
kepnuts. Use small snap in
grommets for signal level
cables.