
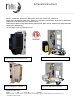
E-Panel Manual


E-Panel Instructions (continued)
7 | P a g e 1 0 - 0 0 3 - 1 R E V : J
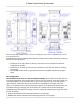
Note: The Stretched OutBack E-Panel uses the 14.41” Magnum chassis. The LT and MM version use the
9.41” OB sized chassis.
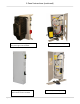
The dimensioned chassis drawings above show the location of the conduit knockouts, mounting
holes and mounting brackets.
Knockouts on the top surface are directly in line with ones on the bottom surface for
stacking units vertically.
Knockouts on the lower end of each side are directly in line with each other for stacking
horizontally.
Steel powder coated units are gray textured. Aluminum powder coated units are gloss
white.
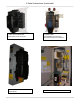
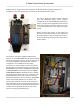
Door Configuration
The standard E-Panel comes as a left hand hinged assembly with breakers on the left side and
a left hand hinged door. The door will open to the left over the breakers. If for some reason you
need the breakers on the left, but the door to open to the right, then you need the optional
right hand door. All breakers can be unmounted and reassembled on the right side of the
chassis as is explained in this manual. Right hand E-Panels can be built special at the factory for
no additional charge. Changing sides in the field is not a simple task! The left hand hinge is
standard because the majority of charge controllers need to be mounted to the right side of the
E-Panel. See below.
1. Apollo T-80 should be a left hand hinge (heatsink is on the right)
2. MidNite Solar Classic should be a left hand hinge (heatsink is on the right)