
Magnum (MS4448 120/240VAC) MNE240 SeriesOwner's Manual


10 | P a g e 1 0 - 0 2 9 - 1 R E V : B
MNE-240 E-PANEL INSTRUCTIONS
3.5 Locating and Mounting the E-Panel
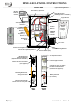
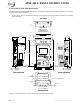
Review Figure 6, MNE-240 Series E-Panel Mounted to determine the mounting space requirements
for the E-Panel with the inverter/charger and any other optional equipment that may be mounted.
Info: Do as much of the additional wiring as possible before hanging the E-Panel on the
wall.
Install the E-Panel in a location that meets the following requirements:
•
The E-Panel must be mounted vertically on a flat surface (such as a wall).
•
Do not mount the E-Panel near any flammable or combustible fluid or components (i.e. paper,
cloth, plastic, etc.) that may be ignited by heat, sparks or flames - they must be at a minimum
distance of 2 feet away from the E-Panel/inverter.
•
Τhis E Panel system will weigh approximately 100 pounds. The mounting surface and hardware
must be capable of supporting at least twice the weight of the E-Panel/inverter combination.
•
The area must be free from any risk of condensation, water or any other liquid that can enter
or fall on the inverter.
•
Locate the E-Panel and inverter system as close to the batteries as possible. Long DC wires
tend to loose efficiency and reduce the overall performance of an inverter. However, the unit
should not be mounted where it will be exposed to gases produced by the batteries. These
gases are corrosive and will damage the inverter; also if these gases are not ventilated and if
allowed to collect, they could ignite and cause an explosion.
•
Ensure the E-Panel is accessible after it is mounted. Select a wall that has suitable clearance
to open the door with the inverter attached. It must also have adequate clearance to operate
the breakers and outlets that protrude out the sides.
E-Panel Mounting Procedure
Info: Prior to mounting the E-Panel to the wall, ensure the bottom mounting bracket has
been installed and the door has been removed.
1. Use a level and hold the top mounting bracket on the wall in a horizontal position and mark on
the wall where you want the mounting screw holes.
2. If required, drill holes using a #10 (0.193” diameter) drill bit. Drill appropriately sized holes for
anchors when installing on non-wood surfaces.
3. Secure the top mounting bracket to the wall using the three ¼ X 1½ hex-head lag bolts. If
mounting to other than a wood wall or surface, use appropriate screws and anchors as required.
4. Lift the E-Panel and place the keyhole slots (located in the upper back of the E-Panel) directly
over the mounting screws on the mounting bracket and lower into place.
5. Tighten the top mounting screws to secure the E-Panel to the mounting bracket.
6. Secure the bottom mounting bracket to the wall.