
Schneider XW E-Panel Manual


XW E-Panel installation manual
5 | P a g e 10- 1 8 5 - 1 R E V : -
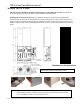
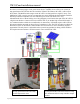
Installing the E-Panel to the inverter continued:
Remove two 5mm #2 Philips tip screws from the bottom of the inverter that will be used to attach
the E-Panel. These two screws are the only attachment to the inverter. The bottom wall mounting
bracket also needs to be secured to the wall. You must also remove the battery terminal bolts prior
to setting the E-Panel in place. Note: 10-32 UNF screws are interchangeable with the 5mm screws
if you should misplace them.
To gain access to these two main mounting screws, you will need a long #2 Philips screwdriver.
The tip must be at least 9 inches long. Most tool boxes do not have a Philips screwdriver this long,
so consider adding it to your arsenal of tools. Slide the AC breakers to the right a bit to allow the
screwdriver to line up with the screw. Move
them back after the E-Panel is secured to the
inverter. Install the battery terminal bolts as
shown to the left. Remove the left side plate
of the E-Panel. This allows access to tighten
the bottom of the battery plus bus bar
located on the 250 amp circuit breaker. Both
the Plus and Minus battery busbars are
shipped loose for ease of alignment and
must be tightened. Use a 9/16” wrench for
these connections. (Note: some earlier bus
bars may require enlarging the slot for
battery terminals). If required, use a 3/8”
drill and a strong pair of pliers to hold it
while drilling.
Left attachment. E-Panel to inverter
Right attachment. E-Panel to inverter