
Installation Instructions

Note: It is highly recommended to have a
licensed contactor preform the installation.
7. Perform a nal test.
8. Apply a thick bead of silicone around the area
where the tub meets the oor. Allow 24 hours for
the silicon to set.
5. Align and connect the tub’s drain to the waste
drain outlet.
6. Remove the masking plastic over the overow
and waste drain covers.
4. Adjust leveling feet if needed to ensure the tub is
completely leveled. If the tub is not properly level
leakage may occure and/or the water will not
completely drain.
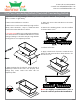
1. Remove the tub from it’s crate/box.
2. Make sure to avoid contact with any rough surface.
Ideally, there should be a tarp or cardboard sheet
between the tub and the oor’s surface.
3. Very Important! Before proceeding with installation,
close the waste drain and ll tub with water to test for
leakage. If leakage occures this may be a sign that the
leveling feet are not completely leveled.
One Piece Freestanding Bathtub (Non-Jetted) Freestanding Bathtub
Inspect the box for any damages and then proceed to inspect the bathtub. If any damage is found
please contact us right away
V2.2
Contact Us at 1-888-260-0993
or email us at info@MidWestTubs.com
Visit us as www.MidWestTubs.com