Operating instructions Dryers Gebruiksaanwijzing Droogautomaat PT 8251 + COP PT 8331 + COP PT 8401 To avoid the risk of accidents or damage to the machine it is essential to read these instructions before installing, commissioning and using it for the first time. PT 8253 PT 8333 PT 8403 PT 8503 PT 8803 en, nl - GB, NL M.-Nr.
Gas safety precautions This machine must be installed in accordance with local and national building and safety regulations by a suitably qualified engineer. In the U.K. this must be done for gas-heated machines by a Gas Safe registered engineer. Adequate ventilation must be present in the room in which the machine is operated. It is essential to read these instructions before installing and operating the machine.
Contents Gas safety precautions . . . . . . . . . . . . . . . . . . . . . . . . . . . . . . . . . . . . . . . . . . . . . . . . . . . . . . . . . . . . . . . . . . . . . . 2 Warning and Safety instructions . . . . . . . . . . . . . . . . . . . . . . . . . . . . . . . . . . . . . . . . . . . . . . . . . . . . . . . . . . . . . . . 4 Caring for the environment . . . . . . . . . . . . . . . . . . . . . . . . . . . . . . . . . . . . . . . . . . . . . . . . . . . . . . . . . . . . . . . . . . .
Warning and Safety instructions Explanation of the Warning and Safety symbols on the machine It is essential to read these operating instructions. – items soiled with grease or oil which have not been properly cleaned beforehand. Use heavy-duty detergents where necessary to clean heavily soiled garments, e.g. workwear. If necessary consult the detergent manufacturer for advice. With sensitive fabrics there may be a danger of them self igniting if dried for too long.
Warning and Safety instructions ~ The dryer must have a constant supply of fresh air. Vapours containing chlorine, fluorine or other solvents must not be able to reach the dryer. ~ The drum door must be able to be opened to its ~ The ventilation inlet to the dryer is located at the back of the machine. It must not be blocked or hindered in any way. Do not cover the machine lid with cloths or similar items.
Caring for the environment Disposal of the packing material Tips on saving energy The transport and protective packing has been selected from materials which are environmentally friendly for disposal. Make sure that your laundry is thoroughly spun before drying. This saves time and energy. Rather than just throwing these materials away, please ensure they are recycled. ,Ensure that any plastic wrappings, bags, etc are disposed of safely and kept out of the reach of babies and young children.
Guide to the machine b f a j c d g h e i a Emergency stop switch f Electrical connection Only for use in an emergency. Once the danger is no longer present, turn the grooved disc clockwise to disengage the switch. g Air intake Do not use the Emergency stop switch to turn off the dryer in normal use. h Exhaust connection b Control panel i Equipotential bonding c Drum door j Communication slot Pull the door handle to open the drum door.
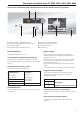
Description of tumble dryer PT 8251, 8331, 8401 Control panel PT 8251, 8331, 8401 Profitronic B Timed programmes 1 3 1 Segment display - Time 4 Venting system fault indicator 7 Time selection rotary dial 2 4 5 6 7 2 Programme sequence display 5 Fluff filter fault indicator 8 On/Off switch 8 3 Temperature selection button 6 START/STOP button Mains On/Off switch s Segment display Switches the machine on or off. Before the start of a programme this shows the selected drying duration in minutes.
Description of tumble dryer PT 8253, 8333, 8403, 8503, 8803 Control panel PT 8253, 8333, 8403, 8503, 8803 Profitronic B Plus Residual moisture programmes 1 3 2 4 5 1 Segment display - Residual moisture 3 Low temperature (additional option) button 5 Fluff filter indicator 7 Programme selection rotary control 6 7 8 2 Programme sequence display 4 Venting system fault indicator 6 START/STOP button 8 On/Off switch Mains On/Off switch s Segment display Switches the machine on or off.
Drying Sort the laundry Not all textiles are suitable for machine drying. Please read the instructions given on the garment care label. The meaning of the care symbols: q = Dry at normal temperature r = Dry at low temperature s = Do not tumble dry Sort the laundry according to fibre type and weave to ensure even drying and to prevent the risk of damage to textiles.
Drying This machine must only be installed and commissioned by a Miele authorised technician. For gas heated machines in the UK, this must be carried out by a Gas Safe registered engineer. Before using for the first time Before loading the dryer with laundry, wipe the internal drum surface with a soft, dry cloth. Switch the machine on and load the drum ^ Open all stopcocks for water, gas and steam as applicable. ^ Switch on the on-site mains electricity switch.
Dryers PT 8251, 8331, 8401 Selecting a temperature High Medium ! Drying L Cooling down O Programme finished / Anti-crease Low Cold ^ Press the temperature selection button and select the required drying temperature Cold, Low, Medium, High. The corresponding LED will light up. Cottons Cotton and linen fabrics can be dried at any temperature, including High. Minimum iron Synthetic and mixed fibre fabrics can be dried at a maximum of Medium.
Dryers PT 8253, 8333, 8403, 8503, 8803 Selecting a programme Lowering the temperature ^ When drying delicate fabrics (such as acrylic), press the K Low temperature additional option button. ^ Press the START/STOP button. The drying programme will begin. The segment display will show the residual moisture which is currently in the laundry until the programme is finished. ^ Use the programme selector rotary dial to select the programme you want. The corresponding LED will light up.
Drying At the end of the programme: Interrupting a programme ^ Open the drum door. The programme is interrupted by: - pressing the mains On/Off switch s, - opening the drum door, - opening the fluff compartment flap. ^ Unload the drum. Make sure nothing is left behind in the drum. If items are left in the dryer, they could be damaged by overdrying when the dryer is next used. ,Do not unload laundry from the drum until the cooling down phase has been completed.
PT 8251, 8331 COP Control panel PT 8251, 8331 Profitronic B COP (Coin Operation) 1 3 2 4 5 6 7 1 Segment display - Time 2 Programme sequence display 4 Venting system fault indicator 5 Fluff filter fault indicator 3 Temperature selection button 6 START/STOP button 7 On/Off switch Time selection can be controlled by a C 4065 or C 4070 coin control unit or other type of payment system. ^ Press the mains On/Off switch s ^ Load the drum and close the door.
Reprogramming Reprogramming individual drying programmes (Changing the Standard options) Individual drying programmes can be altered to suit specific requirements, practices and processes. If the machine is connected to a payment system (coin operation) it is not possible to reprogramme the Standard options. Example of reprogramming PT 8251, 8331, 8401 Profitronic B Timed programme machines P 4 to alter the acoustic tone when a button is pressed (see "Programmable functions").
Reprogramming Programmable functions No. Programmable function Standard Programmable option P1 Buzzer volume 1 0 = quiet 1 = loud P2 Buzzer at the end of the programme 1 0 = Off 1 = On P3 Memory function 1 0 = Off 1 = On P4 Acoustic tone which sounds when a button is pressed 0 0 = Off 1 = On P 5* Water conductivity setting 0 0 = Normal P6 Fan and heating during pauses 1 0 = Off P7 Cottons and Timed progs.
Problem solving guide Fault messages Indicator / display N0 N W Possible cause Remedy Over-pressure in vent ducting. Leaks in the airways. Check the vent ducting. Call the Service Department. Fluff filter blocked Clean the fluff filter. Gas burner malfunction Press the START/STOP button. Peak load cut-out The dryer will continue to run without heating (cold) for the remainder of the programme. If the peak load cut-out is overridden, the programme will continue as normal.
Cleaning and care Fluff filter ,Do not use the machine without the fluff filter in place. Fire risk. A damaged fluff filter must be replaced before the machine is used again. Otherwise fluff and lint will cause a blockage in the airways, the heating and the vent ducting, and the correct functioning of the machine cannot be assured. The fluff filter collects any fluff and lint from the laundry. It should be cleaned at least once a day and when the 0 indicator comes on.
Installation and connection Read the instructions supplied before installing and using it for the first time. This machine must be installed and commissioned in strict accordance with local and national safety and building regulations by a suitably qualified engineer. In the UK, gas heated tumble dryers must only be installed by a Gas Safe registered engineer.
Installation and connection Levelling the machine This machine does not require a plinth. However, make sure that any uneven areas of the floor are made level. Fitting the language insert (Programme selection panel) The machine must be perfectly level to ensure that it functions correctly. The screw feet A can be adjusted to align it. Remove the protective film from the control panel.
Installation and connection Electrical connection Gas connection The electrical components of this machine comply with IEC 335-1 and IEC 335-2-11. This work must be carried out by an authorised person in accordance with local and national safety regulations. This must be a Gas Safe registered technician in the UK. See the installation instructions supplied.
Technical data PT 825X EL/G PT 833X EL/G/D PT 840X EL/G/D PT 850X EL/G/D PT 880X EL/G/D Height in mm 1400 1400 1400 1640 1640 Width in mm 906 906 906 1206 1206 Depth in mm 852 1035 1164 1018 1384 Depth with door open in mm 1456 1639 1768 1622 1988 Weight in kg 148/149.5 164.5/167.5/201 190.5/188.5/215.5 238/238.5/265 286/280/318 Drum volume in l 250 325 400 500 800 Max.
Explanation of symbols on the data plate a b c d o r p s e f g t u i j h k l m n 1 Machine type 2 Serial number 3 Article number 4 Material number 5 Voltage/Frequency 6 Control fuse 7 Drive motor 8 Drum data 9 Drum diameter/Drum depth 10 Spin speed 11 Drum volume/Laundry dry weight 12 Kinetic energy 13 Run-up time 14 Braking time 15 Heating 16 Indentification/Year of manufacture 17 Commissioning date 18 Electric heating 19 Fuse rating (on-site) 20 Indirect steam heating 21 Direct steam heating 22 G
Alteration rights reserved/3412 M.-Nr.
Gebruiksaanwijzing Droogautomaat PT 8251 + COP PT 8331 + COP PT 8401 Lees beslist de gebruiksaanwijzing voordat u het apparaat plaatst, installeert en in gebruik neemt. Dat is veiliger voor uzelf en u voorkomt onnodige schade aan het apparaat. PT 8253 PT 8333 PT 8403 PT 8503 PT 8803 nl - NL M.-Nr.
2
Inhoud Veiligheidsinstructies en waarschuwingen . . . . . . . . . . . . . . . . . . . . . . . . . . . . . . . . . . . . . . . . . . . . . . . . . . . . . . 4 Een bijdrage aan de bescherming van het milieu . . . . . . . . . . . . . . . . . . . . . . . . . . . . . . . . . . . . . . . . . . . . . . . . . 7 Algemeen. . . . . . . . . . . . . . . . . . . . . . . . . . . . . . . . . . . . . . . . . . . . . . . . . . . . . . . . . . . . . . . . . . . . . . . . . . . . . . . . . .
Veiligheidsinstructies en waarschuwingen Toelichting op de veiligheidsinstructies en waarschuwingen op de automaat Lees de gebruiksaanwijzing. Lees de aanwijzingen, bijvoorbeeld een installatie-instructie. – wasgoed dat niet voldoende is gereinigd en dat met vetten of oliën verontreinigd is. Behandel ernstig verontreinigd textiel (zoals werkkleding) met speciale wasmiddelen. Neem hiervoor contact op met uw wasmiddelenleverancier. Bij bepaalde textielsoorten bestaat gevaar van zelfontbranding.
Veiligheidsinstructies en waarschuwingen ~ Plaats de droogautomaat niet in één ruimte met reinigingsautomaten waarin oplosmiddelen worden gebruikt die CFK's bevatten. Door de vrijkomende dampen kan zoutzuur ontstaan dat schade kan veroorzaken aan het wasgoed en de automaat. Bij plaatsing in gescheiden ruimtes mag geen luchtuitwisseling plaatsvinden. ~ Zorg voor de toevoer van schone, frisse lucht. De lucht mag geen chloor-, fluor- of andere oplosmiddeldampen bevatten.
Veiligheidsinstructies en waarschuwingen Gasverwarmde droogautomaten Gebruik van toebehoren ~ Sluit bij een storing en bij reinigings- of onderhoudswerkzaamheden de gaskraan bij het apparaat en de hoofdkraan bij de gasmeter. ~ Toebehoren mogen alleen worden aan- of inge- ~ Let op! Voor beëindiging van de werkzaamheden bij ingebruikneming, onderhoud, ombouw of reparaties moeten alle gasleidingen en onderdelen waar gas door stroomt, van de gaskraan tot de inspuiter, op lekkage worden gecontroleerd.
Een bijdrage aan de bescherming van het milieu Het verpakkingsmateriaal De verpakking beschermt het apparaat tegen transportschade. Het verpakkingsmateriaal is uitgekozen met het oog op een zo gering mogelijke belasting van het milieu en de mogelijkheden voor recycling. Hergebruik van het verpakkingsmateriaal remt de afvalproductie en het gebruik van grondstoffen. Vaak neemt de leverancier de verpakking terug.
Algemeen b f a j c d g h e i a Noodschakelaar f Elektrische aansluiting Gebruik de noodschakelaar alleen in noodgevallen. Als het probleem is verholpen, ontgrendelt u de schakelaar weer door de schijf met de kartelrand naar rechts te draaien. g Opening luchttoevoer h Tuit luchtafvoer Gebruik de noodschakelaar niet als u de machine gewoon wilt uitschakelen! i Aarding b Bedieningspaneel j Communicatieschacht c Deur Trek aan de deurgreep om de deur te openen.
Beschrijving PT 8251, 8331, 8401 Bedieningspaneel PT 8251, 8331, 8401 Profitronic B (tijdgestuurd) 1 3 1 Segmentdisplay "Tijd" 4 Controlelampje "Luchtafvoer" 7 Draaiknop "Tijdkeuze" 2 4 5 6 7 2 Display "Programmaverloop" 5 Controlelampje "Pluizenzeef" 8 Toets "Aan/Uit" 8 3 Toets "Temperatuurkeuze" 6 Toets "START/STOP" Toets s "Aan/Uit" Segmentdisplay Met deze toets schakelt u de automaat in of uit. Het display toont voor de programmastart de ingestelde droogtijd in minuten.
Beschrijving PT 8253, 8333, 8403, 8503, 8803 Bedieningspaneel PT 8253, 8333, 8403, 8503, 8803 Profitronic B Plus (restvochtgestuurd) 1 2 3 4 1 Segmentdisplay "Restvocht" 4 Controlelampje "Luchtafvoer" 7 Draaiknop "Programmakeuze" 5 6 7 2 Display "Programmaverloop" 5 Controlelampje "Pluizenzeef" 8 Toets "Aan/Uit" 8 3 Toets "Temperatuur laag" 6 Toets "START/STOP" Toets s "Aan/Uit" Segmentdisplay Met deze toets schakelt u de automaat in of uit.
Drogen Voorbereiding Niet alle textielsoorten mogen in een droogautomaat worden gedroogd. Houdt u zich aan de aanwijzingen van de fabrikant op het wasetiket. Betekenis van de symbolen: q = drogen op normale temperatuur r = drogen op lage temperatuur s = niet geschikt voor droogautomaten Sorteer het wasgoed op vezel- en weefselsoort. U bereikt zo een gelijkmatig droogresultaat en voorkomt beschadigingen aan het textiel.
Drogen Alleen Miele of een geautoriseerde vakhandelaar mag de automaat plaatsen en in gebruik nemen. Vóór het eerste gebruik Reinig de binnenkant van de trommel met een zachte, droge doek, voordat u wasgoed in de droogautomaat doet. Automaat inschakelen en trommel vullen ^ Open alle kranen (voor stoom c.q. gas). ^ Schakel de hoofdschakelaar (ter plaatse) in. ^ Druk op de toets s "Aan/Uit". ^ Open de deur. ^ Vul het wasgoed in de automaat. De gesorteerde was moet losjes in de trommel liggen.
Drogen PT 8251, 8331, 8401 Temperatuur instellen Hoog Gemiddeld ! Drogen L Afkoelen O Programma-einde/kreukbeveiliging Laag Koud ^ Druk op de toets "Temperatuurkeuze" en stel de gewenste droogtemperatuur in. U kunt kiezen uit koud, lage temperatuur, gemiddelde temperatuur en hoge temperatuur. Het betreffende lampje licht op. Het display "Programmaverloop" toont het programmaverloop in drie stappen. De betreffende programmastap licht geel op.
Drogen PT 8253, 8333, 8403, 8503, 8803 Programma kiezen Temperatuur verlagen ^ Druk bij kwetsbaar textiel (zoals acryl) op de toets K "Temperatuur laag". ^ Druk op de toets "START/STOP" en het droogprogramma start. Het segmentdisplay toont de actuele restvochtwaarde tot aan het programma-einde. ! Drogen L Afkoelen O Programma-einde/kreukbeveiliging ^ Stel met de draaiknop "Programmakeuze" het gewenste programma in. Het betreffende lampje licht op.
Drogen Na afloop van het programma Programma-onderbreking ^ Open de deur. Het programma wordt onderbroken als u: - op de toets s "Aan/Uit" drukt, - de deur opent, - de klep van de pluizenzeef opent. ^ Haal het wasgoed uit de automaat. Laat geen was in de trommel achter. De was kan anders tijdens een volgend programma beschadigd raken door te intensieve droging. ,Haal het wasgoed niet vóór afloop van het droogprogramma, dus niet zonder afkoelfase, uit de automaat.
PT 8251 / 8331 COP Bedieningspaneel PT 8251, 8331 Profitronic B COP (Coin Operation) 1 3 2 4 1 Segmentdisplay "Tijd" 4 Controlelampje "Luchtafvoer" 7 Toets "Aan/Uit" 5 6 7 2 Display "Programmaverloop" 5 Controlelampje "Pluizenzeef" 3 Toets "Temperatuurkeuze" 6 Toets "START/STOP" De functie "Tijdkeuze" kan worden overgenomen door de muntautomaat C 4065 of C 4070 of door andere afrekensystemen. ^ Druk op de toets s "Aan/Uit". ^ Doe de was in de trommel en sluit de deur.
Herprogrammering Het wijzigen van droogprogramma's door herprogrammering (wijziging van de standaardopties) U kunt de droogprogramma's wijzigen en zo aanpassen aan uw specifieke wensen. Bij gebruik van een muntautomaat kunt u de standaardopties niet herprogrammeren. Voorbeeld herprogrammering PT 8251, 8331, 8401 Profitronic B (tijdgestuurd) Wijziging instelling P 4 "Akoestisch signaal bij bediening toetsen" (zie tabel "Programmeerfuncties") ^ Draai de draaiknop "Tijdkeuze" drie klikjes naar rechts.
Herprogrammering Programmeerfuncties (door de klant te programmeren) Nr. Programmeerfunctie Standaard Programmeeropties P1 Volume zoemer 1 0 = zacht 1 = hard P2 Zoemer programma-einde 1 0 = uit 1 = aan P3 Memory-functie 1 0 = uit 1 = aan P4 Akoestisch signaal bij bediening toetsen 0 0 = uit 1 = aan P 5* Instelling geleidbaarheid 0 0 = normaal P6 Ventilator en verwarming tijdens pauzes 1 0 = uit P7 87 0 = 0 sec. 99 = 99 sec. 3 3 = 3 sec. 99 = 99 sec.
Nuttige tips Foutmeldingen Display N0 N W Oorzaak Oplossing Overdruk in de luchtafvoer. Lekkage in de luchtgeleiding. Controleer de luchtafvoer. Neem contact op met Miele. Verstopte pluizenzeef. Reinig de pluizenzeef. Storing gasbrander. Druk op de toets "START/STOP". Overige meldingen De piekbelastingsschakelaar heeft ge- Als de piekbelasting opgeheven is, wordt reageerd. het programma voortgezet. De droogautomaat draait zonder verwarming door. De resttijd wordt stopgezet.
Reiniging en onderhoud Pluizenzeef ,Gebruik de droogautomaat nooit zonder de ingebouwde pluizenzeef. Brandgevaar! Een beschadigde zeef moet onmiddellijk worden vervangen. De pluizen verstoppen anders de luchtwegen, de verwarming en de afvoerbuis. De correcte werking van de droogautomaat is dan niet meer gewaarborgd. ^ Reinig de ommanteling, het bedieningspaneel en de kunststof delen alleen met een mild reinigingsmiddel of met een zachte, vochtige doek. Wrijf de delen vervolgens weer droog.
Plaatsen en aansluiten Alleen Miele of een geautoriseerde vakhandelaar mag de automaat plaatsen en in gebruik nemen. Om latere onderhoudswerkzaamheden door Miele eenvoudiger te maken, dient u rekening te houden met de aangegeven minimale afmetingen en met de afstand tot de wand. Dit apparaat moet volgens de geldende voorschriften worden geïnstalleerd en mag uitsluitend in een ruimte worden gebruikt die voldoende wordt geventileerd.
Plaatsen en aansluiten Stellen De automaat hoeft niet op een speciale ondergrond te worden geplaatst. Oneffenheden moeten wel worden gecompenseerd. Programmakaart plaatsen (folie programmakeuze in landstaal) De droogautomaat moet waterpas staan. Alleen dan kan de automaat goed functioneren. Stel de automaat met behulp van de stelvoeten A. Na het stellen moeten de schijven B met een schroevendraaier worden vastgedraaid (tegen de bodemplaat van de machine).
Plaatsen en aansluiten Elektrische aansluiting De elektrische installatie van de droogautomaat voldoet aan de normen IEC 335-1 en IEC 335-2-11. De automaat mag uitsluitend op een volgens de voorschriften geïnstalleerde huisinstallatie worden aangesloten. Dit mag alleen door een erkend elektricien worden gedaan, met inachtneming van de landelijke voorschriften en de voorschriften van het plaatselijke energiebedrijf. Gebruik het bijgevoegde schema.
Technische gegevens PT 825X EL/G PT 833X EL/G PT 840X EL/G/D PT 850X EL/G/D PT 880X EL/G/D Hoogte in mm 1400 1400 1400 1640 1640 Breedte in mm 906 906 906 1206 1206 Diepte in mm 852 1035 1164 1018 1384 Diepte bij geopende deur in mm 1456 1639 1768 1622 1988 Gewicht in kg 148/149,5 164,5/167,5/201 190,5/188,5/215,5 238/238,5/265 286/280/318 Trommelinhoud in l 250 325 400 500 800 Max.
Betekenis van de symbolen op het typeplaatje a b c d o r p q s e f g t u i j h k l m v w n 1 Model 2 Serienummer 3 Artikelnummer 4 Materiaalnummer 5 Spanning/frequentie 6 Besturingszekering 7 Aandrijfmotor 8 Trommelgegevens 9 Diameter/diepte trommel 10 Centrifugetoerental 11 Trommelinhoud/gewicht droog wasgoed 12 Kinetische energie 13 Centrifugeertijd (aanlooptijd vanaf 0) 14 Remtijd 15 Verwarming 16 Aanduiding/bouwjaar 17 Datum ingebruikneming 18 Elektrische verwarming 19 Zekering (huisinstal
26
27
Wijzigingen voorbehouden/3412 M.-Nr.