
Operating instructions/Installation instructions


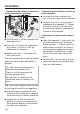


Table Of Contents
- Contents
- Warning and Safety instructions
- Caring for the environment
- Saving energy
- Guide to the appliance
- Accessories
- Before using for the first time
- Switching on and off
- The correct temperature
- Using Super freeze
- Temperature and door alarm
- Selecting further settings
- Settings overview
- Selecting further settings
- Explanation of the different Settings
- Using the minute minder (QuickCool timer)
- – Setting the minute minder
- – When the minute minder duration has elapsed
- – Altering a minute minder entry
- – Cancelling a minute minder duration
- Switching the ice cube maker on and off
- – Additional functions
- Switching the ice cube maker off for a long time.
- Activating or deactivating the safety lock
- – Deactivating the safety lock temporarily
- – Deactivating the safety lock
- Switching the refrigeration appliance off
- Switching Sabbath mode on/off
- – Switching Sabbath mode on
- – Switching Sabbath mode off prematurely
- Setting the time before the door alarm is triggered
- Switching the sensor tone on / off
- Setting the volume/Switching alarms and audible tones on/off
- Setting the display brightness
- Setting the temperature unit /
- Switching Demo mode off
- Resetting to the factory default settings
- Accessing information
- – Displaying licence agreements
- Clean ventilation grille reminder
- Freezing and storing food
- Automatic defrosting
- Cleaning and care
- Problem solving guide
- Noises
- Service
- Installation
- Installation
- Climate range
- Ventilation
- Fitting supplied wall spacers
- Limiting the opening angle of the appliance door
- Fitting the door opening angle limiter
- – Removing the soft-close mechanism
- – Fitting the door opening angle limiter
- – Fitting the soft-close mechanism
- Installing the refrigeration appliance
- Aligning the appliance
- Levelling the appliance door
- Installing the appliance in a run of kitchen units
- Appliance dimensions
- Installing in a side-by-side combination
- Changing the door hinging
- Preparing to change the door hinging
- Removing the top covers
- Removing the soft-close mechanism
- Removing the appliance door
- Changing the lower hinge plate over
- Changing the upper door hinge over
- Preparing the appliance door
- Change the door opening aid over
- Changing the soft-close mechanism over
- Fit the bearing bush supplied into the upper appliance door
- Changing over the bearing bush stopper
- Refitting the appliance door
- Securing the soft-close mechanism
- Fitting the upper covers
- Aligning the appliance doors
- Mains water connection
- Electrical connection
- Installation

Installation
*INSTALLATION*
101
Only use the stainless steel hose
supplied. The stainless steel hose
must not be shortened, extended or
replaced by a different hose.
The stainless steel hose must only
be replaced by an original Miele
spare part. The food-grade, stainless
steel hose is available to order from
the Miele webshop, from the Miele
Customer Service Department or
from your local Miele dealer.
A stopcock must be provided between
the stainless steel hose and the mains
water supply to ensure that the water
supply can be cut off if necessary.
Make sure that the stopcock is still
accessible after the refrigeration ap-
pliance has been installed.
Solenoid valve
Stopcock
The stainless steel hose supplied is 4'
11" (1.5 m)m long.
Water supply
Ensure that the connections are tight
and leak-proof.
Risk of damage to the stainless
steel hose.
The water supply from the tap to the
ice cube maker has been interrupted.
Do not bend or damage the stainless
steel hose.
A stopcock with a metric R3/4thread
must be incorporated when connect-
ing to the water supply.
The solenoid valve is located at the
back of the refrigeration appliance on
the bottom right. It also has a metric
R3/4thread.
Danger of injury from damaged
tool.
If exposed to very high or very low
temperatures, the tool supplied can
become brittle and break.
Use the tool at room temperature
only.