
Operating instructions/Installation instructions


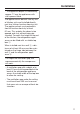


Table Of Contents
- Contents
- Warning and Safety instructions
- Caring for the environment
- Saving energy
- Guide to the appliance
- Accessories
- Before using for the first time
- Switching on and off
- The correct temperature
- Using Super freeze
- Temperature and door alarm
- Selecting further settings
- Settings overview
- Selecting further settings
- Explanation of the different Settings
- Using the minute minder (QuickCool timer)
- – Setting the minute minder
- – When the minute minder duration has elapsed
- – Altering a minute minder entry
- – Cancelling a minute minder duration
- Switching the ice cube maker on and off
- – Additional functions
- Switching the ice cube maker off for a long time.
- Activating or deactivating the safety lock
- – Deactivating the safety lock temporarily
- – Deactivating the safety lock
- Switching the refrigeration appliance off
- Switching Sabbath mode on/off
- – Switching Sabbath mode on
- – Switching Sabbath mode off prematurely
- Setting the time before the door alarm is triggered
- Switching the sensor tone on / off
- Setting the volume/Switching alarms and audible tones on/off
- Setting the display brightness
- Setting the temperature unit /
- Switching Demo mode off
- Resetting to the factory default settings
- Accessing information
- – Displaying licence agreements
- Clean ventilation grille reminder
- Freezing and storing food
- Automatic defrosting
- Cleaning and care
- Problem solving guide
- Noises
- Service
- Installation
- Installation
- Climate range
- Ventilation
- Fitting supplied wall spacers
- Limiting the opening angle of the appliance door
- Fitting the door opening angle limiter
- – Removing the soft-close mechanism
- – Fitting the door opening angle limiter
- – Fitting the soft-close mechanism
- Installing the refrigeration appliance
- Aligning the appliance
- Levelling the appliance door
- Installing the appliance in a run of kitchen units
- Appliance dimensions
- Installing in a side-by-side combination
- Changing the door hinging
- Preparing to change the door hinging
- Removing the top covers
- Removing the soft-close mechanism
- Removing the appliance door
- Changing the lower hinge plate over
- Changing the upper door hinge over
- Preparing the appliance door
- Change the door opening aid over
- Changing the soft-close mechanism over
- Fit the bearing bush supplied into the upper appliance door
- Changing over the bearing bush stopper
- Refitting the appliance door
- Securing the soft-close mechanism
- Fitting the upper covers
- Aligning the appliance doors
- Mains water connection
- Electrical connection
- Installation

Installation
*INSTALLATION*
76
Aligning the appliance
To align the appliance, adjust the
front feet using the spanner supplied
Levelling the appliance door
Risk of damage and injury
caused by the appliance door falling
out or the refrigeration appliance tip-
ping over.
If the additional adjustable foot on
the hinge plate at the bottom is not
resting firmly on the floor, the appli-
ance door can fall out or the refriger-
ation appliance can tip over.
Use the open spanner supplied with
the appliance to unscrew the ad-
justable foot until it is resting on the
floor.
Then unscrew the adjustable foot by
a further quarter turn.
Installing the appliance in a run of
kitchen units
Risk of fire and damage due to
insufficient ventilation.
If the refrigeration appliance is not
ventilated sufficiently, the com-
pressor will run more frequently and
for longer periods. This will result in
increased energy consumption and a
higher operating temperature for the
compressor. This may, in turn, cause
damage to the compressor.
Please ensure that there is adequate
ventilation around the refrigeration
appliance.
It is essential to observe the ventila-
tion gaps given.
Top box
Refrigeration appliance
Kitchen furniture housing unit
Wall