
Operating and Installation instructions
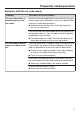
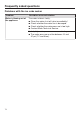
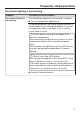
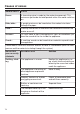
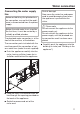
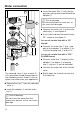
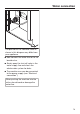
Table Of Contents
- Contents
- IMPORTANT SAFETY INSTRUCTIONS
- Caring for the environment
- Saving energy
- Guide to the appliance
- Switching on and off
- The correct temperature
- Using Automatic SuperCool and SuperFreeze
- Selecting additional settings
- Temperature and door alarm
- Storing food in the refrigerator section
- Storing food in the PerfectFresh zone
- Adjusting the interior fittings (refrigerator section)
- Adjusting the interior fittings (freezer section)
- Freezing and storing food
- Making ice cubes
- Automatic defrosting
- Cleaning and care
- Frequently asked questions
- Causes of noises
- Service and warranty
- Water connection
- Electrical connection
- Installation information
- Installation and appliance dimensions
- Building in the appliance
- Before installing the appliance
- Preparing the niche
- Securing the covers
- Pushing the appliance into the niche
- Aligning the appliance
- Aligning the freezer drawer fronts
- Securing the appliance in the niche
- Remove the fixing bracket
- Fixing the fixing brackets to the cabinet doors
- Securing the cabinet fronts to the freezer drawers
- Securing the cabinet door to the refrigerator door
- Fitting the air filter and ventilation grille

Water connection
77
Connecting the water supply
line
Before establishing the plumbed wa-
ter connection, ensure that the appli-
ance is disconnected from the power
supply.
Before the cold water line is used for
the first time, it must be vented by a
suitably qualified plumber.
The plumbed water connection is at the
front of the machine, at the bottom.
The connection parts included with the
machine permit the connection of vari-
ous water lines (water line not supplied).
Push the appliance carefully into the
niche, leaving sufficient room for in-
stallation work behind the appliance.
Feed the water line forwards from be-
hind through the opening provided on
the back of the appliance.
Guide the power cord out of the
niche area.
Risk of damage!
Now move the water line and power
cord to avoid damaging them when
the appliance is pushed into the
niche.
Please note
Do not connect the appliance to the
power supply yet.
Do not connect the appliance to the
power supply until the plumbed wa-
ter connection work has been com-
pleted.
Carefully push the appliance into the
building-in niche (see “Building in the
appliance”).