
Operating and Installation instructions
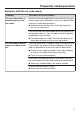
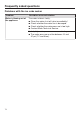
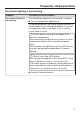
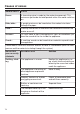
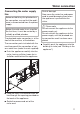
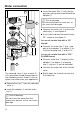
Table Of Contents
- Contents
- IMPORTANT SAFETY INSTRUCTIONS
- Caring for the environment
- Saving energy
- Guide to the appliance
- Switching on and off
- The correct temperature
- Using Automatic SuperCool and SuperFreeze
- Selecting additional settings
- Temperature and door alarm
- Storing food in the refrigerator section
- Storing food in the PerfectFresh zone
- Adjusting the interior fittings (refrigerator section)
- Adjusting the interior fittings (freezer section)
- Freezing and storing food
- Making ice cubes
- Automatic defrosting
- Cleaning and care
- Frequently asked questions
- Causes of noises
- Service and warranty
- Water connection
- Electrical connection
- Installation information
- Installation and appliance dimensions
- Building in the appliance
- Before installing the appliance
- Preparing the niche
- Securing the covers
- Pushing the appliance into the niche
- Aligning the appliance
- Aligning the freezer drawer fronts
- Securing the appliance in the niche
- Remove the fixing bracket
- Fixing the fixing brackets to the cabinet doors
- Securing the cabinet fronts to the freezer drawers
- Securing the cabinet door to the refrigerator door
- Fitting the air filter and ventilation grille

Water connection
78
The solenoid valve has a metric R
3/4 connection thread (the position of
the solenoid valve as shown in this di-
agram may differ from your appliance).
Remove the cap from the solenoid
valve.
Insert the adapter into the union
nut.
Risk of damage
Do not insert the water filter the
wrong way around, as this can cause
damage.
Insert the water filter with the de-
pression facing downward toward the
adapter.
Risk of damage
Do not overtighten the union nut, as
this can cause damage.
Connect the union nut to the sole-
noid valve, and tighten it.
If you want to divert the water line by
90°, screw on the elbow.
In case of a water line with a 1/4"
thread:
Connect the water line (e.g., cop-
per) to the adapter or elbow us-
ing the clamping ring and nut.
In case of a water line with a 7/16"
24-UNS thread:
Connect water line directly to the
adapter or elbow (clamping
ring and nut are not required).
Connect the water line to the shutoff
valve.
Briefly open the shutoff valve to vent
the water line.