
Operating and Installation instructions
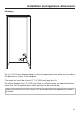
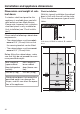
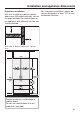
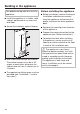
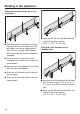
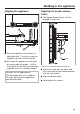
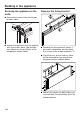
Table Of Contents
- Contents
- IMPORTANT SAFETY INSTRUCTIONS
- Caring for the environment
- Saving energy
- Guide to the appliance
- Switching on and off
- The correct temperature
- Using Automatic SuperCool and SuperFreeze
- Selecting additional settings
- Temperature and door alarm
- Storing food in the refrigerator section
- Storing food in the PerfectFresh zone
- Adjusting the interior fittings (refrigerator section)
- Adjusting the interior fittings (freezer section)
- Freezing and storing food
- Making ice cubes
- Automatic defrosting
- Cleaning and care
- Frequently asked questions
- Causes of noises
- Service and warranty
- Water connection
- Electrical connection
- Installation information
- Installation and appliance dimensions
- Building in the appliance
- Before installing the appliance
- Preparing the niche
- Securing the covers
- Pushing the appliance into the niche
- Aligning the appliance
- Aligning the freezer drawer fronts
- Securing the appliance in the niche
- Remove the fixing bracket
- Fixing the fixing brackets to the cabinet doors
- Securing the cabinet fronts to the freezer drawers
- Securing the cabinet door to the refrigerator door
- Fitting the air filter and ventilation grille

Installation and appliance dimensions
*INSTALLATION*
91
Plumbing
For a 24" (610mm) deep building-in niche the opening for the water line must be in
the position as shown in the diagram.
The water line must be at least 31 1/2" (800mm) long for this.
For niches deeper than 24" (610mm) there is sufficient room for repositioning the
water line, so the position given does not have to be maintained.
Make sure that the shut-off valve is still accessible after the appliance has been
installed.