
Operating instructions/Installation instructions


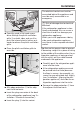
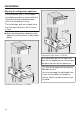
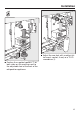


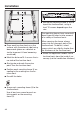
Table Of Contents
- Contents
- Warning and Safety instructions
- Caring for the environment
- Installation
- Location
- Installation notes
- Specifications for the mains water connection
- Building-in dimensions
- Dimensions of front panels
- Installing the appliance
- Before starting ...
- Tools required
- Weight of the furniture fronts
- Aligning the building-in niche
- Checking the installation niche
- Before installation
- Preparing the building-in niche
- Pushing the refrigeration appliance into the building-in niche
- Aligning the refrigeration appliance
- Securing the refrigeration appliance in the building-in niche
- Preparing to install the front panels
- Securing and aligning the furniture fronts
- Mounting the fixing brackets
- Securing the covers
- Installing the cover in a side-by-side combination
- Securing the plinth ventilation grille and plinth panel
- Limiting the opening angle of the appliance doors
- Mains water connection
- Electrical connection
- Saving energy
- Guide to the appliance
- Accessories
- Initial commissioning
- Switching on and off
- Selecting additional settings
- Switching / on or off
- Switching on or off
- Performing a
- Switching on and off
- Switching on the
- Switching off the
- Miele@home
- Switching off the
- Resetting the settings to their default settings
- Switching mode on or off
- Switching on or off
- Switching on, switching off or resetting the
- Switching on, switching off or resetting the
- The correct temperature
- Using Super cool and Super freeze
- Temperature and door alarm
- Adjusting the interior fittings
- Storing food in the refrigerator section
- Storing food in the MasterFresh zone
- Freezing and storing food
- Making ice cubes
- Automatic defrosting
- Cleaning and care
- Water filter
- Problem solving guide
- Noises
- Service
- EU Conformity declaration
- UK Conformity declaration
- Copyrights and Licences

Installation
*INSTALLATION*
40
Place each furniture front on a firm
surface, with the external side facing
downwards (place on a blanket or
similar to prevent it from becoming
scratched).
Mark the distanceX -3mm on the in-
ner side of the furniture front.
Also locate and mark the centre
pointY on the furniture front.
Position each mounting frame ac-
cording to the markings on the fur-
niture front.
Pre-drill the holes.
Screw each mounting frame to the
furniture front:
Use at least one screw for each re-
taining point on the mounting
frame.
Secure the mounting frame to the
top of the furniture front, using at
least 10screws depending on the
size.
The mounting frames have several dif-
ferent types of holes to take account
of a variety of furniture fronts.
When securing the frame, always
screw into the strongest part of the
furniture front. To do this, select
screws which are slightly shorter than
the thickness of the furniture front.
Screw the appliance handles to the
furniture fronts from the inside if ne-
cessary (not for handle-free kitchens).