
User manual
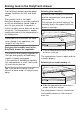
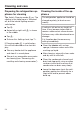

Table Of Contents
- Contents
- Warning and Safety instructions
- Caring for the environment
- Installation
- Saving energy
- Guide to the appliance
- Start display
- Adjusting the interior fittings
- Using the door shelf fine adjustment
- Repositioning the door shelf with fine adjustment
- Moving the door shelf/bottle shelf
- Clipping the egg trays on
- Adjusting or removing the bottle holder
- Moving the adjustable shelf/adjustable shelf with lighting
- Space for a baking tray
- Moving the bottle rack
- Moving the charcoal filters
- When storing very strong smelling food (e.g. very ripe cheese):
- Optional accessories
- Switching on and off
- The correct temperature
- Using Super cool and DynaCool
- Selecting further settings
- Explanation of the different settings
- Party mode
- Holiday mode
- Switching the lock function / on
- Deactivating the lock function / temporarily
- Switching the lock function / off completely
- Sabbath mode
- Switching Sabbath mode off
- Information on Sabbath mode
- Changing the time before the door alarm is triggered
- Miele@home
- Availability of the WiFi connection
- Miele@home availability
- Miele App
- Setting up Miele@home for the first time
- Deactivating or activating the WiFi connection
- Resetting the network configuration
- Changing the volume of the alarms and buzzers /
- Adjusting the display brightness
- Switching off Demo mode
- Resetting the settings to their default settings
- Information
- Charcoal filter change indicator
- Cleaning mode
- Explanation of the different settings
- Door alarm
- Storing food in the fridge zone
- Storing food in the DailyFresh drawer
- Defrosting
- Cleaning and care
- Cleaning agents
- Preparing the refrigeration appliance for cleaning
- Cleaning the inside of the appliance
- Cleaning accessories by hand or in the dishwasher
- Removing and dismantling accessories for cleaning
- Removing the door shelf with fine adjustment
- Dismantling the door shelf/bottle shelf
- Dismantling the adjustable shelf/adjustable shelf with lighting
- Removing the drawers from the fridge zone
- Replacing the drawers
- Removing the dividing plate
- Removing the compartment cover
- Replacing the charcoal filters (optional accessories)
- Cleaning the door seal
- Cleaning the ventilation gaps
- After cleaning
- Problem solving guide
- Noises
- Service
- EU Conformity declaration
- UK Conformity declaration
- Copyrights and licences

Cleaning and care
59
Cleaning accessories by hand
or in the dishwasher
The following components must be
cleaned by hand only:
- The stainless steel trims or strips
- Flexible bottle rack
- Door shelf with fine adjustment
- Protective strips at the back of the
adjustable shelves
- Adjustable shelf with printing
- All drawers and compartment lids
(these vary depending on model)
- The plastic parts of the adjustable
shelf with pivotable glass shelf (avail-
able as optional accessory)
- Organisation box (available as an op-
tional accessory)
The following components are dish-
washer-safe:
Risk of damage due to high dish-
washer temperatures.
Parts of the refrigeration appliance
may become unusable, e.g. deform,
if they are washed in the dishwasher
at more than 55°C.
For dishwasher-safe components, al-
ways select dishwasher programmes
with a maximum temperature of
55°C.
Contact with natural dyes from car-
rots, tomatoes and ketchup, etc., may
discolour the plastic parts in the dish-
washer. This discolouration does not
affect the stability of the parts.
- Bottle holder, egg tray
- Shelves and bottle shelves in the ap-
pliance door (without stainless steel
trim)
- The guide rails for the door shelf with
fine adjustment
- Adjustable shelves (without the trim
or printing)
- The holder for the charcoal filter
(available as an optional accessory)
Removing and dismantling ac-
cessories for cleaning
Removing the door shelf with fine ad-
justment
Hold the door shelf in both hands,
press the grey buttons on both sides
under it and slide it up off the guide
rails.
Remove the guide rail from the lugs.
Once you have cleaned it, move the
guide rail to the desired position and
place the second guide rail parallel to
the first rail on the opposite side.
Push the shelf back down onto the
guide rails.