
Operating instructions/Installation instructions
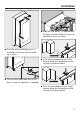
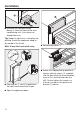
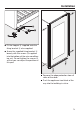
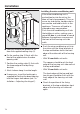
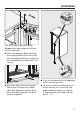
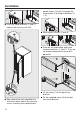
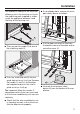
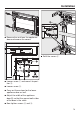
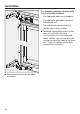
Table Of Contents
- Contents
- Warning and Safety instructions
- Caring for the environment
- Saving energy
- Guide to the appliance
- Accessories
- Switching on and off
- Selecting further settings
- The optimum temperature and air quality
- Temperature and door alarm
- Feature lighting
- Storing wine bottles
- Automatic defrosting
- Cleaning and care
- Active AirClean filters
- Problem solving guide
- Noises
- Service
- Installation
- Information for dealers

Installation
*INSTALLATION*
72
Unscrew the transport safety
device from the front of the wine
conditioning unit, if you have not
already done so.
Tip: Keep this device in a safe place for
refitting should the appliance need to
be moved in the future.
With 16mm thick unit walls only:
5
6
Clip spacers and supplied on
the right-hand side of the hinges.
Open the appliance door.
Remove top cover.
Screw the supplied fixing bracket
loosely with the screws supplied
into the top left of the wine condition-
ing unit (1st and 3rd hole from the
left). Do not tighten the screws so
that you can adjust the position of
bracket later on.