
Operating and Installation instructions
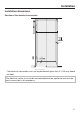
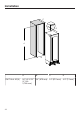
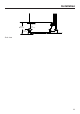
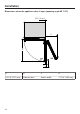
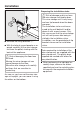
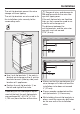

Table Of Contents
- Contents
- IMPORTANT SAFETY INSTRUCTIONS
- Caring for the environment
- Installation
- Installation location
- Installation notes
- Installation dimensions
- Installing the wine conditioning unit
- Before starting...
- Tools required
- Aligning the installation niche
- Checking the installation niche
- Before installation
- Preparing the installation niche
- Pushing the wine conditioning unit into the niche
- Aligning the wine storage unit
- Securing the wine conditioning unit in the niche
- Securing the toe-kick board and cover
- Aligning the appliance door
- Limiting the opening angle of the appliance door
- Electrical connection
- Saving energy
- Guide to the appliance
- Accessories
- Before first use
- Switching the wine conditioning unit on and off
- Selecting additional settings
- The ideal temperature and humidity
- Door alarm
- Storing wine bottles
- SommelierSet
- Automatic defrosting
- Cleaning and care
- Frequently Asked Questions
- Causes of noises
- Customer Service
- Declaration of conformity
- Copyrights and licenses

Installation
*INSTALLATION*
26
Tools required
- Cordless drill
- TX20 screwdriver
- Hammer drill
- Drill bits in various sizes, depending
on materials
- Hammer
- Open-ended wrench
- Ratchet wrench, attachment: socket,
5/16" (8mm)
- Adhesive tape
- Utility knife
- Pipe wrench
- Level
- Tape measure
- Pencil
Other
- Step ladder
- Hand truck
Aligning the installation niche
The installation niche must be carefully
aligned using a bubble level before in-
stalling the wine conditioning unit. The
niche corners must be at 90° angles to
each other, otherwise the cabinet front
will not sit straight on all 4corners of
the installation niche.