
User's Manual


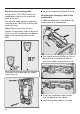
Table Of Contents
- Contents
- Warning and Safety instructions
- Caring for the environment
- Guide to the appliance
- -
- Installation and connection
- Assembling the vacuum cleaner
- Connecting the Comfort handle
- Connecting the PowerUnit and the suction tube
- Inserting the battery
- Connecting the Electrobrush
- General battery information
- Charging the battery (without wall mounting)
- Charging the battery (with wall mounting)
- Wall mounting
- Attaching the mounting plate
- Attaching the charging cable to the wall bracket
- Connecting the accessories holder (if required)
- Connecting the wall bracket
- Battery charging state indicator (while charging)
- Battery charging state indicator (while in use)
- Using the accessories supplied
- Use
- Maintenance
- Problem solving guide
- Error messages
- Cleaning and care
- Service
- Optional accessories
- Electrical connection
- Installation and connection

14
Installation and connection
Assembling the vacuum cleaner
You can assemble the vacuum cleaner
in 2different ways.
You can place the suction tube either
above or below the PowerUnit.
The advantages of placing the
PowerUnit at the bottom of the va-
cuum cleaner are as follows:
- secure self-standing function possible
(see “Use” – “Self-standing function for
short pauses in vacuuming”)
- ergonomic (reduced strain on the
wrist)
- convenient cleaning of large surfaces
The advantages of placing the
PowerUnit at the top of the vacuum
cleaner are as follows:
- convenient cleaning underneath fur-
niture
- PowerUnit can be removed quickly
PowerUnit solo
The PowerUnit can be used on its own
without the suction tube and Electro-
brush as a quick way of vacuuming up
crumbs and lint in specific areas.
Tip: This configuration is particularly
suitable when using the three-piece ac-
cessory set (see “Using the accessories
supplied”).
Connecting the Comfort handle
Depending on how your vacuum
cleaner is configured, you can connect
the Comfort handle to either the suction
tube or the PowerUnit.