Operating and Installation Instructions Ventilation System DA 2280 DA 2210 To prevent accidents and appliance damage, read these instructions before installation or use. en - US, CA M.-Nr.
Contents IMPORTANT SAFETY INSTRUCTIONS. . . . . . . . . . . . . . . . . . . . . . . . . . . . . . . . . 3 Functional description . . . . . . . . . . . . . . . . . . . . . . . . . . . . . . . . . . . . . . . . . . . . . 7 Guide to the Ventilation System . . . . . . . . . . . . . . . . . . . . . . . . . . . . . . . . . . . . . . 8 Operation . . . . . . . . . . . . . . . . . . . . . . . . . . . . . . . . . . . . . . . . . . . . . . . . . . . . . . . 10 Joystick . . . . . . . . . . . . . . . . . . . . . . . . .
IMPORTANT SAFETY INSTRUCTIONS READ AND SAVE THESE INSTRUCTIONS Keep these instructions in a safe place and pass them on to any future user. Read these instructions carefully before installing or using the Ventilation System. ~ This appliance is intended for residential use only. Use the appliance only for its intended purpose. ~ This appliance complies with current safety requirements. Improper use of the appliance can lead to personal injury and material damage.
IMPORTANT SAFETY INSTRUCTIONS ~ d) Before connecting the appliance to the power supply make sure that the voltage and frequency listed on the data plate correspond with the household electrical supply. This data must correspond to prevent appliance damage. If in doubt consult a qualified electrician. ~ e) Installation work and repairs should only be performed by a qualified technician in accordance with all applicable codes and standards. Repairs and other work by unqualified persons could be dangerous.
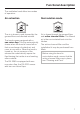
IMPORTANT SAFETY INSTRUCTIONS ,WARNING TO REDUCE THE RISK OF INJURY TO PERSONS IN THE EVENT OF A COOKTOP GREASE FIRE, OBSERVE THE FOLLOWING*: ~ Do not allow children to play with or ~ a) SMOTHER FLAMES with a close fitting lid, cookie sheet, or metal tray then turn off the burner. BE CAREFUL TO PREVENT BURNS. If the flames do not go out immediately, EVACUATE AND CALL THE FIRE DEPARTMENT. ~ Never operate gas burners without ~ b) NEVER PICK UP A FLAMING PAN - You may be burned.
IMPORTANT SAFETY INSTRUCTIONS Installation ~ g) Do not install this hood over cooktops that burn solid fuel. ,WARNING TO REDUCE THE RISK OF FIRE, ELECTRIC SHOCK, OR INJURY TO PERSONS, OBSERVE THE FOLLOWING: ~ a) Installation work and electrical wiring must be done by qualified person(s) in accordance with all applicable codes and standards, including fire-rated construction.
Functional description The ventilation hood offers two modes of operation: Air extraction Recirculation mode The air is drawn in and cleaned by the grease filters and directed outside. Air is drawn through the grease filters and active charcoal filters. The filtered air is then recirculated back into the kitchen. The hood comes equipped with a non-return flap. This flap automatically closes when the hood is turned off so that no exchange of outside air and room air can occur.
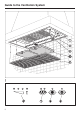
Guide to the Ventilation System 8
Guide to the Ventilation System a Control panel h Grease filter button b Joystick The indicator next to the grease filter button lights when the grease filters need to be cleaned. This button is also used: The fan and light can be operated with the joystick. c Overhead lighting d Charcoal filters optional accessory for recirculation mode DA 2280: 2 filters DA 2210: 4 filters e Grease filters – to reset the grease filter timer after cleaning the grease filters (see "Cleaning and Care").
Operation Joystick Selecting the power level The joystick controls the fan power and overhead lighting. ^ Press the joystick to the right, to increase the fan speed. Press it to the left to decrease the fan speed. Turning on the fan The corresponding fan power indicator lights. Level "1" to "3" are usually sufficient for normal cooking. Intensive setting Level "4" should be used for a short period when frying or cooking food with a strong aroma. Fan performance ^ Press the joystick once to the right.
Operation Automatically switching back to the "Intensive" setting The intensive level "4" can be programmed to automatically switch back to level "3" after 10 minutes. ^ Turn the fan and the lights off. Delayed Shut Down If odors or smoke remain in the kitchen after cooking has been completed, the Delayed Shut Down feature can be selected to allow the hood to continue running for either 5 or 15 minutes. ^ Press and hold the Delay Shut Down button for 10 secs.
Operation Overhead lighting Dimming the lighting The overhead lighting can be turned on and off independently of the fan. The brightness of the lighting can be adjusted. ^ While the lighting is turned on, press and hold the joystick backwards or forwards. The lighting will dim until the joystick is released. ^ If the joystick is pressed again, the lighting will brighten until the joystick is released. If the joystick is pressed continuously, the light will cycle between bright and dark.
Operation Filter timers Checking the filter timers Grease filter timer To check the percentage of time set already used: A timer monitors the hours of operation. The indicator for the grease filter will light after 30 hours of fan operation. The grease filters must then be cleaned. ^ Press the joystick to the left to turn the fan on. After the grease filters have been cleaned and put back in place, the grease filter timer must be reset. ^ To do this press the grease filter button for about 3 seconds.
Operation Reprogramming the timers The grease filter timer is preset to 30 hours. This time can be lengthened or shortened to 20, 30, 40 or 50 hours. – A time of 20 hours should be programmed in kitchens with frequent pan or deep frying. – A time of 20 hours should also be programmed if the kitchen is only used occasionally. Otherwise grease which has accumulated over a long period of time will harden on the filters making cleaning more difficult. ^ Use the joystick to select the desired time.
Operation Reprogramming the charcoal filter timer The active charcoal filters can only be used in recirculation mode and cannot be used to exhaust fumes. The charcoal filter timer is not preset. Before using the hood in recirculation mode, the charcoal filter timer must be programmed. ^ Press the joystick to the left to turn the fan off. ^ Press the Delayed Shut Down and charcoal filter buttons at the same time. The indicator for the charcoal filter and one of the fan power scale indicators will flash.
Cleaning and care ,WARNING TO REDUCE THE RISK OF FIRE, ELECTRIC SHOCK, OR INJURY TO PERSONS, OBSERVE THE FOLLOWING: Before cleaning or servicing the hood, disconnect it from the power supply, see "Important Safety Instructions". Avoid: – cleaning agents containing soda, acids or chlorides, – abrasive cleaning agents e.g. powder or cream cleansers, – abrasive sponges, e.g. pot scourers or sponges which have been previously used with abrasive cleaning agents, – limescale removers.
Cleaning and care Grease filters Cleaning the grease filters The reusable metal grease filters remove solid particles from the vented kitchen air (grease, dust, etc). ^ By hand: use a scrub brush with a solution of warm water and mild detergent. Do not use pure detergent, aggressive all purpose cleaners, oven sprays or limescale removers. They could destroy the filters.
Cleaning and care Inserting the grease filters When putting the grease filters back make sure that the locking clips are visibly facing the cooking surface. If the filters are incorrectly installed, insert a small screwdriver into the slit along its edge to disengage it from the casing. ^ After returning the grease filters, press and hold the grease filter button for 3 seconds to reset the timer. The indicator light will go out.
Cleaning and care Active charcoal filter DA 2280 uses 2 active charcoal filters DA 2210 uses 4 active charcoal filters In recirculation mode active charcoal filters must be used in addition to the grease filters. It is designed to absorb cooking odors. The active charcoal filters will be replaced in the canopy above the grease filters. Replacement active charcoal filters can be ordered from Miele. ^ Remove the grease filters to access the charcoal filters. See "Cleaning and Care - Grease filters".
Cleaning and care Changing the light bulb ,WARNING TO REDUCE THE RISK OF FIRE, ELECTRIC SHOCK, OR INJURY TO PERSONS, OBSERVE THE FOLLOWING: Before changing the light bulbs, disconnect the hood from the power supply, see "Important Safety Instructions". When in use halogen bulbs become extremely hot, and they can burn your hands. Do not attempt to change the bulbs until they have had sufficient time to cool down. Do not touch the bulb surface.
After Sales Service Repairs MieleCare In the event of a fault which you cannot easily fix yourself, please contact the Miele Technical Service Department. (USA only) ^ When contacting the Technical Service Department, please quote the model and serial number of your appliance. These are shown on the data plate which is visible when the grease filters are removed.
Installation Instructions Read these instructions and the "Important Safety Instructions" before installing this hood. Leave these instructions with the appliance for the comsumer/user. Information is subject to change. Please refer to our website to obtain the most current product specification, technical & warranty information.
Caring for the environment Disposal of packing material Disposal of an old appliance The cardboard box and packing materials protect the appliance during shipping. They have been designed to be biodegradable and recyclable. Please recycle. Old appliances may contain materials that can be recycled. Please contact your local recycling center about the possibility of recycling these materials. ,DANGER Ensure that any plastic wrappings, bags, etc.
Appliance dimensions DA 2280 25
Appliance dimensions DA 2210 26
Appliance dimensions *Cut out dimensions A depth T, min. 1" (25 mm), is necessary in the rear of the cabinet. Distance between cooktop and hood (S) Do not install this exhaust hood over cooktops burning solid fuel.
Installation ^ Please read the "Important Safety Instructions" and Installation instructions before installing this hood. Non-return flap Installation The hood is designed to be installed within cabinetry and kitchen islands. The top half (motor and fan assembly) should be accessible after installation. If the motor and fan assembly are not accessible, assemble the ductwork and the electrical connection before the installation. The hood comes equipped with a non-return flap.
Installation Preparation for air extraction mode ^ See "Air extraction" for further information on installing the exhaust hose. ^ DA 2210: The hood has two vent collars for two 6" (150 mm) diameter exhaust hoses. The supplied Yadapter can be used to feed the exhaust from both connections into an 8" (200 mm) diameter common duct. dai2699 ^ If using a 6" (150 mm) diameter exhaust hose, attach the supplied vent collar to the exhaust hose with a hose clamp.
Installation 14 3 dai2453 Recirculation mode DA 2280 installation needs one installation kit and two active charcoal filters 31 9 DA 2210 installation needs two installation kits and four active charcoal filters 10 A non-return flap is not needed in recirculation mode. 24 ^ Install the installation kit according to the installation situation.
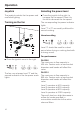
Installation Installing the joystick Joystick extension The joystick can be extended for an easier reach. ^ Screw the spring into the socket and tighten by hand. At the same time hold the socket using a SW 9 wrench, do not rotate. ^ Screw the base onto the spring and tighten by hand. Again, hold the socket with the wrench, do not rotate. ^ Place the bottom section of the joystick onto the base and loosely secure it in place with the included screw and spring washer.
Installation Electrical connection Before connecting the appliance to power read the "Important Safety Instructions". ^ Plug in the power cord. Before using the appliance remove the grease filters and remove the protective foil from the filter frame. Insert the grease filters back into place.
Air extraction ,WARNING Danger of toxic fumes. Gas cooking appliances release carbon monoxide that can be harmful or fatal if inhaled. To reduce the risk of fire and to properly exhaust air, the exhaust gases extracted by the hood should be vented outside of the building only. Do not vent exhaust air into spaces within walls or ceilings or in attics, crawl spaces or garages. To reduce the risk of fire, only use metal ductwork.
Air extraction Condensate trap optional accessory – If the exhaust is ducted into an inactive flue, the air must be expelled parallel to the flow direction of the flue. Never connect an exhaust hood to an active chimney, dryer vent, flue, or room venting ductwork. Seek professional advice before connecting an exhaust hood vent to an existing, inactive chimney or vent flue. Important If the ductwork runs through rooms, ceilings, garages, etc.
Electrical connection ,WARNING TO REDUCE THE RISK OF FIRE, ELECTRIC SHOCK, OR INJURY TO PERSONS, OBSERVE THE FOLLOWING: All electrical work should be performed by a qualified electrician in strict accordance with national regulations (for USA: ANSI-NFPA 70) and local safety regulations. Installation, repairs and other work by unqualified persons could be dangerous. Ensure that power to the appliance is off while installation or repair work is performed.
Technical data DA 2280 Maximum load . . . . . . . . . . . . . . . 450 W Fan. . . . . . . . . . . . . . . . . . . . . . . 350 W Light. . . . . . . . . . . . . . . . . . . . 2 x 50 W DA 2210 Maximum load . . . . . . . . . . . . . . . 900 W Fan . . . . . . . . . . . . . . . . . . . 2 X 350 W Light. . . . . . . . . . . . . . . . . . . . 4 x 50 W Voltage . . . . . . . . . . . . . . . . . . . . . 120 V Frequency . . . . . . . . . . . . . . . . . . 60 Hz Circuit rating. . . . . . . . . . . . . . . . . .
Alteration rights reserved / 0910 M.-Nr. 07 773 240 / 01 INFORMATION IS SUBJECT TO CHANGE. PLEASE REFER TO OUR WEBSITE TO OBTAIN THE MOST CURRENT PRODUCT SPECIFICATIONS, TECHNICAL & WARRANTY INFORMATION.