Installation instructions Ceramic Cooktop KM 451 To prevent accidents and machine damage, read the Operating Manual before installation or use. UV M.-Nr.
Contents IMPORTANT SAFETY INSTRUCTIONS . . . . . . . . . . . . . . . . . . . . . . . . . . . . . . . . . 4 Safety distance above the appliance . . . . . . . . . . . . . . . . . . . . . . . . . . . . . . . . . . . 5 Appliance dimensions and countertop cut-out . . . . . . . . . . . . . . . . . . . . . . . . . 6 KM 451. . . . . . . . . . . . . . . . . . . . . . . . . . . . . . . . . . . . . . . . . . . . . . . . . . . . . . . . . . . 6 Installation . . . . . . . . . . . . . . . . . . . . . . . . . . . . . . .
IMPORTANT SAFETY INSTRUCTIONS Note to the installer: Please leave this instruction book with the consumer for the local electrical inspector’s use. The minimum distances given in these Installation Instructions must be observed in order to ensure safe operation. Failure to do so increases the risk of fire. recommended The cabinetry and venting hood should be installed first, to prevent damage to the cooktop.
IMPORTANT SAFETY INSTRUCTIONS This equipment has not been designed for maritime use or for use in mobile installations such as aircraft or recreational vehicles. However, under certain circumstances it may be possible for installation in these applications. Please contact the nearest Miele Dealer or the Miele Technical Service Department with specific requirements. Because of the heat radiated downwards from this type of appliance we do not recommend installing it over a drawer.
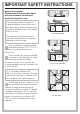
Appliance dimensions and countertop cut-out KM 451 5 (8m16" m) 24 (58 16" mm ) 4 " 20 16 ) m (514m 36 5 10 (930 16 " mm) " 16 (8m 4 3 m) " 16 m) m (83 max. R4 b 3 1 (9 6 16" 16 mm ) 2" ) 50 in. 2 " .50) in (m c 11 16" ) 19 0mm 0 (5 b (m a Spring clips b There must be at least 3 1/4" (83 mm) of usable depth to the right hand side of the cut out. ^ Make the countertop cut-out following the dimensions given in the illustration.
Installation Installing the spring clips (75m Granite countertops m) 3 ” b ^ Fix the supplied spring clips, a, at the marked positions as shown above, by laying them on the upper edge of the cut-out and then securing them with the 3.5 x 25 mm screws supplied. For granite countertops, the spring clips, a, must be placed in position and secured with strong, double-sided adhesive tape. In addition coat the edges of the spring clips with silicone sealant. The screws are not needed for granite countertops.
Installation Installing the cooktop ^ Feed the power cord down through the cut-out and connect the appliance to the power supply. ^ Position the cooktop on the spring clips, a. ^ Then with a hand on each side of the cooktop press down on the edges evenly until it clicks into position. When doing so make sure that the cooktop seal sits tightly on the countertop to ensure a correct seal is provided. The cooktop can now only be removed with a special tool.
Electrical connection Caution: All electrical work should be performed by a qualified electrician in accordance with local and national codes. Disconnect the appliance from the main power supply before servicing. To reduce the risk of electric shock, make sure that the appliance is properly grounded after installation. Power supply Please check the data plate for 240 VAC, 60 Hz, 208 VAC, 60 Hz and make sure your electrical supply matches the data plate.
Alterations rights reserved / 0705 M.-Nr.