
Installation Guide
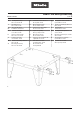
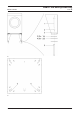


Table Of Contents
- Montageanweisung APCL Sockel 15/30
- Gefahr durch unsachgemäße Instandhaltungsarbeiten
- Maßnahmen, bevor Instandhaltungsarbeiten am Gerät durchgeführt werden
- Maßnahmen, nachdem Instandhaltungsarbeiten am Gerät durchgeführt wurden
- Schnittverletzungsgefahr bei Instandhaltungsarbeiten
- Verletzungsgefahr durch übermäßige körperliche Beanspruchung
- Sockel vorbereiten
- Waschmaschine auf Sockel montieren
- Trockner auf Sockel montieren
- Sockelwände montieren
- Installation instructions for APCL plinth 15/30
- Danger due to incorrect service and repair work
- Measures to be carried out before commencing any service work on the appliance
- Measures to be carried out after service work has been completed
- Risk of cuts during service and maintenance work
- Danger of injury due to excess physical strain
- Preparing the plinth
- Fitting a washing machine to the plinth
- Fitting a tumble dryer to the plinth
- Fitting the plinth panels
- Инструкция за монтаж на цокъла APCL 15/30
- Опасност поради неправилни работи по поддръжката
- Мерки преди извършване на работи по поддръжката на уреда
- Мерки след извършване на работите по поддръжката на уреда
- Опасност от порезни рани при извършване на работите по поддръжката
- Опасност от нараняване вследствие на прекомерно физическо натоварване
- Подготовка на цокъла
- Монтиране на пералната машина върху цокъла
- Монтиране върху цокъла на сушилня
- Монтиране на стените на цокъла
- Montážní návod APCL soklu 15/30
- Nebezpečí v důsledku neodborných údržbářských prací
- Před údržbářskými pracemi musí být na přístroji provedena následující opatření
- Po údržbářských pracích musí být na přístroji provedena následující opatření
- Nebezpečí úrazu pořezáním při údržbářských pracích
- Nebezpečí úrazu v důsledku nadměrné tělesné námahy
- Příprava soklu
- Montáž pračky na soklu
- Montáž sušičky na soklu
- Montáž stěn soklu
- Monteringsanvisning APCL sokkel 15/30
- Vedligeholdelsesarbejde foretaget af ikke-sagkyndige medfører fare.
- Sikkerhedsforanstaltninger inden der foretages vedligeholdelsesarbejde på produktet
- Sikkerhedsforanstaltninger efter vedligeholdelsesarbejde
- Fare for snitsår ved reparation og vedligeholdelse
- Fare for at komme til skade på grund af stor kropslig anstrengelse
- Forberedelse af soklen
- Vaskemaskinen monteres på soklen
- Tørretumbleren monteres på soklen
- Montering af sokkelvægge
- Οδηγίες τοποθέτησης APCL σε βάση 15/30
- Κίνδυνος λόγω ακατάλληλων εργασιών συντήρησης
- Μέτρα πριν από την εκτέλεση εργασιών συντήρησης στη συσκευή
- Μέτρα μετά την εκτέλεση εργασιών συντήρησης στη συσκευή
- Κίνδυνος τραυματισμού λόγω κοψίματος κατά τις εργασίες συντήρησης
- Κίνδυνος τραυματισμού μέσω υπερβολικής σωματικής επιβάρυνσης
- Προετοιμασία βάσης
- Τοποθέτηση πλυντηρίου σε βάση
- Τοποθέτηση στεγνωτηρίου στη βάση
- Τοποθέτηση τοιχωμάτων βάσης
- APCL 15/30 stand installation instructions
- Danger due to incorrect service work
- Measures to be carried out before starting any service work
- Measures to be carried out after service work has been completed
- Risk of cuts
- Risk of injury due to excessive physical strain
- Stand preparation
- Installing a washer on the stand
- Installing a dryer on the stand
- Installing the stand panels
- Instrucciones de montaje APCL zócalo 15/30
- Peligro debido a trabajos de mantenimiento inadecuados
- Medidas antes de realizar trabajos de mantenimiento en el aparato
- Medidas después de realizar trabajos de mantenimiento en el aparato
- Peligro de sufrir cortes al realizar trabajos de mantenimiento
- Peligro de lesiones por esfuerzo físico elevado
- Preparar el zócalo
- Montar la lavadora sobre el zócalo
- Montar la secadora en el zócalo
- Montar las paredes del zócalo
- Asennusohje – Jalusta APCL 15/30
- Asiattomien korjausten aiheuttama vaaratilanteiden vaara
- Ennen asennustöiden aloittamista suoritettavat toimenpiteet
- Huoltotöiden jälkeen suoritettavat toimenpiteet
- Huoltotöiden yhteydessä on olemassa viiltohaavojen vaara
- Liian suuren fyysisen rasituksen aiheuttama loukkaantumisvaara
- Jalustan esivalmistelu
- Pesukoneen asennus jalustalle
- Kuivausrummun asennus jalustalle
- Jalustan seinien asennus
- Notice de montage socle APCL 15/30
- Danger en cas de travaux de maintenance non conformes.
- Mesures à prendre avant la réalisation de travaux de maintenance sur l’appareil
- Mesures à respecter après la réalisation des travaux de maintenance sur l'appareil
- Risque de coupure lors des travaux d'entretien
- Risque de blessures dus à un effort physique excessif
- Préparation du socle
- Installer le lave-linge sur le socle
- Monter le sèche-linge sur le socle
- Monter les parois du socle
- Upute za ugradnju APLC postolja 15/30
- Opasnost uzrokovana nestručnim radovima održavanja
- Mjere koje se provode prije radova održavanja na uređaju
- Mjere nakon što su izvršeni radovi održavanja na uređaju
- Opasnost od posjekotina pri radovima održavanja
- Opasnost od ozljeda uzrokovanih pretjeranim tjelesnim naporom
- Priprema postolja
- Ugradnja perilice rublja na postolje
- Ugradnja sušilice rublja na postolje
- Ugradnja stijenki podnožja
- Montageanweisung APCL Sockel 15/30
- Szakszerűtlen karbantartás miatti veszély
- A készüléken végzett karbantartási munkák előtti teendők
- A készüléken végzett karbantartási munkák utáni teendők
- Vágásos sérülések veszélye a karbantartás során
- Túlzott fizikai terhelés okozta sérülésveszély
- Lábazat előkészítése
- Mosógép felszerelése a lábazatra
- Szárítógép felszerelése a lábazatra
- Lábazat oldalfalainak felszerelése
- Istruzioni di montaggio APCL zoccolo 15/30
- Pericoli dovuti a lavori di manutenzione non corretti
- Misure da intraprendere prima di effettuare lavori di riparazione sull'elettrodomestico
- Cosa fare dopo aver effettuato i lavori di riparazione sulla macchina
- Pericolo di ferimento da taglio in caso di lavori di riparazione/manutenzione
- Pericolo di ferimento a causa di eccessiva sollecitazione fisica
- Preparare lo zoccolo
- Montare la lavatrice sullo zoccolo
- Montare l'asciugatrice sullo zoccolo
- Montare le pareti dello zoccolo
- Montage-instructie APCL sokkel 15/30
- Risico door ondeskundig onderhoud
- Wat u moet doen voordat er werkzaamheden aan het apparaat worden uitgevoerd
- Wat u moet doen na voltooiing van de werkzaamheden
- U kunt zich snijden bij onderhouds-/reparatiewerkzaamheden
- Kans op letsel door te hoge lichamelijke inspanning
- Sokkel voorbereiden
- Wasmachine op de sokkel monteren
- Droger op de sokkel monteren
- De zijkanten van de sokkel monteren
- Monteringsanvisning for sokkel APCL 15/30
- Fare pga. vedlikeholdsarbeider som ikke er forskriftsmessig utført
- Forholdsregler før vedlikeholdsarbeid på maskinen blir utført
- Forholdsregler etter at vedlikeholdsarbeid på produktet er blitt utført
- Fare for kuttskader under vedlikeholdsarbeid
- Fare for skade pga. overdreven fysisk belastning
- Klargjøre sokkelen
- Montere vaskemaskinen på sokkelen
- Montere tørketrommelen på sokkelen
- Montere sokkelvegger
- Instrukcja montażu cokołu APCL 15/30
- Zagrożenie na skutek nieprawidłowo przeprowadzonych prac konserwacyjnych
- Czynności do wykonania przed rozpoczęciem prac instalacyjnych na urządzeniu
- Czynności do wykonania po wykonaniu prac instalacyjnych na urządzeniu
- Niebezpieczeństwo ran ciętych podczas prac instalacyjnych
- Niebezpieczeństwo obrażeń spowodowane nadmiernym obciążeniem fizycznym
- Przygotowanie cokołu
- Montaż pralnicy na cokole
- Montaż suszarki na cokole
- Montaż ścianek cokołu
- Instruções de montagem da sapata APCL 15/30
- Perigo devido a trabalhos de manutenção inadequados
- Medidas antes de se realizarem trabalhos de reparação no aparelho
- Medidas após a realização de trabalhos de reparação no aparelho
- Perigo de lacerações durante a realização dos trabalhos de manutenção
- Perigo de lesões por esforço físico excessivo
- Preparar a sapata
- Montar a máquina de lavar roupa sobre a sapata
- Montar o secador de roupa sobre a sapata
- Montar os painéis da sapata
- Инструкция по монтажу цоколя APCL 15/30
- Опасности, возникающие при ненадлежащем выполнении ремонтных работ
- Действия, которые необходимо выполнить до проведения технического обслуживания и ремонта прибора
- Действия, которые необходимо выполнять после технического обслуживания и ремонта прибора
- Опасность порезов в ходе проведения ремонтных работ и технического обслуживания
- Риск травмы из-за физического перенапряжения
- Подготовка цоколя
- Монтаж стиральной машины на цоколь
- Монтаж сушильной машины на цоколь
- Монтаж стенок цоколя
- Návod na montáž podstavca APCL 15/30
- Nebezpečenstvo z dôvodu neodborných údržbárskych prác
- Opatrenia pred vykonávaním údržbárskych prác na spotrebiči
- Opatrenia po vykonaní údržbárskych prác na spotrebiči
- Nebezpečenstvo rezného poranenia pri údržbárskych prácach
- Nebezpečenstvo poranenia v dôsledku nadmerného telesného namáhania
- Príprava podstavca
- Montáž práčky na podstavec
- Montáž sušičky na podstavec
- Montáž stien podstavca
- Navodila za montažo podnožja APCL 15/30
- Nevarnost zaradi nestrokovnih vzdrževalnih posegov
- Ukrepi pred izvedbo del na stroju
- Ukrepi po izvedbi del na stroju
- Nevarnost ureznin pri vzdrževalnih posegih
- Nevarnost poškodbe zaradi čezmerne telesne obremenitve
- Priprava podnožja
- Montaža pralnega stroja na podnožje
- Montaža sušilnega stroja na podnožje
- Montaža sten podnožja
- Uputstvo za montažu APCL postolja 15/30
- Opasnost zbog neadekvatnog održavanja
- Mere koje se preduzimaju pre obavljanja radova na održavanju uređaja
- Mere koje se preduzimaju nakon obavljanja radova na održavanju uređaja.
- Rizik od povreda tokom radova na održavanju
- Rizik od povreda usled preteranog fizičkog naprezanja
- Pripremite postolje
- Montirajte mašinu za pranje veša na postolje
- Montirajte mašinu za sušenje rublja na postolje
- Montirajte zidove postolja
- Monteringsanvisning APCL-sockel 15/30
- Fara på grund av felaktigt utförda servicearbeten
- Innan några servicearbeten utförs på maskinen måste följande åtgärdas:
- Innan några servicearbeten utförs på maskinen måste följande åtgärdas:
- Risk för skärskador under servicearbeten
- Risk för personskador på grund av för stor belastning
- Förbereda sockeln
- Montera tvättmaskin på sockel
- Montera torktumlare på sockeln
- Montera sockelväggarna
- APCL baza 15/30 montaj talimatı
- Hatalı servis çalışmaları sonucu tehlike
- Cihazda servis çalışmaları yapılmadan önce alınması gereken tedbirler
- Cihazda servis çalışmaları yapıldıktan sonra alınması gereken tedbirler
- Servis çalışmaları sırasında kesik yaralanmaları tehlikesi
- Aşırı fiziksel zorlama nedeniyle yaralanma tehlikesi
- Bazanın hazırlanması
- Çamaşır makinesinin bazaya monte edilmesi
- Kurutma makinesinin bazaya monte edilmesi
- Baza panellerinin monte edilmesi

Umbau- und Montageanweisung
M.-Nr. 11313351 8 von 50
Diese Unterlagen dürfen ohne unsere Genehmigung weder vervielfältigt noch Dritten zugänglich gemacht werden. Eigentumsrechte vorbehalten. 12.05.2021
Risk of cuts during service and maintenance work
WARNING
Components may have sharp edges.
There is a risk of cuts during service and maintenance work.
A Protective gloves should be worn.
Danger of injury due to excess physical strain
WARNING
Danger of injury due to excess physical strain.
Spinal injuries.
A The relation of the weight of the machines to the physical strength of the technician must be taken into account.
For machine weight details, see the operating instructions.
Preparing the plinth
A Use 2 screws (6x12) to attach each of the clamping plates to the rear of the plinth, see Fig.1.
The arrow embossed on the top of the plinth points to the front, see Fig.1.
A Level the plinth on the floor.
A Mark the hole positions.
A Drill holes measuring 12mm in diameter in the marked positions, to a depth of approximately 65mm.
A Insert plugs (5) into the holes, see Fig.2.
A Line the plinth up with the underlay supplied (4), see Fig.2.
A Fasten the plinth to the floor with the hexagonal-head wood screws (1), 8.4 washers (2) and 15x44x3 washers (3),
see Fig.2.
Fitting a washing machine to the plinth
A Fit the tensioning strips on the plinth and fasten them in the appropriate holes (1), see Fig.3.
A Secure each tensioning strip to the plinth with 1 M6x30 bolt (1), 2 galvanised B6.4 washers (2) and 1 M6 nut (3).
Do not tighten the nuts yet, see Fig.4.
A Unscrew the washing machine feet by at least 5mm.
A Set the washing machine down on the plinth and slide it into the clamping plates with the rear feet.
A Level the washing machine on the plinth.
A Use the tensioning strips to fix the washing machine to the front feet, see Fig.4.
A Fit another M6 nut (4) to each of the feet to counter the first nut, see Fig.4.
A Screw 1 M6x20 screw (1) into each of the clamping plates and tighten, see Fig.5.
Fitting a tumble dryer to the plinth
A Unscrew the tumble dryer feet by at least 5mm.
A Set the tumble dryer down on the plinth and slide it into the clamping plates with the rear feet.
A Level the tumble dryer on the plinth.
A Screw 1 M6x20 screw (1) into each of the clamping plates and tighten, see Fig.6.
Fitting the plinth panels
A Use 4 M4x25 screws to attach each of the 2 side panels, see Fig.7.