
Manual
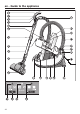


Table Of Contents
- Titelseite
- Inhalt
- Inhalt
- Sicherheitshinweise und Warnungen
- Gerätebeschreibung
- Ihr Beitrag zum Umweltschutz
- Anmerkung zu den Europäischen Verordnungen (EU) Nr. 665/2013 (länderabhängig) und (EU) Nr. 666/2013
- Abbildungsverweise
- Anschließen
- Saugschlauch anschließen (Abb. 01 + 02)
- Saugschlauch und Handgriff zusammenstecken (Abb. 03)
- Handgriff und Saugrohr zusammenstecken (Abb. 04)
- Teleskoprohr und umschaltbare Bodendüse zusammenstecken (Abb. 05)
- Batterien in LED-Handgriff einlegen (Abb. 06 + 07)
- Aktivierung der Abluftfilter-Wechselanzeige timestrip am Abluftfilter
- Funktion der Abluftfilter-Wechselanzeige timestrip
- Verwendung des mitgelieferten Zubehörs (Abb. 14)
- Gebrauch
- Saugpinsel am Eco Comfort -Handgriff einstellen (Abb. 16)
- Teleskoprohr einstellen (Abb. 17)
- Umschaltbare Bodendüse einstellen (Abb. 18, 19 + 20))
- Umschaltbare Bodendüse (Abb. 21)
- Anschlusskabel herausziehen (Abb. 22)
- Anschlusskabel aufrollen (Abb. 23)
- Ein- und Ausschalten (Abb. 24)
- Saugleistung wählen
- Fußtasten (Abb. 25)
- Fußtasten mit Anwahlmöglichkeit der Saugleistungs-Zwischenstufen
- Fußtasten mit Funktion Boost (Abb. 26 + 27)
- Funkhandgriff (Abb. 28)
- Funkhandgriff mit Funktion Boost
- Nebenluftsteller öffnen (Abb. 29 + 30)
- Beim Saugen
- Betrieb unterbrechen (Abb. 28)
- Arbeitsbereich ausleuchten (Abb. 34)
- Abstellen, Transportieren und Aufbewahren
- Wartung
- Bezugsquellen für Staubbeutel und Filter
- Staubbeutel-Wechselanzeige (Abb. 37)
- Zur Prüfung
- Funktion der Staubbeutel-Wechselanzeige
- Staubbeutel entnehmen (Abb. 38)
- Staubbeutel einsetzen (Abb. 39)
- Motorschutzfilter austauschen (Abb. 40)
- Zeitpunkt des Abluftfilterwechsels
- Abluftfilter AirClean austauschen (Abb. 41 + 42)
- Abluftfilter AirClean Plus 50 , Silence AirClean 50 , Active AirClean 50 und HEPA AirClean 50 austauschen (Abb. 43 + 44)
- Abluftfilter umrüsten (Abb. 08)
- Beim Umrüsten beachten
- Serviceanzeige mit Resettaste (Abb. 45)
- Zeitpunkt des Batteriewechsels am Funkhandgriff
- Batterie am Funkhandgriff austauschen (Abb. 46)
- Zeitpunkt des Batteriewechsels am LED-Handgriff
- Batterie am LED-Handgriff austauschen (Abb. 06 + 07)
- Fadenheber austauschen (Abb. 47)
- Laufrolle der Bodendüse AllTeQ reinigen (Abb. 48)
- Pflege
- Was tun, wenn ...
- Technische Daten
- Konformitätserklärung
- Kundendienst
- Nachkaufbares Zubehör
- Bodendüsen/-bürsten
- Bodendüse AllergoTeQ (SBDH 285-3)
- Turbobürste TurboTeQ (STB 305-3) / Turbobürste Turbo (STB 205-3)
- Bodenbürste Hardfloor (SBB 235-3)
- Bodenbürste Parquet Twister mit Drehgelenk (SBB 300-3)
- Bodenbürste Parquet Twister XL mit Drehgelenk (SBB 400-3)
- Sonstiges Zubehör
- Handturbobürste Turbo XS (STB 20) / Handturbobürste Turbo Mini (STB 101)
- Universalbürste (SUB 20)
- Lamellen-/Heizkörperbürste (SHB 30)
- Matratzendüse (SMD 10)
- Fugendüse, 300 mm (SFD 10)
- Fugendüse, 560 mm (SFD 20)
- Polsterdüse, 190 mm (SPD 10)
- Comfort-Handgriff mit Beleuchtung (SGC 20)
- Filter
- Abluftfilter AirClean Plus 50 (SF-AP 50)
- Abluftfilter Silence AirClean 50 (SF-SA 50)
- Abluftfilter Active AirClean 50 (SF-AA 50)
- Abluftfilter HEPA AirClean 50 (SF-HA 50)
- Filtergitter
- Contents
- Warning and Safety instructions
- Guide to the appliance
- Caring for the environment
- Notes on Delegated Regulation (EU) No. 665/2013 (country-specific) and 666/2013
- Illustrations
- Connection
- Attaching the suction hose (Fig. 01 + 02)
- Connecting the suction hose to the handle (Fig. 03)
- Connecting the handle to the suction tube (Fig. 04)
- Connecting the telescopic tube to the floorhead (Fig. 05)
- Inserting batteries into the LED handle (Fig. 06 + 07)
- Activating the timestrip filter change indicator on the exhaust filter
- How the exhaust filter timestrip change indicator works
- Using the accessories supplied (Fig. 14)
- Use
- Adjusting the dusting brush integrated in the Eco Comfort handle (Fig. 16)
- Adjusting the telescopic suction tube (Fig. 17)
- Adjusting the floorhead (Fig. 18, 19 + 20)
- Adjustable floorhead (Fig. 21)
- Unwinding the mains cable (Fig. 22)
- Rewinding the cable (Fig. 23)
- To switch on and off (Fig. 24)
- To regulate the suction power
- Foot controls (Fig. 25)
- Footswitches with the option of selecting interim suction power levels
- Footswitch with Boost function (Fig. 26 + 27)
- Radio-control handle (Fig. 28)
- Radio-control handle with Boost function
- Radio-control handle with Auto function
- Opening the air inlet valve (Fig. 29 + 30)
- During vacuuming
- Interrupting operation (Fig. 28)
- Illuminating the work area (Fig. 34)
- Setting down, transportation and storage
- Maintenance
- Purchasing dustbags and filters
- Airflow indicator (Fig. 37)
- To check the airflow indicator
- How the airflow indicator works
- Remove the dustbag (Fig. 38)
- Fitting a dustbag (Fig. 39)
- Replacing the motor protection filter (Fig. 40)
- Replacing the exhaust filter
- Replacing the AirClean filter (Fig. 41 + 42)
- Replacing the AirClean Plus 50 , Silence AirClean 50 , Active AirClean 50 and HEPA AirClean 50 exhaust filters (Fig. 43 + 44)
- Replacing one type of exhaust filter with another (Fig. 08)
- When changing the filter, please note
- Maintenance indicator with reset button (Fig. 45)
- When to replace the battery in the radio-control handle
- How to change the battery in the radio-control handle (Fig. 46)
- When to replace the battery in the LED handle
- How to change the battery in the LED handle (Fig. 06 + 07)
- Replacing the thread lifters (Fig. 47)
- Cleaning the roller on the AllTeQ floorhead (Fig. 48)
- Cleaning and care
- Problem solving guide
- Technical data
- Conformity declaration
- Service
- Optional accessories
- Floorheads / brushes
- AllergoTeQ floorhead (SBDH 285-3)
- Turbobrush TurboTeQ (STB 305-3) / Turbobrush Turbo (STB 205-3)
- Hard floorbrush (SBB 235-3)
- Parquet Twister floorbrush with swivel action (SBB 300-3)
- Parquet Twister XL floorbrush with swivel action (SBB 400-3)
- Other accessories
- Flexible Mini Turbobrush XS (STB 20) / Turbo Mini (STB 101)
- Universal brush (SUB 20)
- Radiator brush (SHB 30)
- Mattress nozzle (SMD 10)
- Crevice nozzle, 300 mm (SFD 10)
- Crevice nozzle, 560 mm (SFD 20)
- Upholstery nozzle, 190 mm (SPD 10)
- Comfort handle with lighting (SGC 20)
- Filters
- AirClean Plus 50 exhaust filter (SF-AP 50)
- Exhaust filter Silence AirClean 50 (SF-SA 50)
- Active AirClean 50 exhaust filter (SF-AA 50)
- HEPA AirClean 50 exhaust filter (SF-HA 50)
- Filter grille
- Electrical connection for the UK
- Electrical connection AU, NZ
- Table des matières
- Consignes de sécurité et mises en garde
- Description de l'appareil
- Votre contribution à la protection de l'environnement
- Notes sur les directives européennes 665/2013 (en fonction du pays) et 666/2013 (UE)
- Références des croquis
- Raccordement
- Raccordement du flexible d'aspiration (croquis 01 + 02)
- Assemblage du flexible et de la poignée (croquis 03)
- Raccordement du flexible et du tube d'aspiration (croquis 04)
- Assemblage du tube télescopique et de la brosse double position (croquis 05)
- Insérer les piles dans la poignée à LED (croquis 06 + 07)
- Activation de l'indicateur de saturation du filtre timestrip sur le filtre d'évacuation
- Fonction de l'indicateur de saturation du filtre timestrip
- Utilisation des accessoires fournis (croquis 14)
- Utilisation
- Réglage de la brosse à meubles sur poignée Eco Comfort (croquis 16)
- Réglage du tube télescopique (croquis 17)
- Réglage de la brosse double position (croquis 18, 19 + 20)
- Brosse double position (croquis 21)
- Sortir le câble d'alimentation (croquis 22)
- Enroulement du câble d'alimentation (croquis 23)
- Mise en marche et arrêt (croquis 24)
- Sélection de la puissance d’aspiration
- Pédales (croquis 25)
- Touches à commande au pied avec possibilité de sélection des niveaux intermédiaires de puissance d'aspiration
- Pédales avec fonction Boost (croquis 26 + 27)
- Poignée avec commande à distance (croquis 28)
- Poignée avec fonction Boost
- Ouvrir le curseur d'air additionnel (croquis 29 + 30)
- Pendant l'aspiration
- Interrompre le fonctionnement de l'aspirateur (croquis 28)
- Eclairer la zone de travail (croquis 34)
- Transport et rangement
- Maintenance
- Commande pour sacs à poussière et filtres
- Jauge de remplacement du sac à poussière (croquis 37)
- Vérification
- Fonctionnement de la jauge de remplacement du sac à poussière
- Retirer le sac à poussière (croquis 38)
- Mise en place du sac à poussière (croquis 39)
- Remplacer le filtre de protection moteur (croquis 40)
- Date de remplacement du sac à poussière
- Remplacer le filtre d'évacuation AirClean (croquis 41 + 42)
- Remplacer le filtre d'évacuation AirClean Plus 50 , Silence AirClean 50 , Active AirClean 50 et HEPA AirClean 50 (croquis 43 + 44)
- Changer le type de filtre d'évacuation (croquis 08)
- Conseils en cas de changement du type de filtre
- Témoin de saturation des filtres avec touche Reset (croquis 45)
- Date de remplacement des piles sur la poignée
- Remplacer la pile sur la poignée avec télécommande (croquis 46)
- Date de remplacement des piles sur la poignée LED
- Remplacer la pile sur la poignée LED (croquis 06 + 07)
- Remplacer les ramasse-fils (croquis 47)
- Nettoyage des roulettes de la brosse AllTeQ (croquis 48)
- Entretien
- En cas d'anomalie
- Caractéristiques techniques
- Déclaration de conformité
- Service après-vente
- Accessoires en option
- Brosses / Suceurs
- Brosse AllergoTeQ (SBDH 285-3)
- Turbobrosse TurboTeQ (STB 305-3) / Turbobrosse Turbo (STB 205-3)
- Brosse Hardfloor (SBB 235-3)
- Brosse Parquet Twister multidirectionnelle (SBB 300-3)
- Brosse Parquet Twister XL (SBB 400-3)
- Autres accessoires
- Mini turbobrosse XS (STB 20)/ Mini turbobrosse (STB 101)
- Brosse universelle (SUB 20)
- Brosse pour radiateurs et interstices (SHB 30)
- Suceur plat pour matelas (SMD 10)
- Suceur plat extra long 300 mm (SFD 10)
- Suceur plat extra long 560 mm (SFD 20)
- Suceur à coussins 190 mm (SPD 10)
- Poignée Confort avec fonction Spotlight (SGC 20)
- Filtres
- Filtre d'évacuation AirClean Plus 50 (SF-AP 50)
- Filtre d'évacuation Silence AirClean 50 (SF-SA 50)
- Filtre à évacuation Active AirClean 50 (SF-AA 50)
- Filtre d'évacuation HEPA AirClean 50 (SF-HA 50)
- Grille de filtre
- Indice
- Istruzioni di sicurezza e avvertenze
- Descrizione apparecchio
- Il Vostro contributo alla tutela dell'ambiente
- Indicazioni sui regolamenti europei (UE) n. 665/2013 (in base al paese) e (UE) n. 666/2013
- Nota relativa alle immagini
- Allacciamento
- Allacciare il tubo flessibile (Fig. 01 + 02)
- Collegare impugnatura e tubo flessibile (Fig. 03)
- Collegare impugnatura e tubo aspirante (Fig. 04)
- Collegare il tubo telescopico e la bocchetta a pavimento commutabile (Fig. 05)
- Inserire le batterie nell'impugnatura a LED (Fig. 06 + 07)
- Attivare l'indicatore saturazione filtro aria in uscita timestrip sul filtro aria in uscita
- Funzione dell'indicatore saturazione filtro aria in uscita timestrip
- Uso degli accessori in dotazione (Fig. 14)
- Uso
- Regolare il pennello sull'impugnatura Eco Comfort (Fig. 16)
- Regolare la lunghezza del tubo telescopico (Fig. 17)
- Impostare la bocchetta commutabile (Fig. 18, 19 + 20)
- Bocchetta commutabile (Fig. 21)
- Estrarre il cavo di alimentazione (Fig. 22)
- Avvolgere il cavo (Fig. 23)
- Accensione e spegnimento (Fig. 24)
- Impostare la potenza aspirante
- Tasti a pedale (Fig. 25)
- Tasti a pedale con possibilità di selezionare i livelli intermedi di potenza aspirante
- Tasti a pedale con funzione Boost (Fig. 26 + 27)
- Radiocomando (Fig. 28)
- Impugnatura con radiocomando e funzione Boost
- Aprire l'aria secondaria (Fig. 29 + 30)
- Durante l'aspirazione
- Interrompere il procedimento (Fig. 28)
- Illuminare la superficie da aspirare (Fig. 34)
- Sospendere il lavoro, trasportare l'aspirapolvere e riporlo
- Manutenzione
- Fonti di riferimento per sacchetti polvere e filtri
- Spia sostituzione sacchetto (Fig. 37)
- Verificare il grado di saturazione del sacchetto
- Funzionamento della spia sostituzione sacchetto
- Rimuovere il sacchetto polvere (Fig. 38)
- Inserire il sacchetto polvere (Fig. 39)
- Sostituire il filtro motore (Fig. 40)
- Sostituzione del filtro aria in uscita
- Sostituire il filtro aria in uscita AirClean (Fig. 41 + 42)
- Sostituire il filtro aria in uscita AirClean Plus 50 , Silence AirClean 50 , Active AirClean 50 e HEPA AirClean 50 (Fig. 43 + 44)
- Cambiare filtro aria in uscita (Fig. 08)
- Da tenere presente quando si cambia tipo di filtro
- Spia di servizio con tasto reset (Fig. 45)
- Sostituzione della batteria sul radiocomando
- Sostituire la batteria sul radiocomando (Fig. 46)
- Sostituzione della batteria sull'impugnatura LED
- Sostituire la batteria sull'impugnatura LED (Fig. 06 + 07)
- Sostituire gli alzafili (Fig. 47)
- Pulire le rotelle della bocchetta AllTeQ (Fig. 48)
- Pulizia / Manutenzione
- Cosa fare se...
- Dati tecnici
- Dichiarazione di conformità
- Assistenza tecnica
- Accessori su richiesta
- Bocchette / Spazzole
- Bocchetta a pavimento AllergoTeQ (SBDH 285-3)
- Turbospazzola TurboTeQ (STB 305-3) / Turbospazzola Turbo (STB 205-3)
- Spazzola pavimenti Hardfloor (SBB 235-3)
- Spazzola pavimenti Parquet Twister con snodo (SBB 300-3)
- Spazzola pavimenti Parquet Twister XL con snodo (SBB 400-3)
- Altri accessori
- Turbospazzola a mano Turbo XS (STB 20) / Turbospazzola Turbo Mini (STB 101)
- Spazzola universale (SUB 20)
- Spazzola a lamelle / spazzola per termosifoni (SHB 30)
- Bocchetta per materassi (SMD 10)
- Bocchetta a lancia, 300 mm (SFD 10)
- Bocchetta a lancia, 560 mm (SFD 20)
- Bocchetta per poltrone, 190 mm (SPD 10)
- Impugnatura Comfort con illuminazione (SGC 20)
- Filtri
- Filtro aria in uscita AirClean Plus 50 (SF-AP 50)
- Filtro aria in uscita Silence AirClean 50 (SF-SA 50)
- Filtro aria in uscita Active AirClean 50 (SF-AA 50)
- Filtro aria in uscita HEPA AirClean 50 (SF-HA 50)
- Griglia filtro
- Inhoud
- Veiligheidsinstructies en waarschuwingen
- Beschrijving van het apparaat
- Een bijdrage aan de bescherming van het milieu
- Informatie met betrekking tot de Europese verordeningen (EU) nr. 665/2013 (landafhankelijk) en (EU) nr. 666/2013
- Verwijzing naar afbeeldingen
- Aansluiten
- Zuigslang aansluiten (afb. 01 + 02)
- Zuigslang en greep in elkaar schuiven (afb. 03)
- Greep en zuigbuis in elkaar schuiven (afb. 04)
- Telescopische zuigbuis en omschakelbare zuigmond in elkaar steken (afb. 05)
- Batterijen in de greep plaatsen (afb. 06 + 07)
- Activering indicator uitblaasfilter (timestrip )
- Functie indicator uitblaasfilter (timestrip )
- Gebruik van de accessoires (afb. 14)
- Gebruik
- Reliëfborstel aan de Eco Comfort -handgreep instellen (afb. 16)
- Telescopische zuigbuis instellen (afb. 17)
- Omschakelbare zuigmond instellen (afb. 18, 19 + 20)
- Omschakelbare zuigmond (afb. 21)
- Aansluitsnoer uitrollen (afb. 22)
- Aansluitsnoer oprollen (afb. 23)
- In- en uitschakelen (afb. 24)
- Zuigvermogen kiezen
- Voetpedalen (afb. 25)
- Voetpedalen met mogelijkheid vermogenstussenstanden te kiezen
- Voetpedalen met “Boost”-functie (afb. 26 + 27)
- Handgreepbediening (afb. 28)
- Handgreep met “Boost”-functie
- Mechanische zuigkrachtregelaar (afb. 29 + 30)
- Tijdens het zuigen
- Pauzeren (afb.28)
- Verlichting van het te reinigen oppervlak (afb. 34)
- Transporteren en opbergen
- Onderhoud
- Waar kunt u stofcassettes en filters krijgen?
- Stofstandindicator (afb. 37)
- Controle of de stofcassette vol is
- Wat u moet weten over de stofstandindicator
- De stofcassette verwijderen (afb. 38)
- De stofcassette plaatsen (afb. 39)
- Het motorfilter vervangen (afb. 40)
- Tijdstip, waarop u het uitblaasfilter dient te vervangen
- Uitblaasfilter AirClean vervangen (afb. 41 + 42)
- Uitblaasfilter AirClean Plus 50 , Silence AirClean 50 , Active AirClean 50 en HEPA AirClean 50 vervangen (afb. 43 + 44)
- Een ander uitblaasfilter plaatsen (afb. 08)
- Belangrijk!
- Controlelampje met reset-toets (afb. 45)
- Tijdstip van vervanging van de batterij in de handgreep
- De batterij in de handgreep vervangen (afb. 46)
- Tijdstip voor het vervangen van de batterij op de LED-handgreep
- De batterijen van de LED-handgreep vervangen (afb. 06 + 07)
- De draadopnemers vervangen (afb. 47)
- Loopwieltje van de zuigmond AllTeQ reinigen (afb. 48)
- Onderhoud
- Nuttige tips
- Technische gegevens
- Conformiteitsverklaring
- Service
- Bij te bestellen accessoires
- Zuigmonden / borstels
- Zuigmond AllergoTeQ (SBDH 285-3)
- Turboborstel TurboTeQ (STB 305-3) / Turboborstel Turbo (STB 205-3)
- Borstel Hardfloor (SBB 235-3)
- Borstel Parquet Twister met draaigewricht (SBB 300-3)
- Borstel Parquet Twister XL met draaigewricht (SBB 400-3)
- Overige accessoires
- Handturboborstel Turbo XS (STB 20) / Handturboborstel Turbo Mini (STB 101)
- Universele borstel (SUB 20)
- Lamellen-/radiatorborstel (SHB 30)
- Matraszuigmond (SMD 10)
- Kierenzuiger, 300 mm (SFD 10)
- Kierenzuiger, 560 mm (SFD 20)
- Meubelzuigmond, 190 mm (SPD 10)
- Comfort-greep met verlichting (SGC 20)
- Filters
- Uitblaasfilter AirClean Plus 50 (SF-AP 50)
- Uitblaasfilter Silence AirClean 50 (SF-SA 50)
- Uitblaasfilter Active AirClean 50 (SF-AA 50)
- Uitblaasfilter HEPA AirClean 50 (SF-HA 50)
- Filterrooster
- Inhalt
- Leere Seite
- Leere Seite

en
49
Use
Adjusting the dusting brush
integrated in the Eco
Comforthandle(Fig. 16)
Some models are equipped with an Eco
Comforthandle.
The dusting brush is suitable for vacu-
uming scratch-resistant surfaces, e.g.
keyboards or vacuuming up crumbs.
Press the release button on the dust-
ing brush and push the brush out un-
til it clearly engages in position.
When you have finished dusting
press the release button and push the
brush back into its original position
until it clicks into place.
Adjusting the telescopic suction tube
(Fig. 17)
One part of the telescopic tube is
packed inside the other, and it can be
adjusted to suit your height for comfort-
able vacuuming.
Grasp the release mechanism and
adjust the telescopic suction tube to
the required length.
Adjusting the
floorhead(Fig. 18, 19 + 20)
Depending on the model, your vacuum
cleaner will be fitted as standard with
one of the floorheads illustrated.
This vacuum cleaner can be used for
daily cleaning of carpets, rugs and ro-
bust hard flooring.
Miele offers a range of other floorheads,
brushes and accessories for other types
of flooring and special applications (see
“Optional accessories”).
Please observe the flooring manu-
facturer’s cleaning and care instruc-
tions.
Clean hard flooring which is not sus-
ceptible to scratching, as well as floor-
ing with gaps or deep crevices in it with
the brush protruding:
Press the foot control.
This type of flooring can be briefly va-
cuumed with the brush retracted. Car-
pets and rugs should be vacuumed with
the brush retracted:
Press the foot control.
If the suction power of the adjustable
floorhead seems too high, reduce the
suction until the floorhead is easier
to manoeuvre (see “Use” – “Regulat-
ing the suction power”).
Adjustable floorhead (Fig. 21)
The adjustable floorhead can also be
used for vacuuming the stairs.
For safety reasons when vacu-
uming stairs, it is best to start at the
bottom of the stairs and move up-
wards.
Unwinding the mains cable (Fig. 22)
Pull the mains cable out to the re-
quired length.
Insert the plug into the socket.
If vacuuming for longer than 30
minutes, the cable must be pulled
out all the way. There is a risk of
overheating and damage.