Installation Instructions CS1212 I CS1221 I en - CA Installation, repair and maintenance work should be performed by a Miele authorized service technician in accordance with national and local safety regulations and the provided installation instructions.
IMPORTANT SAFETY INSTRUCTIONS Children WARNING- When using your appliance follow basic precautions, including the following: ~ Activate the Child Safety Lock so Read all instructions before installation or use to prevent injury and appliance damage. unattended in an area where the appliance is in use. Never allow children to sit or stand on any part of the appliance. Caution: Do not store items of interest to children in cabinets above the appliance.
IMPORTANT SAFETY INSTRUCTIONS Technical Safety ~ Installation, repair and maintenance work should be performed by a Miele authorized service technician. Work by unqualified persons could be dangerous and may void the warranty. ~ Before installing the combiset, check for externally visible damage. Do not operate a damaged appliance. ~ To guarantee the electrical safety of this appliance, continuity must exist between the appliance and an effective grounding system.
IMPORTANT SAFETY INSTRUCTIONS ~ Do not cook on a broken combiset. Any breakages or cracks in the ceramic surface of the appliance are defects and must be treated as such. If the combiset should break, cleaning solutions and spills may penetrate the broken combiset and create a risk of electric shock. Do not use the appliance until it has been repaired. Safety ~ Individuals with a pacemaker or similar medical device: Please note that an electromagnetic field develops when the combiset is turned on.
IMPORTANT SAFETY INSTRUCTIONS ~ Do not store items on the appliance when not in use. Items could melt or catch fire from residual heat or if the appliance is turned on inadvertently. Always switch the cooking zone(s) off after use. ~ Flammable materials should not be stored on or near the appliance. ~ The combiset is fitted with a cooling fan. Drawers under the combiset are not recommended.
IMPORTANT SAFETY INSTRUCTIONS ~ Pot and pan handles should be turned inward and not extend over the countertop to reduce the risk of burns, ignition of flammable materials, and spills. ~ Do not use pots or pans with pronounced edges or ridges on the ceramic combiset. These could scratch the combiset permanently. See "Cookware" for more information. Grains of salt and sand can cause scratches. Make sure that the bases of any pots and pans are clean, free of any fat or oils, and are dry.
SAFETY INSTRUCTIONS FOR INSTALLATION Note to the installer: Please leave this instruction book with the consumer for the local electrical inspector’s use. The minimum distances given in these Installation Instructions must be observed in order to ensure safe operation. Failure to do so increases the risk of fire. The cabinetry and venting hood should be installed first to prevent damage to the appliance.
SAFETY INSTRUCTIONS FOR INSTALLATION Safety distances above the appliance If there is more than one appliance beneath a hood (e.g. wok burner and electric combiset), and they have different minimum safety distances always observe the greater distance. The minimum safety distance given by the hood manufacturer must be maintained between the combiset and the hood above it. See the installation instructions of the hood for these safety measurements.
SAFETY INSTRUCTIONS FOR INSTALLATION Safety distances to the sides of the appliance The appliance should only be installed as shown in the illustrations, while maintaining the required safety distances shown. Do not install the appliance between two tall cabinets, this is a fire hazard. A distance of at least 2" (50 mm) must be kept between the countertop cut-out and the rear wall because of the high temperatures radiated.
Installation Safety distance when installing the appliance near a wall with trim or a back splash A minimum distance of 2" (50 mm) between the trim or back splash and the countertop cut-out if required. This distance is only necessary if these items are made of combustible materials e.g. wood. If the trim or back splash is made of a non-combustible material, the required safety distance can be reduced by the thickness of the wall covering material.
Installation Installation dimensions CS 1212 a Spring clips b Appliance front c Installation height d Power supply box with connection cable 34
Installation CS 1221 a Spring clips b Appliance front c Installation height d Power supply box with connection cable 35
Installation Cut out ^ Make the worktop cut-out for one or more appliances as applicable. Remember to maintain a minimum safety distance from the back wall, as well as from any tall unit or side wall to the right or left of the appliance(s). See also "SAFETY INSTRUCTIONS FOR INSTALLATION". ^ Seal the cut surfaces with a suitable sealant to avoid swelling caused by moisture. The materials used must be heat resistant.
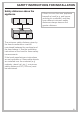
Installation Installation of multiple appliances When installing more than one combiset appliance, a support bar b must be installed between the appliances. Countertop cut-out two appliances D Countertop cut-out three appliances (5 19 11 00 + /1 6" -1 m m b ) D (5 -1 b C A For the installation of two appliances the width of the countertop cut-out D is the sum of A and C.
Installation Sample calculations for a countertop cut-out for three appliances 38 A appliance width minus 5/16" (8 mm) B appliance width C appliance width minus 5/16" (8 mm) D Countertop cut-out 11" (280 mm) 11 5/16" (288 mm) 11" (280 mm) 33 3/8" (848 mm) 11" (280 mm) 15" (380 mm) 14 5/8" (372 mm) 40 5/8" (1032 mm) 11" (280 mm) 22 11/16" (576 mm) 22 3/8" (568 mm) 56 1/16" (1424 mm) 14 5/8" (372 mm) 11 5/16" (288 mm) 11" (280 mm) 37" (940 mm) 14 5/8" (372 mm) 15" (380 mm) 14 5/8" (372
Installation " 3/16 1"5--130mm) (2 D 2" m) 0m (5 (50m " 2"m) 2"m) 3/16 m (50m 1"-130mm) (50 (25- 2"m) a a a b c (5 19 1 00 1/1 + 6" -1 m m ) c a a a B C 3/8" 5/8"/ 22mm) 8 4 1"/1 72/56 1 (280/3 6" 3/8" 11/1 2 2 " 2 2 8 / / / ) " 5 ) 6" 15 mm / 14 68mm 11 5/1 8//380/576 11"280/372/5 8 2 ( ( A a Spring clips b Support bars c Space between support bar and countertop An additional support bar is required for each additional appliance.
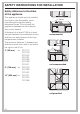
Installation Attach the spring clips and support bars Wood or solid surface countertops Granite countertop " " 1"-1 3/16 1"-1 (25-3 a b ^ Place the supplied spring clips a and the support bars b at the marked positions as shown above, by laying them on the upper edge of the cut-out and then securing them with the 1/8" x 1" (3.5 x 25 mm) screws (supplied). 40 ) 0mm ) 0mm (25-3 3/16 c a c b ^ Position and attach the spring clips a and support bars b with strong, double-sided tape c.
Installation a ^ Coat the edges of the spring clips a, d b ^ and the space d between the strips b and the countertop with silicone (supplied).
Installation Installing the appliance ^ Feed the power cord down through the cut-out. ^ Then place the front side of the appliance in the countertop cut-out. ^ Then with a hand on each side of the appliance press down evenly on the edges until it clicks into position. When doing so make sure that the appliance seal sits tightly on the countertop to ensure it is sealed correctly. Do not permanently seal into the countertop. ^ Connect the appliance to the main power supply.
Installation Sealing Tiled surfaces The appliance must not be permanently sealed into the countertop when installed. The sealing strip under the edge of the appliance provides a sufficient seal for the countertop. The grouting a and shaded area under the appliance frame must be flat and even, so that the frame will lie evenly and the sealing strip under the edge of the upper part of the appliance can provide an adequate seal against the countertop.
Electrical connection ,CAUTION: Before installation or servicing, disconnect the power supply by either removing the fuse, shutting off the main power supply or manually "tripping" the circuit breaker. Installation work and repairs should only be performed by a qualified technician in accordance with all applicable codes and standards. Repairs and service by unqualified persons could be dangerous and the manufacturer will not be held responsible.
Alteration rights reserved / 4608 For the most updated manual see the Miele web site. M.-Nr.