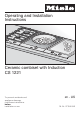
Operating and Installation Instructions Ceramic combiset with Induction CS 1221 To prevent accidents and appliance damage, read these instructions before installation or use. en - US M.-Nr.
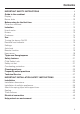
Contents IMPORTANT SAFETY INSTRUCTIONS. . . . . . . . . . . . . . . . . . . . . . . . . . . . . . . . . 4 Guide to the combiset . . . . . . . . . . . . . . . . . . . . . . . . . . . . . . . . . . . . . . . . . . . . . . 9 Display . . . . . . . . . . . . . . . . . . . . . . . . . . . . . . . . . . . . . . . . . . . . . . . . . . . . . . . . . . 10 Burner data . . . . . . . . . . . . . . . . . . . . . . . . . . . . . . . . . . . . . . . . . . . . . . . . . . . . . . 10 Before using for the first time. . . . .
IMPORTANT SAFETY INSTRUCTIONS WARNING- When using your gas appliance follow basic precautions, including the following: This gas combiset conforms to all uniform safety codes and regulations. Read all instructions before installation or use to prevent injury and appliance damage. These instructions contain important information on installation, safety, use and maintenance of this appliance. They will help you avoid injury and damage to the appliance.
IMPORTANT SAFETY INSTRUCTIONS Technical Safety ~ Installation, repair and maintenance work should be performed by a Miele authorized service technician. Work by unqualified persons could be dangerous and may void the warranty. ~ Be sure your appliance is properly installed and grounded by a qualified technician. ~ Before installing the combiset, check for externally visible damage. Do not operate a damaged appliance.
IMPORTANT SAFETY INSTRUCTIONS ~ Do not cook on a broken combiset. Any breakages or cracks in the ceramic surface of the appliance are defects and must be treated as such. If the combiset should break, cleaning solutions and spills may penetrate the broken combiset and create a risk of electric shock. Do not use the appliance until it has been repaired. ~ Protect your hands with oven mitts ~ Do not use the appliance until it has been properly installed in the countertop. ~ Do not heat unopened containers.
IMPORTANT SAFETY INSTRUCTIONS ~ The combiset is fitted with a cooling fan. Drawers under the combiset are not recommended. If a drawer is fitted directly underneath the combiset, ensure that there is sufficient space between the drawer, its contents and the underside of the appliance in order to ensure sufficient ventilation for the combiset. Do not store small items or paper in the drawer. They could get sucked into the housing by the fan and cause damage or impair cooling.
IMPORTANT SAFETY INSTRUCTIONS ~ Pot and pan handles should be turned inward and not extend over the countertop to reduce the risk of burns, ignition of flammable materials, and spills. ~ Do not allow solid or liquid sugar, ~ Do not use pots or pans with pronounced edges or ridges on the ceramic combiset. These could scratch the combiset permanently. See "Cookware" for more information. Grains of salt and sand can cause scratches.
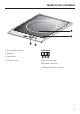
Guide to the combiset a Burner with booster Indicators b Display c Indicators d Control knob l On/Off indicator m Booster indicator n "Residual Heat" indicator 9
Guide to the combiset Display ß = No pan on burner or pan is unsuitable A = Auto-heat F = Fault (see "Frequently asked questions") C/0 = Safety cut-out feature (see "Safety features") I = Booster activated H = Overheating protection (see "Safety features") L = Child safety lock (see "Safety features") Burner data CS 1221 Minimum to maximum diameter* 7" - 11 3/4" (18 cm - 30 cm) Rating in watts 240 V** normal: with Booster: * Pots with a bottom diameter in the stated range may be used.
Before using for the first time Clean the combiset Heat the appliance ^ Before using for the first time, clean the appliance with a damp cloth and dry with a soft cloth. When the combiset is first connected to the power supply and after a power failure, all indicators in the display will light up for approx. 1 second. The combiset can be used as normal once the indicators go out. Do not use liquid dish soap to clean the combiset, this may cause permanent blue discolorations.
Induction How it works An induction coil is located under the burner. When the burner is switched on, this coil creates a magnetic field which impacts directly on the base of the pan and heats it up. The burner itself is heated indirectly by the heat given off by the pan. Induction burners only work when a magnetic based pan is placed on it (see "Cookware"). Induction automatically recognizes the size of the pan, i.e. heat is only generated in the area covered by the base of the pan.
Induction Noises When using an induction burner, the following noises can occur in the pan, depending on what it is made of and how it is constructed. – Higher power settings may cause a buzz. This will decrease or cease altogether when the power setting is reduced. The appliance has a cooling fan to help extend the life of the electronics. When the combiset is being used at high levels for a long period of time, this will come on and you will hear a whirring sound.
Induction Cookware Pan size Suitable pans include: To make optimum use of the burner, choose cookware that fits between the inner and outer marking of the burner. If the base diameter of the pan is smaller than the inner marking, the induction heating will not work. The burner will behave as if it has no pan on it.
Use Turning the burner On/Off Residual heat indicator ^ To turn the burner on, press the control knob down and turn it clockwise a to the desired setting. The residual heat indicator will go out once the combiset has cooled to a safe temperature. As long as the residual heat indicator is lit do not touch or place any heat sensitive items on the burner. Danger of burns, and fire hazard. ^ To turn the burner off, turn the control knob counterclockwise b to "0".
Use Settings Use for Power level* Melting butter, chocolate, etc. Dissolving gelatin Prepare yogurt 1-2 Warming small quantities of food or liquid Keeping delicate dishes warm Cooking rice, Thawing frozen vegetables 1-3 Warming liquid or half-set foods Thickening sauces, e.g., hollandaise sauce Cooking rice pudding 2-4 Defrosting frozen foods Steaming vegetables, fish, etc. Cooking pasta, soups, etc.
Use Auto-heat Activating Auto-heat When Auto-heat has been activated, the burner switches on automatically at the highest setting and then switches to the continued power level which was selected. The "heat-up" time depends on which continued power level has been chosen (see table). ^ Turn the control knob counterclockwise as far as it will go and hold until an A appears in the display. Continued power level* Heat-up time (approx.
Use Booster function To activate the Booster The burner is equipped with a booster function to temporarily increase the power level. This boost is intended to quickly bring large quantities of water to the boil, e.g. cooking pasta. When the Booster is activated the burner will operate with extra power for 10 minutes. ^ Turn the control knob past power level 9 to BI, then turn back to level 9. Once the booster time has elapsed the burner will automatically revert to power level 9.
Use Keep warm Tips This function can be used for keeping food warm right after it has been cooked. It is not for reheating food which has already cooled. – Cover the pan with a lid. Once activated the keep warm function will switch off automatically after 2 hours. – It is not necessary to stir the food while it is being kept warm. – Nutrients are lost when food is cooked, therefore try to keep the warming time to a minimum.
Energy saving tips – Whenever possible, keep pots and pans covered while cooking. This helps keep in the most possible heat. – When cooking small guantities of food, use a small pot or pan. This will required less energy to heat up than a large pot. – Cook with a small amount of water. – Using a pressure cooker will greatly reduce cooking time. – Lower the flame after browning or parboiling.
Safety features Child Safety Lock Keep children away from the combiset for their own safety. The combiset has a Child Safety Lock to prevent children from turning on the burner. To activate the Child Safety Lock: ^ Turn the control knob counterclockwise as far as it will go, and hold until L appears in the display. If the control knob is touched after the lock is activated an L will appear in the display for 3 seconds.
Safety features Overheating protection The induction coils and the cooling element of the electronics are fitted with an overheating protection feature. This prevents the induction coils and cooling element from overheating. This mechanism works in the following ways: – If the booster function is being used, it will be switched off. – The power level will be reduced. – If an induction coil is affected, the burner will turn off and an H will appear in the display. ^ Turn the control knob to "0".
Cleaning and care Do not use a steam cleaner to clean this appliance. Steam could penetrate electrical components and cause a short circuit. Pressurized steam could cause permanent damage to the surface. Do not use any sharp pointed objects which could damage the seal between the ceramic surface, the surrounding frame and the countertop. Never use abrasive cleaners, caustic (oven) cleaners, dishwasher detergent, scouring pads, steel wool or hard brushes. They will damage the surface.
Cleaning and care Ceramic surfaces Stainless steel ^ Wipe off any soiling using a damp cloth. Stubborn soiling is best removed with a shielded scraper blade. Clean stainless steel surfaces with warm water and liquid dish soap applied with a non-abrasive sponge and then wipe dry with a soft cloth. Soak baked or hardened spills first to loosen them. ^ Apply a ceramic cleaner (available from Miele) using a soft cloth or paper towel.
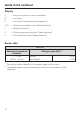
Frequently asked questions ,Repairs should only be carried out by an authorized technician in accordance with local and national safety regulations. Unauthorized repairs could cause injury or appliance damage. What if the burner does not heat up after it is turned on? Possible fault Solution The Child safety lock is activated. See "Child safety lock". The Overheating protection feature See "Overheating protection". has activated. The main fuse has blown. Check the main fuse.
Frequently asked questions What if the combiset turns itself off automatically? Possible fault Solution Either the "Safety cut-out" feature or the See "Overheating protection" or "Safety "Overheating protection" feature has cut-out". been activated. What if one of the following errors occurs: - The booster function turns off automatically ahead of time. - C and 0 flash alternately in the display. - H is shown in the display. Possible fault Solution The overheating protection feature has been activated.
Technical Service In the event of a fault which you cannot easily fix yourself, please contact the Miele Technical Service Department at the address on the back of this booklet. When contacting Technical Service please quote the serial number and model of the appliance. Adhere rating label sticker supplied with the appliance below.
Technical Service MieleCare (USA only) MieleCare, our Extended Service Contract program; gives you the assurance of knowing that your appliance investment is covered by 5 years of worry free ownership. MieleCare is the only Extended Service Contract in the industry that guarantees repairs by a Miele Authorized Service Provider using genuine Miele parts. Only genuine Miele parts installed by factory trained professionals can guarantee the safety, reliability and longevity of your Miele appliance.
Installation Instructions IMPORTANT: SAVE FOR THE LOCAL ELECTRICAL INSPECTOR'S USE Information is subject to change. Please refer to our website to obtain the most current product specification, technical & warranty information. To prevent accidents and appliance damage read these instructions before installation or use.
IMPORTANT INSTALLATION SAFETY INSTRUCTIONS Note to the installer: Please leave this instruction book with the consumer for the local electrical inspector’s use. The minimum distances given in these Installation Instructions must be observed in order to ensure safe operation. Failure to do so increases the risk of fire. The cabinetry and venting hood should be installed first to prevent damage to the appliance.
IMPORTANT INSTALLATION SAFETY INSTRUCTIONS Safety distances above the appliance The minimum safety distance given by the hood manufacturer must be maintained between the combiset and the hood above it. See the installation instructions of the hood for these safety measurements. If the hood manufacturers instructions are not available or if flammable objects are installed over the combiset (e.g. cabinets, utensil rail, etc.), a minimum safety distance of 30" (760 mm) must be maintained.
IMPORTANT INSTALLATION SAFETY INSTRUCTIONS Safety distances to the sides of the appliance The appliance should only be installed as shown in the illustrations, while maintaining the required safety distances shown. Do not install the appliance between two tall cabinets, this is a fire hazard. A distance of at least 2" (50 mm) must be kept between the countertop cut-out and the rear wall because of the high temperatures radiated.
Installation Safety distance from the wall covering If a wall covering is installed, a minimum safety distance must be maintained between the countertop cut-out and the covering, since high temperatures can damage these materials. If the covering is made of a combustible material (such as wood), the distance between the countertop cut-out and the wall covering must be a minimum of 2" (50 mm).
Installation Installation dimensions a Spring clips b Appliance front c Installation height d Power supply box with connection cable e Rating label 34
Installation Cut out ^ Make the countertop cut-out for the desired number of appliances. Remember to maintain a minimum safety distance from the back wall, as well as from any tall unit or side wall to the left or right of the combiset. See also the "IMPORTANT INSTALLATION SAFETY INSTRUCTIONS". If during installation the seal around the frame does not sit flush with the countertop in the corners, the corner radius, maximum 3/16" (4 mm), can be carefully filed down to fit.
Installation Installation of multiple appliances When installing more than one combiset appliance, a support bar b must be installed between the appliances. Countertop cut-out two appliances Countertop cut-out three appliances For the installation of two appliances the width of the countertop cut-out D is the sum of A and C. For the installation of three appliances the width of the countertop cut-out D is the sum of A and B and C.
Installation Sample calculations for a countertop cut-out for three appliances A appliance width minus 5/16" (8 mm) B appliance width C appliance width minus 5/16" (8 mm) D Countertop cut-out 11" (280 mm) 11 5/16" (288 mm) 11" (280 mm) 33 3/8" (848 mm) 11" (280 mm) 15" (380 mm) 14 5/8" (372 mm) 40 5/8" (1032 mm) 11" (280 mm) 22 11/16" (576 mm) 22 3/8" (568 mm) 56 1/16" (1424 mm) 11" (280 mm) 37" (940 mm) 14 5/8" (372 mm) 44 1/4" (1124 mm) 14 5/8" (372 mm) 22 11/16" (576 mm) 22 3/8' (568
Installation a Spring clips b Support bars c Space between support bar and countertop d Cover The illustration represents the attachment of spring clips a and support bars b for 3 appliances. An additional support bar is required for each additional appliance. The position for attachment of an additional support bar depends on the width of appliance B.
Installation Attach the spring clips and support bars Wood or solid surface countertops ^ Place the supplied spring clips a and the support bars b at the marked positions as shown above, by laying them on the upper edge of the cut-out and then securing them with the 1/8" x 1" (3.5 x 25 mm) screws (supplied).
Installation Granite countertop The screws are not needed for granite countertops. ^ Coat the side and lower edges of the spring clips between a and b with silicone. ^ Position and attach the spring clips a and support bars b with strong, double-sided tape c. 40 ^ Fill the space e between the support bars b and the countertop with silicone.
Installation Installing the appliance(s) ^ Feed the power cord down through the cut-out. ^ Place the front edge of the appliance into the cut-out. ^ With a hand on each side of the appliance press down evenly on the edges until it clicks into position. When doing so make sure that the appliance seal sits tightly on the countertop to ensure it is sealed correctly. This is important to ensure an effective seal. Do not permanently seal into the countertop.
Installation Sealing Tiled surfaces The appliance must not be permanently sealed into the countertop when installed. The sealing strip under the edge of the appliance provides a sufficient seal for the countertop. The grouting a and shaded area under the appliance frame must be flat and even so that the frame will lie evenly and the sealing strip under the edge of the upper part of the appliance can provide an adequate seal against the countertop.
Electrical connection ,CAUTION: Before installation or servicing, disconnect the power supply by either removing the fuse, shutting off the main power or manually "tripping" the circuit breaker. Installation work and repairs should only be performed by a qualified technician in accordance with all applicable codes and standards. Repairs and service by unqualified persons could be dangerous.
Help protect our environment Disposal of packing materials Disposal of an old appliance The cardboard box and packing materials are biodegradable and recyclable. Please recycle. Old appliances contain materials that can be recycled. Please contact your local recycling authority about the possibility of recycling these materials. Ensure that any plastic wrappings, bags, etc. are disposed of safely and kept out of the reach of children.
Alteration rights reserved / 3911 M.-Nr. 07 346 540 / 04 INFORMATION IS SUBJECT TO CHANGE. PLEASE REFER TO OUR WEBSITE TO OBTAIN THE MOST CURRENT PRODUCT SPECIFICATIONS, TECHNICAL & WARRANTY INFORMATION.