
Installation Instruction
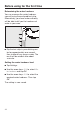
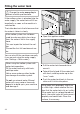


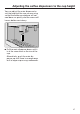

Table Of Contents
- Contents
- IMPORTANT SAFETY INSTRUCTIONS
- Guide to the appliance
- Controls and display
- Accessories
- Before using for the first time
- Operation
- Filling the water tank
- Filling the coffee bean container
- Turning the machine On and Off
- Adjusting the coffee dispensers to the cup height
- Preparing beverages
- Coffee the way you like it
- Portion size
- Profiles
- Settings
- Accessing the "Settings" menu
- Changing and saving settings
- Setting options
- Language
- Time of day
- Date
- Timer
- Eco mode
- Lighting
- Info (displaying information)
- Locking the coffee system (System lock )
- Water hardness
- Display brightness
- Volume
- Activating and deactivating water connection
- Factory default setting
- Showroom program (Demo mode)
- Cleaning and care
- Overview
- Clean by hand or in dishwasher
- Drip tray
- Drip tray cover
- Water tank
- Waste unit
- Main dispenser
- Maintenance of the milk valve
- Milk flask with lid
- Bean container
- Interior and machine front
- Main dispenser connector
- Brew unit
- Care programs
- Rinsing the coffee system
- Rinsing the milk pipework
- Cleaning the milk pipework
- Degreasing the brew unit
- Descaling the machine
- Frequently Asked Questions
- Technical Service
- Saving energy
- Packaging material / Disposal of old machine
- Plumbing
- Electrical connection
- Installation

Adjusting the coffee dispensers to the cup height
27
You can adjust the main dispenser to
suit the height of the cup you are using
so that the coffee or espresso will not
cool down as quickly and the crema will
have a better consistency.
Pull the main dispenser down until it
is at the same level as the rim of the
cup.
Alternatively, push the main dis-
penser up until there is enough room
to fit a larger cup or mug underneath.