
Installation Instruction
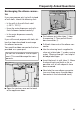


Table Of Contents
- Contents
- IMPORTANT SAFETY INSTRUCTIONS
- Guide to the appliance
- Controls and display
- Accessories
- Before using for the first time
- Operation
- Filling the water tank
- Filling the coffee bean container
- Turning the machine On and Off
- Adjusting the coffee dispensers to the cup height
- Preparing beverages
- Coffee the way you like it
- Portion size
- Profiles
- Settings
- Accessing the "Settings" menu
- Changing and saving settings
- Setting options
- Language
- Time of day
- Date
- Timer
- Eco mode
- Lighting
- Info (displaying information)
- Locking the coffee system (System lock )
- Water hardness
- Display brightness
- Volume
- Activating and deactivating water connection
- Factory default setting
- Showroom program (Demo mode)
- Cleaning and care
- Overview
- Clean by hand or in dishwasher
- Drip tray
- Drip tray cover
- Water tank
- Waste unit
- Main dispenser
- Maintenance of the milk valve
- Milk flask with lid
- Bean container
- Interior and machine front
- Main dispenser connector
- Brew unit
- Care programs
- Rinsing the coffee system
- Rinsing the milk pipework
- Cleaning the milk pipework
- Degreasing the brew unit
- Descaling the machine
- Frequently Asked Questions
- Technical Service
- Saving energy
- Packaging material / Disposal of old machine
- Plumbing
- Electrical connection
- Installation

Plumbing
89
Parts must only be replaced with
original Miele spare parts, available
from Miele.
Connecting the appliance to
the water supply line
Make sure that the supply line is not
kinked or damaged. The supply line
must not be shortened.
Remove the water connection cover
from the bottom of the back panel of
the machine.
Take the angled side of the supply
line and check whether a gasket is
present. If not, insert one.
Screw the supply line coupling nut
onto the threaded union.
Ensure that the supply line is cor-
rectly fitted and that it is water-tight.
Connecting to the water supply
Before establishing the fixed network
connection, ensure the appliance is
disconnected from the electrical sup-
ply.
Connection to the water supply should
be carried out by a qualified plumber
and should incorporate a connection
with a 3/8" thread.
Check that the gasket is present. Re-
place, if not, insert before connecting
to the water supply.
Screw the supplied brass compres-
sion fitting, with the 3/8" end, tightly
onto the water connector of the cof-
fee machine. (Tighten the compres-
sion fitting by hand, do not use a
tool.) The fitting includes an opening
for standard 1/4" piping.
Old or used hoses must not be con-
nected to this coffee system.
Connect the compression fitting to
the water supply.
Slowly open the shut-off valve to the
water supply and check for leaks.
If necessary, check whether the seal-
ing ring and fittings are tight.
You can now continue with the installa-
tion of the coffee system in its housing
unit (see "Installation").