
Installation Instruction

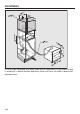
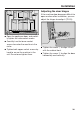


Table Of Contents
- Contents
- IMPORTANT SAFETY INSTRUCTIONS
- Guide to the appliance
- Accessories
- Operation
- Before using for the first time
- Filling the water tank
- Filling the coffee bean container
- Turning the machine On and Off
- Dispenser adjustment
- Preparing beverages
- Coffee the way you like it
- Portion size
- Resetting drinks
- User profiles
- User profiles: Creating and editing your own drinks
- MyMiele
- Settings
- Accessing the "Settings" menu
- Changing and saving settings
- Setting options
- Language
- Time of day
- Date
- Timer
- Eco mode
- Lighting
- Start screen
- Info (displaying information)
- Locking the coffee system (System lock )
- Water hardness
- Display brightness
- Volume
- Activating and deactivating water connection
- Dispenser adjustment
- Factory default setting
- Showroom program (Demo mode)
- Cleaning and care
- Overview
- Clean by hand or in dishwasher
- Drip tray
- Drip tray cover
- Water tank
- Waste unit
- Main dispenser
- Sensor cover
- Maintenance of the milk valve
- Milk flask with lid
- Bean container
- Interior and machine front
- Main dispenser connector
- Brew unit
- Care programs
- Rinsing the coffee system
- Rinsing the milk pipework
- Cleaning the milk pipework
- Degreasing the brew unit
- Descaling the machine
- Frequently Asked Questions
- Technical Service
- Saving energy
- Packaging material / Disposal of old machine
- Plumbing
- Electrical connection
- Installation
- Copyright and licenses

Installation
102
Installing the coffee system
Make sure that there is no power to
the machine during installation. This
also applies when uninstalling.
The machine may only be operated
when installed and in an ambient
t
emperature range between +50°F
(10°C) to +100°F (38°C).
For installation, you will require two
soc
ket wrenches in sizes 3 and 5.
To ensure the appliance door is flush
with the cabinetr
y front, a seal around
the building-in niche is needed or a
sealing strip must be adhered to the
coffee system.
If ther
e is not a seal at the front of the
building-in niche, adhere the Miele
sealing strips from the back (see pic‐
ture) before installing the coffee sys‐
tem.The sealing strips can be pur‐
chased from Miele.
Sealing strips are available from your
Miel
e dealer or from Miele.
Tip: W
e recommend providing a place
to sit the coffee system which is the
same height as the building-in niche.
This will make it easier to connect the
machine to the electrical supply and
water line.
Usin
g the large allen key, unscrew all
four feet out by about 3/4" (2 mm).
The feet can be unscrewed by up to
appr
ox. 4" (10 mm).
Co
nnect the appliance to the water
intake hose (see "Plumbing").
Co
nnect the appliance to the electri‐
cal supply.
Ensure the electrical and water con‐
nection does not get damaged when
pushin
g the appliance into the niche.
P
ush the coffee system all the way
into the building-in niche.
Mak
e sure the coffee system is cen‐
tered and straight in the building-in
niche. If this is not the case, align the
machine using the four bases.
The appliance comes with four M5
sock
et screws to help you align and se‐
cure it in the building-in niche.