
Operating & Installation Instructions
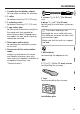
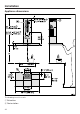
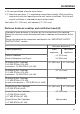
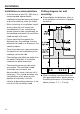
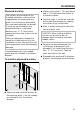
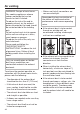
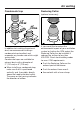
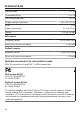
Table Of Contents
- Contents
- IMPORTANT SAFETY INSTRUCTIONS
- Caring for the environment
- Guide to the appliance
- Description of functions
- Before using for the first time
- Operation (Automatic mode)
- Operation (Manual mode)
- Operation (Automatic and Manual modes)
- Energy-saving tips
- Cleaning and care
- Installation
- Air venting
- Electrical connection
- Service and warranty
- Technical data

Installation
41
a
3 protective installation sheets
for use when installing the chimney.
b
1 collar
for exhaust ducting 6" (150mm).
c
1 reducing collar
for exhaust ducting 5" (125mm).
d
1 non-return flap
for fitting into the exhaust socket on
the motor unit (not needed for
recirculation mode). Depending on
the model, the non-return flap may
already be mounted.
e
Telescopic wall bracket
for securing the ventilation system
on the wall.
f
Conversion kit for recirculation
mode
contains a directional unit socket
and flexible aluminum hose with
hose clips (not supplied, available as
an optional accessory, see
“Technical data”).
6 screws ³/₁₆“x2³/₈” (5x60mm)
and
6 plugs ⁵/₁₆“x2” (8x50mm)
for securing the ventilation system on
the wall.
The screws and plugs are
designed for use in solid walls only.
Use different fasteners for other wall
construction types.
Make sure that the wall can support
the load.
2 M6locknuts
for mounting the appliance unit.
2¹/₈"x⁵/₁₆"(3.9x7.5mm) screws
for attaching the chimney.
1lever
for disassembling the chimney.
Montage
Installation
Montaje
Montaggio
Montering
Montagem
Asennus
Installation plan