Operating and Installation Instructions Steam oven DG 2661 To prevent accidents and machine damage read these instructions before installation or use. UV M.-Nr.
Contents IMPORTANT SAFETY INSTRUCTIONS . . . . . . . . . . . . . . . . . . . . . . . . . . . . . . . . . 4 Guide to the steam oven . . . . . . . . . . . . . . . . . . . . . . . . . . . . . . . . . . . . . . . . . . . . 8 Overview . . . . . . . . . . . . . . . . . . . . . . . . . . . . . . . . . . . . . . . . . . . . . . . . . . . . . . . . . 8 Control panel . . . . . . . . . . . . . . . . . . . . . . . . . . . . . . . . . . . . . . . . . . . . . . . . . . . . . . 9 Accessories . . . . . . . . . . . . . . .
Contents Special uses . . . . . . . . . . . . . . . . . . . . . . . . . . . . . . . . . . . . . . . . . . . . . . . . . . . . . 35 Canning . . . . . . . . . . . . . . . . . . . . . . . . . . . . . . . . . . . . . . . . . . . . . . . . . . . . . . . . . 35 Blanching . . . . . . . . . . . . . . . . . . . . . . . . . . . . . . . . . . . . . . . . . . . . . . . . . . . . . . . . 36 Making Yogurt . . . . . . . . . . . . . . . . . . . . . . . . . . . . . . . . . . . . . . . . . . . . . . . . . . . .
IMPORTANT SAFETY INSTRUCTIONS WARNING - When using your appliance follow basic precautions, including the following: To prevent injury and appliance damage read all instructions before installation or use of the steam oven. Use the steam oven only for its intended purpose. This appliance is intended for residential cooking only. This appliance conforms to all uniform safety codes and regulations. The manufacturer cannot be held responsible for damage or injury caused by improper use of this appliance.
IMPORTANT SAFETY INSTRUCTIONS Use Children This appliance must only be operated after it has been correctly installed into cabinetry. This is necessary to ensure that all electrical components are shielded. When in use the oven, particularly the inside of the door as well as the outer side by the vent, may become very hot and remain so for a while after the oven has been turned off. Keep children at a safe distance.
IMPORTANT SAFETY INSTRUCTIONS Appliance safety Do not heat unopened food containers. Pressure can build up causing an explosion that will damage the cooking compartment. Danger of personal injury and scalding. To prevent condensation which could corrode the appliance, do not leave cooked foods in the oven for an extended period of time. Do not use items in the steam oven which might rust. This can lead to corrosion of the appliance.
IMPORTANT SAFETY INSTRUCTIONS Personal safety Further safety notes The steam oven should be installed at a safe height for the user to safely access all cooking levels and containers. Otherwise spills could cause burns or scalding and children may be put at risk by the hot appliance door. Be sure that electrical cords of other electrical appliances do not come in contact with the appliance door. The insulation of the cords could become damaged creating a hazard. Take care when opening the door.
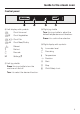
Guide to the steam oven Overview a Control panel i Steam inlet b Vent for moist air j Interior drip channel c Door gasket k Bottom heating element d Steam channel l Temperature sensor e Steam generator compartment m Air outlet f Steam generator (with insert) n Door drip channel g Steam generator outlet o Door release h Side runners with 4 levels 8
Guide to the steam oven Control panel p Left display with symbols: Q Cook Universal Q1 Cook Vegetables r Right jog shuttle Turn this jog shuttle to adjust the default temperature and durations. Press it to confirm the selection. Q_ Cook Fish QG Cook Meat/Poultry P Reheat N Defrost k Descale C Settings J s Right display with symbols: p Low water level k Descaling z Temperature g Duration q Left jog shuttle Press this jog shuttle to turn the machine on and off.
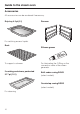
Guide to the steam oven Accessories All accessories can be reordered if necessary. Drip tray 4.2 pt (2 l) Runners For catching excess liquids Rack Silicone grease To support cookware For lubricating the O-Ring on the connection valve of the steam generator 2 cooking containers, perforated 3.17 pt (1.
Guide to the steam oven Optional accessories Stainless steel cooking containers Labeling Application DGG 2 solid container To cook food in sauces, marinades or gravy, also for pasta and rice DGG 3 solid container same as DGG 2, but deeper DGGL 4 perforated container To cook vegetables, fish and meat when not cooked in a sauce DGGL 5 perforated container To cook vegetables, fish and meat and potatoes DGGL 6 perforated container To blanch or cook vegetables DGG 7 solid container To cook soup or st
Guide to the steam oven Cleaning and Care Labeling Application Descaling tablets 6 tablets To descale Miele steam ovens and coffee systems. Stainless steel conditioner To prevent resoiling after cleaning. Also 205 ml cleans water streaks, spots and finger prints on stainless steel surfaces. Sidol Stainless steel and Ceran cleaner 250 ml To purchase these products contact Miele at the phone numbers on the back of this manual or go to www.store.miele.com.
Before the first use Selecting the language The oven comes factory set to German. The desired language must be set. ^ Press the left jog shuttle to turn the appliance on. ^ Turn the left jog shuttle to select the desired language. ^ Press the left jog shuttle to confirm the setting. The left display shows: A welcome screen shows. The display changes to the language setting.
Before the first use Setting the water hardness The steam oven is factory set to water hardness setting IV (4) . Set the steam oven to your local water hardness. The water hardness can be tested with the supplied test strip or call your local water authority. The water hardness is given in hardness levels (I to IV) or in German hardness (1 to >21°dH).
Before the first use Setting the altitude Relocating This process rinses the water lines and sets the unit to the water boiling temperature which varies depending on the altitude in your area. When relocating to a new area, reset the unit’s water boiling temperature by descaling the appliance. See "Cleaning and Care" for more information. ^ Open the door by pushing on the left side of the door release. Setting the altitude for the first time and after relocation will produce more steam than usual.
Suitable containers Stainless steel cooking containers are supplied with the appliance. Other containers are available in a variety of sizes, perforated or solid, as optional accessories. Please note when selecting cookware: – Use the perforated cooking containers whenever possible, e.g. for cooking vegetables. The steam can reach the food from all sides and cook evenly. – For thicker items, e.g. potatoes, build larger spaces between them.
Using the steam oven Before each use ^ Insert the drip tray in the lower level when using a perforated container. ^ Fill the water tank. The insert can remain inside. Only use tap water, do not use distilled or mineral water! The water level must be between the min. 0.75 l, and max. 1.2 l marks. The marks are on the outside and inside of the steam generator. Do not exceed the "max" level marker. To shorten the heating phase, use hot water. Use caution when handling the water tank.
Using the steam oven Functions overview Symbol Function Default temperature in °F / °C Adjustable temperature range in °F / °C Q COOK UNIVERSAL 212 / 100 105 - 212 / 40 - 100 Q1 COOK VEGETABLES 212 / 100 195 - 212 / 90 - 100 Q_ COOK FISH 185* / 85* 165 - 212 / 75 - 100 QG COOK MEAT/POULTRY 212 / 100 195 - 212 / 90 - 100 P REHEATING 212 / 100 175 - 212 / 80 - 100 N DEFROSTING 140 / 60 125 - 145 / 50 - 60 k DESCALE – – C SETTINGS – – * Increase the default temperature to 21
Using the steam oven Turning the oven on ^ Press the left jog shuttle to turn the steam oven on. The left display shows COOK UNIVERSAL. The "Q" symbol is highlighted. Setting a function If a function and duration is not confirmed within 15 minutes, the oven will turn off. ^ Turn the left jog shuttle to the desired function, e.g. Cook Fish. The left display shows COOK FISH and the respective symbol is highlighted. ^ Press the left jog shuttle to confirm the setting.
Using the steam oven Confirming the default temperature Changing the default temperature Once the function is confirmed, the right display shows the default temperature, e.g. 185 °F / 85 °C, and the temperature symbol z flashes. The default temperature can be changed in 10°F/5°C increments. The default temperatures and the temperature range are shown in the table "Functions overview". Adjusting temporarily z ^ Press the right jog shuttle.
Using the steam oven Setting the duration Starting a function Once the temperature is confirmed, the display shows 3 zeros and the duration symbol g flashes. The oven is factory set so that it starts automatically once the duration is confirmed. See "Settings" for more information on setting a manual start. g Manual start After confirming the duration, the right display highlights the start symbol h. g z ^ Turn the right jog shuttle to the desired duration, e.g. 20 minutes.
Using the steam oven After the start After a cooking process is started, a fan noise is heard and the symbols in the left display go out. The selected function, e.g. Cook Fish, is shown until the end of the duration set. Once the selected temperature is reached, the cooking phase begins and the duration will elapse. z g During the cooking phase the time symbol g is highlighted and the elapsing time is shown. The right display shows the function phase.
Using the steam oven Interrupting the cooking process ^ The cooking process can be interrupted at any time by opening the door. The heat is turned off and the remaining time is stopped. ,Hot steam will escape when the door is opened. Use caution when taking containers out of the oven. Spilled liquids, steam and the interior walls are hot. Danger of burns! ^ Close the oven door to continue the cooking process. The appliance heats and displays the rising interior temperature.
Using the steam oven Changing the temperature during the heating phase Changing the duration during the heating phase ^ Press the right jog shuttle. ^ Turn the right jog shuttle to highlight the g symbol. The set duration shows. The right display shows the selected temperature. The temperature symbol z flashes briefly. ^ While the symbol flashes, turn the right jog shuttle to the desired temperature.
Using the steam oven At the end of the cooking process Once the selected duration has elapsed, a tone sounds and the time/temperature display shows 3 zeros. z g ^ To turn the steam oven off, press the left jog shuttle until the right display goes out. After use ^ Remove and empty the drip tray. ^ Remove and empty the steam generator. ^ Clean and dry the appliance after each use. See "Cleaning and Care". ^ Leave the door open until the moisture in the cooking compartment has evaporated.
Using the steam oven Child Safety Lock The appliance has a Child Safety Lock to prevent it from being turned on accidentally by children. To activate the Child Safety Lock while the oven is off ^ Turn the right jog shuttle and press to confirm. The machine is factory set to "locked" while not in use. $ To generally lock the oven during operation (to prevent accidental changing of the duration and temperature), change the setting "In Operation Lock" to possible. See "Settings".
Using the steam oven To activate the Child Safety Lock while the oven is turned on To deactivate the Child Safety Lock while the oven is turned on ^ After the start turn the right jog shuttle to the lock symbol $ and confirm. ^ Turn the right jog shuttle to highlight the lock symbol $ and confirm. The symbol $ flashes and "0" shows briefly. ^ While the symbol $ flashes, turn to "1". The symbol $ flashes and "1" shows briefly. ^ While the symbol $ flashes, turn to "0". The lock is deactivated.
Cooking tips Steaming Food Function Temperature in °F (°C) Time in minutes COOK VEGETABLES 212 (100) 6-8 Green beans " 212 (100) 8-10 Broccoli, florets " 212 (100) 4-6 Peas " 212 (100) 3-5 Carrots, cut " 212 (100) 6-8 Potatoes, peeled and halved " 212 (100) 20-25 Potatoes, unpeeled " 212 (100) 25-28 Brussels sprouts " 212 (100) 12-14 Asparagus " 212 (100) 10-14 Turnips, cubed " 212 (100) 7-10 COOK MEAT 194 (90*) 2-4 Smoked pork chops " 212 (100) 6-8 Chicken
Cooking tips Food Function Temperature in °F (°C) Time in minutes Meat casserole COOK UNIVERSAL 212 (100) 10-12 Rice casserole " 212 (100) 20-25 COOK UNIVERSAL 212 (100) 20-60 Peas, soaked " 212 (100) 20-40 Lentils, not soaked " 212 (100) 20-25 Soaking grains, whole COOK UNIVERSAL 212 (100) 16-35 Soaking grains, ground " 212 (100) 10 Parboiled Rice " 212 (100) 20 COOK UNIVERSAL 212 (100) 3-4 Eggs, medium " 212 (100) 5-6 Eggs, hard " 212 (100) 8-10 COOK UNIVERSA
Cooking tips Tips for steaming – The duration for cooking with steam is almost the same as cooking in a pot. – The steam prevents the food from drying out and the disadvantages coming with it. The food stays moist and juicy. The same is true not only for vegetables but also for desserts, fish and meat recipes. – Food like noodles or rice need to be cooked in fluids. Noodles should be well covered with fluid. Rice, beans and cereals need to be cooked in equal amounts of food and water.
Cooking tips Reheating Function REHEATING Food to be reheated Time in minutes Vegetables Cauliflower, Beans 2 Turnips, Carrots 2 Side dishes Potatoes (cut lengthwise) 3-4 Pasta, Rice 2-3 The steam oven can be used to reheat dishes. ^ Place the food on a flat plate and cover it with a deeper plate or aluminum foil. ^ Select the function "Reheat" and confirm. ^ Select the time (see table) and confirm. Meat and poultry Roast in slices ½" (1.
Cooking tips Defrosting Function DEFROSTING Food to be defrosted Weight in ounces (grams) Temperature in °F (°C) Thaw time in minutes Compensation time in minutes Ground meat 9 (250) 122 (50) * 15-20 10-15 Cutlets, Sausage 28 (800) 140 (60) 25-35 15-20 Chicken 35 (1000) 140 (60) 40 15-20 Chicken drumsticks 5.5 (150) 140 (60) 20-25 10-15 Chicken breast 17.5 (500) 140 (60) 25-30 10-15 14 (400) 140 (60) 15 10-15 10.5 (300) 140 (60) 4-6 5 Frozen in a block 10.
Cooking tips When defrosting frozen foods in the steam oven, the defrosting time is much shorter than defrosting at room temperature. ^ Insert the food in a container or on the rack. ^ Select the function "Defrosting" and confirm. ^ If desired adjust the default temperature (see table) and confirm. ^ Select the defrosting time (see table) and confirm. Tips for defrosting ,Do not cook with defrosting liquids. – When defrosting poultry, set the food on the rack and insert the drip tray beneath it.
Meal planning With some planning, an entire meal can be cooked in the steam oven. ^ Insert the food with the longest cooking time (rice) first. ^ Place cooking containers on different levels or side by side on the rack. ^ Set the difference in time until inserting the next food, here 14 minutes, and confirm. Since different foods cook differently, they must be inserted at different times.
Special uses Canning Function COOK UNIVERSAL Canning food Temperature Time in in °F (°C) minutes Fruit Apples 194 (90*) 50 Apple sauce 194 (90*) 65 Currants 176 (80*) 50 Stone fruit 185 (85*) 55 Vegetables Beans 212 (100) 120 Cucumbers 194 (90*) 55 * This temperature does not reflect the default temperature. The given times are for 1 liter jars. For ½ liter jars shorten the times by 15 minutes, for ¼ liter jars shorten the time by 20 minutes.
Special uses Blanching Making Yogurt The steam oven can also be used to blanch vegetables and fruit to prepare them for freezing. Ingredients: 3.5 oz (100 g) yogurt (with live cultures) and 1 quart (1 l) of pasteurized or fresh whole milk. Yogurt and milk must have the same fat contents. ^ Put the prepared vegetables/fruit (cleaned, washed, chopped, etc.) into a perforated container. ^ Select the function "Cook Vegetables" and confirm. Confirm the default temperature (100 °C / 212 °F).
Special uses Disinfecting baby bottles The steam oven can be used to disinfect baby bottles and other dishware. Check beforehand that all parts are heat resistant up to 212 °F (100 °C). ^ Place the drip tray on the lowest runner level and place the rack above it. ^ Dismantle, clean and thoroughly rinse the bottles. Space the individual parts out on the rack, ensuring that they do not touch each other. This allows the hot steam to reach all sides. ^ Select the function "Cook Universal" and confirm.
Settings The basic settings in the table can be changed. The settings are changed with the left jog shuttle. Follow the steps in the display. Multiple settings can be changed at a time. Setting Options * Select C SETTINGS for: F LANGUAGE I PROGRAMMING z TEMPERATURES All functions allow you to permanently adjust the default temperature within a certain range. See the "Functions overview". Z English, German, etc.
Cleaning and Care General Appliance front ^ Clean and dry the steam oven after each use. Let the appliance cool before cleaning. ^ Clean the front and the control panel with a solution of hot water and liquid dish soap applied with a soft sponge. ^ Close the door only after the cooking compartment is completely dry. ^ Dry with a soft cloth. Glass surfaces Do not use a steam cleaner to clean this appliance. Pressurized steam could penetrate electrical components and cause a short circuit.
Cleaning and Care Oven interior Runners The cooking compartment including the ceiling, door gasket, drip channel, door interior and steam generator niche should be cleaned after each use. The side runners can be removed for better cleaning of the cooking compartment. ^ Most cooking residues can be easily removed using a sponge, liquid dish soap and warm water. ^ Wipe the interior with clean water and dry with a soft cloth. The bottom heating element may become discolored over time from dripping liquids.
Cleaning and Care Steam generator Do not submerge the steam generator in water or wash it in the dishwasher. Empty the steam generator after each use to avoid the build up of condensate water. b a Do not use hard brushes or sponges for cleaning. ^ Place the insert back into the steam generator only when both parts are dry. Insert it at an angle a and lower in the side with the opening b. ^ Remove the steam generator after each use, empty and dry. Remove the insert before cleaning and drying.
Cleaning and Care Connection valve ^ If the connection valve becomes brittle, dried out or if a lot of water collects at the bottom of the steam connector niche, the valve needs to be replaced. A valve can be purchased from Miele. When lubricating the valve only use the silicone grease supplied. Never use margarine, oil, or any other grease or fat on the valve, they will cause deterioration.
Cleaning and Care Descale When descaling the oven, only use descaling agents with a citric acid base or the descaling tablets available from Miele. Follow the manufacturer’s instructions. Do not use vinegar, it will damage the appliance. The oven indicates when the steam generator needs to be descaled. The right display shows the descaling symbol k and the number 10. The number indicates the uses before the oven will be locked if not descaled.
Cleaning and Care At the end of the process At the end of the descaling, a tone sounds. ^ Open the door. The right display shows the k symbol, a duration of 22 minutes and the start symbol h. ^ Press the right jog shuttle. The descaling starts and the elapsing time shows. The descaling can be canceled during the first minute by pressing the left jog shuttle. After that the process cannot be stopped.
Frequently asked questions Repairs should only be carried out by an authorized technician in accordance with local and national safety regulations. Unauthorized repairs could cause injury or appliance damage. The manufacturer cannot be held responsible for unauthorized work. The oven cannot be turned on. Issue Fix There is no power to the steam oven. Reset the circuit breaker if it has tripped. If this is not the case, disconnect the appliance from the power supply for 1 minute.
Frequently asked questions The steam generator is difficult to insert or remove. Issue Fix The connection valve at the steam connector needs to be lubricated. Lubricate the connection valve with a small amount of the supplied silicone grease. See "Cleaning and Care Connection valve". The heating phase takes an unusually long time. Issue Fix Check the bottom of the steam Set the level to the water hardness in generator. If there are calcium deposits, your area.
Frequently asked questions The right display shows the M symbol and a signal sounds. Issue Fix The steam generator is not engaged correctly. Check if the steam generator is inserted all the way by removing it and inserting it again. The water level is low. The water level must be between the two marks. After the start the right display shows k and a number between 1 - 10 or the left display shows k. Issue Fix The unit needs to be descaled. See "Descale". The right display shows an F with a number.
After sales service In the event of a fault which you cannot correct yourself please contact the Miele Technical Service Department at the phone numbers listed on the back of this booklet. When contacting the Technical Service Department, please quote the model and serial number of your appliance. These are shown on the data plate. Data Plate Please attach the data plate in the space provided below.
Installation Instructions To prevent accidents and machine damage read these instructions before installation or use.
IMPORTANT SAFETY INSTRUCTIONS ,WARNING - Read all instructions before installation or use of the steam oven to prevent injury and machine damage. Before installation make sure that the voltage and frequency listed on the data plate correspond with the household electrical supply. This data must correspond to prevent injury and machine damage. Consult a qualified electrician if in doubt. Installation, repair and maintenance work should be performed by a Miele authorized service technician.
IMPORTANT SAFETY INSTRUCTIONS This steam oven is designed for installation in cabinetry or beneath a countertop. This is necessary to ensure that all electrical components are shielded. Be certain your appliance is properly installed and grounded by a qualified technician. To guarantee the electrical safety of this appliance, continuity must exist between the appliance and an effective grounding system. It is imperative that this basic safety requirement be met.
Installation Product and Cutout dimensions Installation in a tall cabinet a Steam oven b Cabinet opening c Terminal block d Outlet or junction box This should be accessible after the appliance has been installed.
Installation Installation in a cabinet a Steam oven b Cabinet opening c Terminal block d Outlet or junction box This should be accessible after the appliance has been installed.
Installation Installation in a wall cabinet a Steam oven b Cabinet opening c Terminal block d Outlet or junction box This should be accessible after the appliance has been installed.
Installation Installation under a countertop a Steam oven b Cabinet opening c Terminal block d Outlet or junction box This should be accessible after the appliance has been installed.
Installation Installing the feet Four feet are supplied with the appliance. If the installation niche is 13 3/4" (350 mm) high, the appliance will be installed without the feet. If the niche is 14 3/16" (360 mm) high, the feet must be installed before the appliance is built in. If the oven is built into a countertop or installed in casing, the feet must not be installed. ^ Carefully lay the appliance on its rear side and install the four feet in the supplied holes (see illustration).
Installation Installing the appliance ^ Install the supplied wooden strip h on the left side in the niche with the two supplied screws g 3 x 20 mm (see illustration). ^ Push the appliance into the niche. The measure x is at a niche height of: 13 3/4" (350 mm) = 1 3/16" ± 3/16" (30 ± 5 mm) ^ Drill two left fixing holes with a 1/16" (2 mm) diameter bit. 1 14 /16" (360 mm) = 1 9/16" ± 3/16" (40 ± 5 mm). ^ Mark the holes. ^ Pull the oven out. ^ Push the oven in and align.
Electrical connection Installation, repairs and other work by unqualified persons could be dangerous. The manufacturer cannot be held responsible for unauthorized work. The appliance comes equipped with a 6 ft (1.8 m) power cord with a NEMA 6-15P molded plug for connection to a 240 V, 15 A, 60 Hz power supply. Connection should be made via a suitable isolator, with an on-off switch which should be easily accessible for servicing work.
Caring for our environment Disposal of packing material Disposal of an old appliance The transport and protective packing materials are environmentally friendly for disposal and may be recyclable. Old appliances may contain materials that can be recycled. Please contact your local recycling authority about the possibility of recycling these materials. Ensure that any plastic wrap is disposed of safely and kept out of the reach of children.
Alteration rights reserved / 2806 M.-Nr.