
Operating and Installation instructions


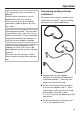
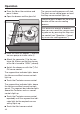
Table Of Contents
- Contents
- IMPORTANT SAFETY INSTRUCTIONS
- Caring for the environment
- Overview
- Cleaning for the first time
- Operation
- Cleaning and care
- Frequently Asked Questions
- Customer Service
- Installation

Operation
27
Vacuuming and sealing bags
Fill the vacuum-sealing bag.
Open the drawer and the glass lid.
Place the vacuum-sealing bag in the
vacuum chamber so that the open
end of the bag lies across the sealing
bar. Ensure that the edge of the bag
is positioned centrally and crease-
free on the sealing bar.
If a bag is too small and slips into the
vacuum chamber, place the vacuum-
sealing bag support underneath.
Switch the drawer on with the On/
Off sensor control.
The segment bar indicator lights above
theVaccum and Sealsensor controls
light up.
Touch the Vaccumsensor control re-
peatedly until the segment bar indica-
tor light for the required vacuum set-
ting lights up.
Touch the Sealsensor control repeat-
edly until the segment bar indicator
light for the required sealing level
lights up.
Close the glass lid and press it down
lightly.
Tip: Press the small black triangle to
close the glass lid.
The vacuum-sealing process will start.
The Startsensor control goes out and
the Stopsensor control lights up.
The following occurrences during the
vacuum-sealing process are normal
and do not indicate a functional or ap-
pliance fault:
- The bag inflates, before enveloping
the food being vacuum sealed.
- Bubbles form in the liquid, creating
the impression that it is boiling.
If you notice during the vacuum-seal-
ing process that liquids are threaten-
ing to boil over, you can end the
process and seal the bag early (see
“Operation – Sealing the bag early”).