Operating and Installation Instructions
Manuals
Brands
Miele Manuals
Appliances
EVS 7010 OB 24" Handleless Vacuum Sealing Drawer with Touch Control, Fully Telescopic Runners, Push2open Mechanism, Three Vacuum Settings, Timer, in Obsidian Black
41
42
43
44
45
46
47
48
49
50
Table Of Contents
Contents
IMPORTANT SAFETY INSTRUCTIONS
Appropriate use
Safety with children
Technical safety
Correct use
Vacuum sealing single-use jars and jars with twist-off lids in the closed vacuum chamber:
Cleaning and maintenance
Caring for the environment
Disposal of the packing material
Disposal of your old appliance
Overview
EVS 7010
EVS 7670
Controls and indicators
Included accessories
Vacuum adapter
Vacuum-sealing bag support
Cleaning for the first time
Cleaning the drawer for the first time
Operation
Storage compartment
Opening the storage compartment
Closing the storage compartment
Reopening the vacuum-sealing compartment
Suitable vacuum-sealing bags
Important usage information
Tips
Using the vacuum settings
Using the sealing levels
Vacuuming and sealing bags
After the vacuum-sealing process
Sealing the bag early
Vacuuming sealing external containers
After the vacuum-sealing process
After use
Canceling a vacuum-sealing process
Cleaning and care
Unsuitable cleaning agents
Cleaning the drawer front and glass lid
Cleaning the vacuum chamber and sealing bar
Cleaning the vacuum adapter
Cleaning the vacuum-sealing bag support
Carrying out a drying cycle
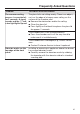
Frequently Asked Questions
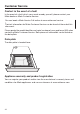
Customer Service
Contact in the event of a fault
Data plate
Appliance warranty and product registration
Installation
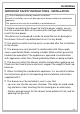
IMPORTANT SAFETY INSTRUCTIONS - INSTALLATION
Installation notes
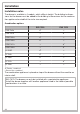
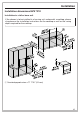
Combination options
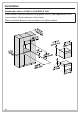
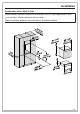
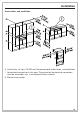
Installation dimensions EVS 7010
Installation in a tall or base unit
Combination with an H 2840 or CVA/DGC/H 7 x4x
Combination with a DGC/H 7 x6x
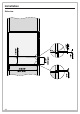
Side view
Connections and ventilation
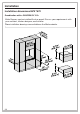
Installation dimensions EVS 7670
Combination with a CVA/DGC/H 7 x7x
Combination with a DGC 7 x8x
Side view
Connections and ventilation
Installation
Preparing the drawer
Installing the air filter and removing the safety screws
Installing the drawer
Installing the anti-tipping mechanism
Installing and connecting the drawer
Aligning the front of the drawer
Electrical connection
Connection
Connection data
Installation
*INSTALLATION*
48
Side view
1
...
...
46
47
48
49
50
...
...
64