
Operating and Installation Instructions
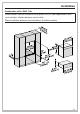
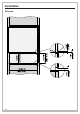
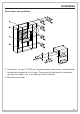
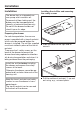
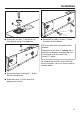
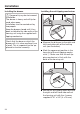
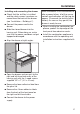
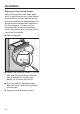
Table Of Contents
- Contents
- IMPORTANT SAFETY INSTRUCTIONS
- Caring for the environment
- Overview
- Cleaning for the first time
- Operation
- Cleaning and care
- Frequently Asked Questions
- Customer Service
- Installation

Installation
*INSTALLATION*
57
Installing and connecting the drawer
Check that the air filter is installed
and the safety screws have been re-
moved from the back of the drawer
(see “Installation – Building in”).
Connect the power cord to the
drawer.
Slide the closed drawer into the
housing unit. When doing so, make
sure that the power cord does not get
trapped or damaged.
Align the drawer at right angles.
Open the drawer and secure it to the
right and left-hand side walls of the
housing unit with the 2wood screws
supplied 1/8" x 1" (3.5x25mm).
Remove the foam adhesive label from
the glass lid.
Remove the 4foam adhesive labels
from the back of the front panel on
the right and left-hand sides.
Connect the drawer to the power
supply.
When the drawer is first connected, or
after a power failure, all of the sensor
controls and indicators will light up for
approx. 10seconds for testing (initial-
ization). As soon as they go out, the
drawer is ready for use.
When installing the combination ap-
pliance, protect the top edge of the
front panel from abrasive marks.
Install the combination appliance in
accordance with the operating and
installation instructions supplied with
it.