Operating and installation instructions F 623 Ui F 623 Ui-2 It is essential to read these operating instructions before installing or using the machine, to avoid the risk of accident or damage to the machine. G M.-Nr.
Contents Description of the appliance . . . . . . . . . . . . . . . . . . . . . . . . . . . . . . . . . . . . . . . . 4 Caring for the environment . . . . . . . . . . . . . . . . . . . . . . . . . . . . . . . . . . . . . . . . . . 5 Warning and Safety instructions . . . . . . . . . . . . . . . . . . . . . . . . . . . . . . . . . . . . . 6 How to save energy . . . . . . . . . . . . . . . . . . . . . . . . . . . . . . . . . . . . . . . . . . . . . . . 10 Operation . . . . . . . . . . . . . . . . . . . . . . .
Contents Electrical connection . . . . . . . . . . . . . . . . . . . . . . . . . . . . . . . . . . . . . . . . . . . . . . 29 Electrical connection U.K. . . . . . . . . . . . . . . . . . . . . . . . . . . . . . . . . . . . . . . . . . . . 29 Installation . . . . . . . . . . . . . . . . . . . . . . . . . . . . . . . . . . . . . . . . . . . . . . . . . . . . . . 30 Location . . . . . . . . . . . . . . . . . . . . . . . . . . . . . . . . . . . . . . . . . . . . . . . . . . . . . . . . . 30 Climate range . . .
Description of the appliance a Alarm button and indicator light b Temperature display e Drawer with freezer calendar f Marker system for frozen food g Ventilation gaps 4 c Super freeze button and indicator light d On/off and temperature selector dial
Caring for the environment Disposal of the packing material The transport and protective packing has been selected from materials which are environmentally friendly for disposal, and can normally be recycled. Ensure that any plastic wrappings, bags etc. are disposed of safely and kept out of the reach of babies and young children. Danger of suffocation! Rather than just throwing these materials away, please ensure that they are recycled.
Warning and Safety instructions Technical safety This appliance complies with all relevant legal safety requirements. Inappropriate use can however lead to personal injury and damage to property. To avoid the risk of accidents and damage to the appliance, read the instructions carefully before using for the first time. They contain important notes on installation, safety, operation and care of the appliance. Keep these operating instructions in a safe place and pass them on to any future user.
Warning and Safety instructions Before connecting the appliance to the mains supply, make sure that the rating on the data plate corresponds to the voltage and frequency of the household supply. This data must correspond in order to avoid risk of damage to the appliance. Consult a qualified electrician if in doubt.
Warning and Safety instructions Do not take ice cubes out with your bare hands and never place ice cubes or ice lollies in your mouth straight from the freezer. The very low temperature of the frozen ice or lollies can cause frost burn to the lips and tongue. Do not refreeze thawed or partially thawed food. Defrosted food should be used up as quickly as possible as food soon loses it nutritional value and goes off. Defrosted food may only be re-frozen after it has been cooked.
Warning and Safety instructions The appliance is designed for use within certain climate ranges (ambient temperatures). It must not be used in ranges for which it is not designed. The climate range for your appliance is stated on the data plate inside the appliance. Installing it in a room with too low an ambient temperature, e.g. a garage, will lead to the appliance switching off for longer periods so that it cannot maintain the required temperature.
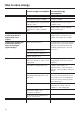
How to save energy Normal energy consumption Increased energy consumption In a ventilated room. In an enclosed, unventilated room. Protected from direct sunlight. In direct sunlight. Not situated near to a heat source (radiator, oven). Situated near to a heat source (radiator, oven. Where the ambient room temperature is ideal at approx. 20°C. Where there is a high ambient room temperature. Temperature setting with a thermostat which is approximate (set in stages). With a medium setting of 2 to 3.
How to save energy Normal energy consumption Defrosting Increased energy consumption Defrost the freezer when a layer of A layer of ice hinders the cold ice one centimetre thick has built from reaching the frozen food, and causes an increase in energy up. consumption.
Operation Before using for the first time Switching off the alarm ^ Clean the inside of the appliance and the accessories with luke warm water and a little washing up liquid and then dry using a soft cloth. Important: To ensure the correct functioning of the appliance, let it stand for between 1½ and 2 hour after transporting it to its final location before connecting it to the mains. Switching on ^ Press the alarm button. The alarm stops.
The correct temperature It is very important to set the correct temperature for storing food in the freezer. Micro organisms will cause food which is not stored at the correct temperature to deteriorate rapidly. Temperature influences the growth rate of these micro organisms. Reducing the temperature reduces their growth rate. For freezing fresh food and storing frozen food for a long time a temperature of at least -18 °C is needed. At this temperature the growth of micro organisms is generally halted.
The correct temperature Temperature display During normal operation the temperature display on the control panel shows the temperature in the warmest part of the appliance. Ranges of temperatures rather than individual temperatures are shown. This means that the temperatures displayed are approximate. If you have adjusted the temperature dial in order to set a different temperature, wait for approx. 6 hours if the freezer is not very full and for approx.
Alarm Your appliance has been fitted with a warning system which ensures that the temperature in the freezer cannot rise unnoticed. It is always active. An alarm will sound and the alarm indicator light will flash if the temperature becomes too warm. The setting on the temperature control determines the temperature the appliance recognises as too warm. Switching the alarm tone off early The alarm stops and the indicator light goes out once the set temperature range has been reached.
Super freeze Freezing fresh food Switching on super freeze Fresh food should be frozen as quickly as possible. This way the nutritional value of the food, its vitamin content, appearance and taste are not impaired. When freezing small quantities of food in the freezer the super freeze function should be switched on 4 - 6 hours beforehand. When freezing the maximum load of food the super freeze function should be switched on 24 hours beforehand.
Freezing and storing food Maximum freezing capacity Home freezing To ensure that fresh food placed in the freezer freezes through to the core as quickly as possible, the maximum freezing capacity must not be exceeded. The maximum freezing capacity for freezing within a 24 hour period is given on the data plate "Freezing capacity ...kg/24 hrs". Only freeze fresh food which is in a good condition.
Freezing and storing food – Do not season fresh foods or blanched vegetables before freezing. Only season cooked food lightly before freezing but care should be taken as the taste of some spices alters when frozen. – Do not place hot foods or drinks in the freezer. This causes already frozen food to thaw and increases the energy consumption considerably. Allow hot foods and drinks to cool down before placing them in the freezer.
Freezing and storing food When freezing, make sure that food already frozen does not come into contact with fresh food being frozen as this could cause the frozen food to begin to defrost. month the food was first placed in the freezer. Defrosting Frozen food can be defrosted in different ways: Freezer calendar – in the microwave oven, The freezer calendar on the freezer drawer gives the length of time which various foods can be stored for effectively.
Freezing and storing food Ice cubes (with or without release button depending on model) ^ Press down the release button on the ice cube tray and fill the tray with water. Any excess will flow out through the outlet. ^ Now pull the release button up to seal the ice cube tray. Place the tray on the bottom of one of the freezer drawers. ^ Once frozen use a blunt instrument, for example a spoon handle, to remove the ice tray from the freezer.
Defrosting The freezer does not defrost automatically because frozen food must not be allowed to defrost. In normal use ice and frost will form on the aluminium panels and drawer fronts. If allowed to accumulate, this will impair the efficiency of the freezer and increase the consumption of electricity. Do not scrape ice and frost off the evaporator plates as this can damage the evaporator plates and the freezer making it unusable. The freezer should be defrosted from time to time.
Defrosting After defrosting ^ Take the bottom drawer out of the appliance and empty it. ^ Use a sponge or towel to soak up any water from defrosting still in the appliance. ^ Clean the freezer and then dry it thoroughly. ^ Close the door and then switch the freezer on. ^ Switch on the super freeze function so that the freezer can get down to temperature quickly. The super freeze indicator light will come on.
Cleaning and care Never use cleaning agents containing abrasive substances such as sand, soda, acids or chemical solvents. "Non-abrasive" cleaning agents are also unsuitable as they can cause matt areas to appear. ^ Take out any removable parts for cleaning e.g. drawers. Interior and accessories Use lukewarm water with a little mild detergent. All accessories should all be hand washed. Do not wash in a dishwasher.
Cleaning and care After cleaning ^ Close the door, and switch the appliance on. ^ Switch on the super freeze function so that the freezer can get down to temperature quickly. The super freeze indicator light will come on. ^ Once the freezer has reached the required temperature place the food back in the drawers and place them back in the freezer. ^ The super freeze function can be switched off once a constant temperature of at least -18 °C has been reached in the freezer.
Problem solving guide Repairs to electrical appliances should only be carried out by a suitably qualified and competent person in accordance with local and national safety regulations. Unauthorised repairs could be dangerous. The following faults can be corrected without contacting the Miele Service Department: What to do if . . . . . . the appliance does not get cool. ^ Make sure that the temperature dial is not pointing to the "0" position. ^ Check that the plug is correctly inserted in the socket.
Problem solving guide . . . the super freeze indicator light is not lit up although the appliance is working. ^ The indicator light is defective. Call the Miele Service Department. . . . food has frozen together. Use a blunt instrument, e.g. a spoon handle or plastic scraper to carefully prise it apart. . . . there is a thick layer of ice in the freezer. ^ Check whether the door closes properly. ^ Defrost and then clean the freezer.
Noises Normal noises What causes them Brrrrr... Humming noise made by the motor (compressor). This noise can get louder for brief periods when the motor is switching on. Blubb, blubb.... A gurgling noise can be heard when coolant is circulating through the pipes. Click.... Clicking sounds are made when the thermostat switches the motor on and off. Sssrrrrr.... On multi-zone and frost-free appliances you can sometimes just hear the movement of air circulating inside the appliance.
After sales service In the event of a fault which you cannot correct yourself, or if the appliance is under guarantee, please contact: – your Miele Dealer or – the Miele Service Department (see back cover for address). When contacting your Dealer or the Service Department, please quote the model and serial number of your appliance. This information is given on the data plate. Please note that telephone calls may be monitored and recorded for training purposes.
Electrical connection Electrical connection U.K. Non-rewireable plugs (BS 1363) All electrical work should be carried out by a suitably qualified and competent person in accordance with local and national safety regulations. The fuse cover must be re-fitted when changing the fuse, and if the fuse cover is lost, the plug must not be used until a suitable replacement is obtained.
Installation Building in "side-by-side" This appliance must be built in, otherwise it could tip up. Location The appliance should be installed in a dry well ventilated room. The room temperature should not go above or below the climate range for which the appliance is designed. The higher the ambient temperature of the room the more energy the appliance requires to operate.
Building in dimensions Plinth height A depends on the building under height: With a building under height of 820 mm the plinth height will be between 100 – 170 mm. Appliances in climate range ST or T require a minimum plinth height of 120 mm. The plinth height is affected by the height of the furniture front panel on the appliance. With a building under height of 870 mm the plinth height will be between 150 – 220 mm.
Changing the door hinging Before building the appliance in decide on the door hinging. If left hand door hinging is required follow these instructions. ^ Unscrew the fixing screws c completely, and loosely screw them into the holes on the opposite side of the appliance e. ^ Open the appliance door and remove all the freezer drawers. ^ Using a screwdriver, remove all the spacer pieces a and fit them on the opposite side. ^ Unscrew and remove screws a. Do not close up the hinges. You might hurt yourself.
Changing the door hinging ^ Fit the appliance door onto the previously fitted screws a, and then tighten the screws. ^ Refit the covers b.
Installing the appliance Building under Where the building under height is 820 mm the appliance can be pushed straight into the niche. Align the appliance beforehand using the adjustable feet. Where the building under height is 870 mm the adjustable feet will need to be extended by about 50 mm. Use an SW 30 spanner or screwdriver to do this. Then align the appliance.
Installing the appliance If there is a continuous plinth in the kitchen a ventilation gap will need to be made in the plinth for the appliance: Building-under height [mm] Dimension H [mm] 820 870 60+1 110+1 The ventilation gaps must not be covered over. Fitting a furniture door ^ A gap of 8mm must be maintained between the appliance door and the fixing bracket.
Installing the appliance ^ Using a pencil mark a line down the centre of the inside of the furniture door. ^ Hang the fixing bracket with the fitting aids a onto the inside side of the furniture door. Align the fixing bracket centrally. ^ Attach the fixing bracket securely using at least 6 short 4 x 14 mm chip board screws b. (On cassette doors only use 4 screws on the edges). ^ Pull the fitting aids upwards to remove them c.
Installing the appliance – (On large or divided doors attach a second pair of fixing brackets a in the handle region of the door. Use the pre-drilled holes in the appliance door.) Securing the appliance ^ Securing the appliance door to the furniture door: – Secure bracket a to the appliance door by screwing hexagon headed screw b through the pre-drilled holes in the appliance door. ^ Whilst counterholding the adjusting bolts b with a screwdriver, tighten nuts a at the top of the appliance door.
Alteration rights reserved / 2105 F 623 Ui F 623 Ui-2 M.-Nr.