Operating and installation instructions Freezer F 9212 i To avoid the risk of accidents or damage to the appliance, it is essential to read these instructions before it is installed and used for the first time. G M.-Nr.
Contents Guide to the appliance . . . . . . . . . . . . . . . . . . . . . . . . . . . . . . . . . . . . . . . . . . . . . 4 Caring for the environment . . . . . . . . . . . . . . . . . . . . . . . . . . . . . . . . . . . . . . . . . . 5 Warning and Safety instructions . . . . . . . . . . . . . . . . . . . . . . . . . . . . . . . . . . . . . 6 How to save energy . . . . . . . . . . . . . . . . . . . . . . . . . . . . . . . . . . . . . . . . . . . . . . . 11 Switching on and off . . . . . . . . . . . . . . .
Contents Electrical connection . . . . . . . . . . . . . . . . . . . . . . . . . . . . . . . . . . . . . . . . . . . . . . 30 Installation . . . . . . . . . . . . . . . . . . . . . . . . . . . . . . . . . . . . . . . . . . . . . . . . . . . . . . 31 Location . . . . . . . . . . . . . . . . . . . . . . . . . . . . . . . . . . . . . . . . . . . . . . . . . . . . . . . . . 31 Climate range . . . . . . . . . . . . . . . . . . . . . . . . . . . . . . . . . . . . . . . . . . . . . . . . . . 31 Ventilation. . . .
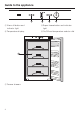
Guide to the appliance a Alarm off button and indicator light c Super freeze button and indicator light b Temperature display d On/Off and temperature selector dial a Freezer drawers 4
Caring for the environment Disposal of the packing material The transport and protective packing has been selected from materials which are environmentally friendly for disposal, and can normally be recycled. Ensure that any plastic wrappings, bags etc. are disposed of safely and kept out of the reach of babies and young children. Danger of suffocation! Rather than just throwing these materials away, please ensure that they are recycled.
Warning and Safety instructions Correct application This appliance complies with all relevant legal safety requirements. Improper use of the appliance can, however, present a risk of both personal injury and material damage. To avoid the risk of accidents and damage to the appliance, please read these instructions carefully before installation and before using it for the first time. They contain important notes on the installation, safety, operation and care of the appliance.
Warning and Safety instructions Technical safety Before setting up the appliance, check it for any externally visible damage. Do not install and use a damaged appliance. This appliance contains the coolant Isobutane (R600a), a natural gas which is environmentally friendly. Although it is flammable, it does not damage the ozone layer and does not increase the greenhouse effect. The use of this environmentally friendly coolant has, however, led to a slight increase in the noise level of the appliance.
Warning and Safety instructions Safe operation of the appliance is only assured if it has been installed and connected in accordance with these operating and installation instructions. This appliance may only be used in mobile installations such as ships, caravans, aircraft etc. if a risk assessment of the installation has been carried out by a suitably qualified engineer.
Warning and Safety instructions Do not store cans or bottles containing carbonated drinks or liquids which could freeze in the freezer section. The cans or bottles could explode. Danger of injury and damage to the appliance. When cooling drinks quickly in the freezer, make sure bottles are not left in for more than one hour, otherwise they could burst, resulting in injury or damage. Observe the "use by" dates given on food to avoid the risk of food poisoning.
Warning and Safety instructions Disposal of your old freezer Before disposing of an old appliance, first make the door latch or lock unusable. This way you will prevent children from accidentally locking themselves in and endangering their lives. Disconnect it from the mains, cut off the cable directly behind the appliance, and render any plug unusable. Be careful not to damage any part of the pipework whilst awaiting disposal, e.g. by – puncturing the refrigerant channels in the evaporator.
How to save energy Normal energy consumption Increased energy consumption In a ventilated room. In an enclosed, unventilated room. Protected from direct sunlight. In direct sunlight. Not situated near to a heat source (radiator, oven). Situated near to a heat source (radiator, oven). Where the ideal ambient room temperature is approx. 20°C. Where there is a high ambient room temperature. Temperature setting with a thermostat which is approximate (set in stages). With a medium setting of 2 to 3.
How to save energy Defrosting 12 Normal energy consumption Increased energy consumption Defrost the freezer compartment when a layer of ice 0.5 cm thick has built up. A layer of ice hinders the cold from reaching the frozen food, and causes an increase in energy consumption.
Switching on and off Before using for the first time Cool pack ^ Clean the inside of the appliance and the accessories with luke warm water and a little washing-up liquid, and then dry with a soft cloth. Place the cool pack in the top drawer or, to save space, on the freezer tray. The cool pack will be at its most effective after it has been in the freezer for approx. 24 hours.
The correct temperature It is very important to set the correct temperature for storing food in the appliance. Micro-organisms will cause food which is not stored at the correct temperature to deteriorate rapidly. Temperature influences the growth rate of these micro-organisms. Reducing the temperature reduces their growth rate. To freeze fresh food and to store frozen food for a long time, a temperature of -18 °C is required. At this temperature the growth of micro-organisms is generally halted.
Alarm Your appliance has been fitted with a warning system which ensures that the temperature in the freezer cannot rise unnoticed. An alarm will sound and the alarm indicator light will flash if the temperature becomes too warm. For example, the alarm may sound and the alarm indicator light may flash, – if you freeze a large amount of food at once without having switched on the Super freeze function beforehand. Depending on the temperature in the freezer, you should check the condition of the food.
Super freeze Switch the Super freeze function on before putting fresh food into the freezer. This helps food to freeze quickly and retain its nutrients, vitamins, flavours and appearance. Super freeze is not necessary: – when putting in food that is already frozen. – when freezing up to 2 kg fresh food daily. Switching on Super freeze When freezing small quantities of food in the freezer, the Super freeze function should be switched on 6 hours beforehand.
Freezing and storing food Maximum freezing capacity Storing frozen food To ensure that fresh food placed in the freezer section freezes through to the core as quickly as possible, the maximum freezing capacity must not be exceeded. The maximum freezing capacity for freezing within a 24-hour period is given on the data plate "Freezing capacity ....kg/24 hrs".
Freezing and storing food Home freezing Only freeze fresh food which is in a good condition. Hints on home freezing – The following types of food are suitable for freezing: Fresh meat, poultry, game, fish, vegetables, herbs, fresh fruit, dairy products, pastry, leftovers, egg yolks, egg whites and a range of pre-cooked meals. – The following types of food are not suitable for freezing: Grapes, lettuce, radishes, sour cream, mayonnaise, eggs in their shells, onions, whole raw apples and pears.
Freezing and storing food Before placing food in the freezer Freezing large items ^ When freezing more than 2 kg of fresh food, switch on the Super freeze function for some time before placing the food in the freezer (see "Super freeze"). This also helps to prevent food that is already in the freezer from starting to defrost. If you wish to freeze large items such as a turkey or game, the glass cold plates between the drawers can be removed.
Freezing and storing food Most vegetables can be cooked while still frozen. Just put straight into boiling water or hot fat. The cooking time is slightly less than that of fresh vegetables due to changes in the cell structure. Never re-freeze partially or fully defrosted food. Consume defrosted food as soon as possible as it will lose its nutritional value and spoil if left for too long. Defrosted food may only be re-frozen after it has been cooked.
Freezing and storing food Cool pack The cool pack prevents the temperature in the freezer rising too quickly in the event of a power cut. Place the cool pack in the upper drawer directly on top of food, or in the freezer tray to save space. The cool pack will be at its most effective after it has been in the freezer for approx. 24 hours. If there is a power cut, place the cool pack directly on top of the frozen food in the upper drawer so that the food will be kept cold for as long as possible.
Defrosting the appliance In normal use, ice and frost will form in the freezer. If allowed to accumulate, this will impair the efficiency of the freezer and increase the consumption of electricity. Do not scrape ice and frost off as this can cause damage and render the freezer unusable. The freezer should be defrosted from time to time. It must be defrosted if a layer of ice approx. 0.5 cm thick has accumulated. It is best to defrost when only very little food or no food at all is left in the freezer.
Defrosting the appliance After defrosting ^ Use a sponge or towel to soak up any water from defrosting still in the appliance. ^ Clean the appliance, and then dry it thoroughly. ^ Close the appliance door, insert the plug in the socket and switch the appliance back on. ^ Switch on the Super freeze function so that the appliance can cool down quickly. The indicator light will come on.
Cleaning and care Never use cleaning agents containing abrasive substances such as sand, soda, acids, chlorides or chemical solvents. "Non-abrasive" cleaning agents are also unsuitable as they can cause matt areas to appear. Make sure that water cannot get into the temperature selector. Never use steam-cleaning apparatus to defrost or clean the appliance. Steam could reach the electrical components and cause a short circuit. The data plate located inside the appliance must not be removed.
Cleaning and care After cleaning ^ Close the door and switch the appliance on. ^ Switch on the Super freeze function so that the freezer can cool down quickly. The indicator light will come on. ^ Once the temperature in the freezer is sufficiently low, place the food back in the freezer drawers and put them back in the freezer. ^ You can switch the Super freeze function off once the temperature in the freezer has reached a constant temperature of at least -18°C. The indicator light will then go out.
Problem solving guide . . ? . . . the temperature is too low. Repairs to electrical appliances should only be carried out by a suitably qualified and competent person in strict accordance with current local and national safety regulations. Repairs and other work by unqualified persons could be dangerous. The manufacturer cannot be held liable for unauthorised work. Ensure that current is not supplied to the appliance until after maintenance or repair work has been carried out.
Problem solving guide . . ? Depending on the temperature in the freezer, you should check the condition of the food. If food has defrosted or started to defrost, check that it is still safe to use, and if so, use it as quickly as possible. Defrosted food may only be re-frozen after it has been cooked. . . . the Super freeze indicator light and the temperature display are both flashing at the same time.
Noises Normal noises What causes them Brrrrr... Humming noise made by the motor (compressor). This noise can get louder for brief periods when the motor is switching on. Blubb, blubb.... A gurgling noise can be heard when coolant is circulating through the pipes. Click.... Clicking sounds are made when the thermostat switches the motor on and off. Sssrrrrr.... On multi-zone and frost-free appliances you can sometimes just hear the movement of air circulating inside the appliance.
After sales service In the event of a fault which you cannot correct yourself, or if the appliance is under guarantee, please contact: – your Miele Dealer or – the Miele Service Department (see back cover for address). When contacting your Dealer or the Service Department, please quote the model and serial number of your appliance. This information is given on the data plate. Please note that telephone calls may be monitored and recorded for training purposes.
Electrical connection Electrical connection U.K. Non-rewireable plugs (BS 1363) All electrical work should be carried out by a suitably qualified and competent person in strict accordance with current local and national safety regulations (BS 7671 in the UK). The fuse cover must be re-fitted when changing the fuse, and if the fuse cover is lost, the plug must not be used until a suitable replacement is obtained.
Installation Ventilation This appliance must be built in, otherwise it could tip up. Location The appliance should be installed in a dry, well-ventilated room. The room temperature should not go above or below the climate range for which the appliance is designed. The higher the ambient temperature of the room, the more energy the appliance requires to operate. It should not be installed where it is exposed to direct sunlight or directly adjacent to a heat-producing appliance such as an oven or a radiator.
Installation Before installation ^ Before installation remove the cover strip, sealing strip and other accessories from inside the appliance and from the external rear wall of the appliance. ^ On no account should the spacers be removed from the back of the appliance. These ensure the gap required between the back of the appliance and the wall is maintained. ^ Remove any cable clips from the rear of the appliance. ^ Check that all parts at the back of the appliance are unhindered.
Building-in dimensions [mm] 8 ³ 200 £ 2100 ³3 cm 2 ³5 50 568 A 560- ³ 200 cm2 Niche height [mm] A F 9212 i 874 - 890 33
Changing the door hinging Before building the appliance in, you will need to decide on which side the door is to be hinged. If left hand door hinging is required, follow the instructions below. To change the door hinging, you will need various sizes of Torx screwdrivers and a slotted screwdriver. Appliance door ^ Open the appliance door. ^ Pull off covers a and b. ^ Unscrew hinge pin c. ^ Tilt the door, and lift it off. ^ Unscrew hinge plate d, and replace it on the opposite side using the same screws.
Building in the appliance Preparing the appliance All building-in instructions given are for a right hand hinged appliance. If you have converted the appliance to left hand hinging you will need to adapt these instructions accordingly. Building into a peninsular run When built into a peninsular run, the rear of the building in niche must be fitted with a kitchen furniture panel. Aligning the housing unit ^ Slide cover strip a into the holder as shown, with the bumps facing downwards.
Building in the appliance Building in the appliance ^ Align the appliance height from above on both sides using adjusting screw f. ^ Plug the gap between the appliance and the furniture wall on the door opening side with sealing strip g. Press the sealing strip into the gap starting at the bottom, and cut to length so that it fits snugly to the lower edge of bracket b. ^ Remove cover a. ^ Secure bracket b with screws c (4.8 x 16 mm).
Building in the appliance Securing the appliance and fitting the furniture door ^ Replace cover a, and cap all the holes with stoppers l and m. ^ Secure door fixings n to the appliance door with screw o (3.9 x 9.5 mm), to suit the position of the handle. Very large doors will require several door fixings. ^ Open the door right out, and push fixing guides p into door fixings n. ^ Position the furniture door onto the appliance door, and secure fixing guides p to the furniture door using screws q (4 x 14 mm).
Alteration rights reserved / 5006 F 9212 i M.-Nr.