
User Guide and Installation Instruction

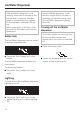
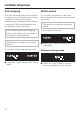
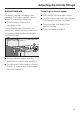
Table Of Contents
- Contents
- IMPORTANT SAFETY INSTRUCTIONS 4
- Guide to the freezer 8
- Before use 10
- Settings 11
- Temperature and door alarm 14
- Setting the temperature 15
- Using the freezer efficiently 17
- SuperCool 20
- Ice/Water Dispenser 21
- Automatic defrost 27
- Adjusting the interior fittings 28
- Cleaning and care 30
- Water filter 36
- Lead free certificate 41
- Frequently asked questions 42
- Causes of noises 48
- After sales service 49
- Caring for the environment 52
- Installation 53
- Installing the appliance 62
- Before you begin 62
- RemoteVision module installation 65
- Preparing the installation niche 66
- Sliding the appliance into the installation niche 70
- Aligning the appliance 71
- Attaching the appliance to the installation niche 72
- Preparing the custom door 74
- Attaching and aligning the custom door front 76
- Aligning the Ice/Water Dispenser 79
- Attaching the frame and the shelf 81
- Plumbing 82
- Electrical connection 85
- RemoteVision (optional accessory) 86
- Contact details 91

Freezer baskets
For easier loading, unloading, and
cleaning, the freezer baskets can be
shifted or completely removed.
^
Pull the basket forward until
resistance is felt.
On the hinged-side of the door is a
safety lock, which must be turned to a
horizontal position before the drawer
can be removed.
^ Using a suitable object, turn the
safety lock to a horizontal position a.
^ On both sides of the basket, pull the
latches b upward and lift the basket
out of the freezer.
Replacing the freezer basket
^
Fully extend the telescopic tracks.
^
Lay the basket onto the tracks so that
it connects in the front and back.
^
Turn the safety lock back to the
vertical position.
^
Slide the freezer basket in.
Adjusting the interior fittings
29