
User Guide and Installation Instruction


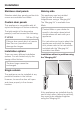
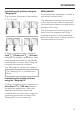


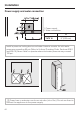
Table Of Contents
- Contents
- IMPORTANT SAFETY INSTRUCTIONS 4
- Guide to the freezer 8
- Before use 10
- Settings 11
- Temperature and door alarm 14
- Setting the temperature 15
- Using the freezer efficiently 17
- SuperCool 20
- Ice/Water Dispenser 21
- Automatic defrost 27
- Adjusting the interior fittings 28
- Cleaning and care 30
- Water filter 36
- Lead free certificate 41
- Frequently asked questions 42
- Causes of noises 48
- After sales service 49
- Caring for the environment 52
- Installation 53
- Installing the appliance 62
- Before you begin 62
- RemoteVision module installation 65
- Preparing the installation niche 66
- Sliding the appliance into the installation niche 70
- Aligning the appliance 71
- Attaching the appliance to the installation niche 72
- Preparing the custom door 74
- Attaching and aligning the custom door front 76
- Aligning the Ice/Water Dispenser 79
- Attaching the frame and the shelf 81
- Plumbing 82
- Electrical connection 85
- RemoteVision (optional accessory) 86
- Contact details 91

Base
A fully loaded appliance is very heavy.
The load-bearing capacity of your floor
must meet the following requirements.
The approx. weight of a fully loaded
machine is:
F 1473 Vi ...........503lbs(228 kg)
To ensure that the appliance is installed
securely and functions properly, the
base must be flat, level and made of a
hard, rigid material.
If in doubt, contact Miele.
Furniture/fixtures
The new appliance will be mounted
securely to adjacent and overhead
furniture/fixtures.
For this reason it is essential that all
attachable furniture/fixtures are
connected securely to the base or the
wall by suitable means.
Ventilation
The air intake and outlet must not be
blocked or covered in any way. They
also need to be dusted/cleaned on a
regular basis.
Installation niche
To ensure safe, trouble-free installation
and the best possible cosmetic result,
check to be sure that the installation
space complies with the installation
dimensions. See "Niche dimensions".
The side walls of the installation cavity
must be plumb.
The minimum thickness of the side
walls and the top wall must be
5
/
8
"
(16 mm).
The minimum thickness of the toe-kick
panel must be ½" (13 mm). A thickness
of
3
/
4
" (19 mm) is recommended.
Installation
55