
User Guide and Installation Instruction


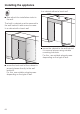

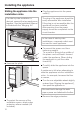
Table Of Contents
- Contents
- IMPORTANT SAFETY INSTRUCTIONS 4
- Guide to the freezer 8
- Before use 10
- Settings 11
- Temperature and door alarm 14
- Setting the temperature 15
- Using the freezer efficiently 17
- SuperCool 20
- Ice/Water Dispenser 21
- Automatic defrost 27
- Adjusting the interior fittings 28
- Cleaning and care 30
- Water filter 36
- Lead free certificate 41
- Frequently asked questions 42
- Causes of noises 48
- After sales service 49
- Caring for the environment 52
- Installation 53
- Installing the appliance 62
- Before you begin 62
- RemoteVision module installation 65
- Preparing the installation niche 66
- Sliding the appliance into the installation niche 70
- Aligning the appliance 71
- Attaching the appliance to the installation niche 72
- Preparing the custom door 74
- Attaching and aligning the custom door front 76
- Aligning the Ice/Water Dispenser 79
- Attaching the frame and the shelf 81
- Plumbing 82
- Electrical connection 85
- RemoteVision (optional accessory) 86
- Contact details 91

Before you begin
Read these instructions completely
and carefully.
Have the appliance installed by a
qualified technician, according to
the enclosed installation
instructions.
To reduce the risk of injury or
damage to the product, two people
should be used for installation.
These installation instructions are
intended for use by qualified installers.
In addition to these instructions, the
appliance must be installed in
accordance with all local codes, or in
the absence of a local code.
– In the USA, in accordance with the
National Electric Code,
ANSI/NFPA 70 - latest edition/State
and Municipal codes and/or local
codes.
–
In Canada, in accordance with the
Canadian Electric code C22.1 - latest
edition/Provincial and Municipal
codes and/or local codes.
Tools needed for installation
–
Cordless screwdriver
–
Torx screwdriver
–
Hammer drill
–
Wood drills in different sizes
–
Hammer
–
Rachet 5/16" (8 mm)
–
Adhesive tape
–
Multi-grip pliers
–
Level
–
Tape measure
–
Square
When fastening the cabinet to the wall
behind it (see "Installing the appliance")
use:
–
suitable plugs/screws depending on
the type of wall.
–
several mounting brackets, if required.
Other
– Stepladder
– Dolly, hand truck
– Wooden beam (cross section
min. 3" x 4" [75 mm x 100 mm] as an
alternative tilt protection, length
depends on the width of the
installation niche)
– Wood screws in different sizes
–
Edge protector(s)
Optional accessories
–
"Merging Kit" for side-by-side installation
–
RemoteVision module for wireless
monitoring
Installing the appliance
62