
User Guide and Installation Instruction


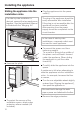
Table Of Contents
- Contents
- IMPORTANT SAFETY INSTRUCTIONS 4
- Guide to the freezer 8
- Before use 10
- Settings 11
- Temperature and door alarm 14
- Setting the temperature 15
- Using the freezer efficiently 17
- SuperCool 20
- Ice/Water Dispenser 21
- Automatic defrost 27
- Adjusting the interior fittings 28
- Cleaning and care 30
- Water filter 36
- Lead free certificate 41
- Frequently asked questions 42
- Causes of noises 48
- After sales service 49
- Caring for the environment 52
- Installation 53
- Installing the appliance 62
- Before you begin 62
- RemoteVision module installation 65
- Preparing the installation niche 66
- Sliding the appliance into the installation niche 70
- Aligning the appliance 71
- Attaching the appliance to the installation niche 72
- Preparing the custom door 74
- Attaching and aligning the custom door front 76
- Aligning the Ice/Water Dispenser 79
- Attaching the frame and the shelf 81
- Plumbing 82
- Electrical connection 85
- RemoteVision (optional accessory) 86
- Contact details 91

^
Push the module into the slot until it
locks into place.
^
Connect the appliance to the power
supply and turn it on. After several
seconds the indicator light e will
come on.
The indicator light will display different
colors one after the other; any control
light at the end indicates that the
module was correctly installed.
If the indicator light does not come on,
installation of the module was
unsuccessful. In that case, repeat the
process. If that does not correct the
problem, contact Miele.
^
Pull the antenna d straight out.
^
Guide the cover b over the antenna
d and screw on the cover.
^ Angle the antenna d so that it faces
to the right or left.
If necessary, disconnect the power
supply and continue installing the
appliance.
Preparing the installation
niche
,
Keep the appliance door closed
until it is securely fastened in the
niche. Tipping hazard.
Because of the size and weight of
the appliance, it is essential to
ensure that the appliance cannot tip
over once it has been mounted in
the niche.
Installing the appliance
66