
User Guide and Installation Instruction
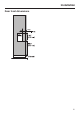


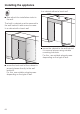

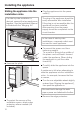
Table Of Contents
- Contents
- IMPORTANT SAFETY INSTRUCTIONS 4
- Guide to the freezer 8
- Before use 10
- Settings 11
- Temperature and door alarm 14
- Setting the temperature 15
- Using the freezer efficiently 17
- SuperCool 20
- Ice/Water Dispenser 21
- Automatic defrost 27
- Adjusting the interior fittings 28
- Cleaning and care 30
- Water filter 36
- Lead free certificate 41
- Frequently asked questions 42
- Causes of noises 48
- After sales service 49
- Caring for the environment 52
- Installation 53
- Installing the appliance 62
- Before you begin 62
- RemoteVision module installation 65
- Preparing the installation niche 66
- Sliding the appliance into the installation niche 70
- Aligning the appliance 71
- Attaching the appliance to the installation niche 72
- Preparing the custom door 74
- Attaching and aligning the custom door front 76
- Aligning the Ice/Water Dispenser 79
- Attaching the frame and the shelf 81
- Plumbing 82
- Electrical connection 85
- RemoteVision (optional accessory) 86
- Contact details 91

Mounting Accessories
The mounting accessories needed for
installing the appliance into the niche
are included in the packaging. Several
plastic bags are included which are
marked alphabetically.
The bag needed for each step will be
marked with its respective letter.
Anti-tip brackets
The anti-tip brackets a keep the
appliance safely secured in the
installation niche b and prevent it from
tipping.
,
Risk of tipping
The installation niche must be
securely attached to the wall behind
it with multiple brackets. This is the
only way the appliance, which is
later secured in the niche, can be
prevented from tipping!
Two anti-tip brackets are
recommended for each appliance. For
side-by-side installations 4 brackets are
recommended.
^ Position the anti-tip brackets on the
left and right in the installation niche
so that there is no more than 3/8"
(10 mm) of space between the
brackets and the side walls.
^ Mark the drill holes in the anti-tip
brackets on the back wall and on the
ceiling of the installation niche.
^ Set the brackets aside - they will be
needed again later.
Screws are supplied with the
appliance for various
applications/materials.
If the anti-tip brackets cannot be
attached securely with the screws
supplied, an alternative anti-tip
device can be used.
Ensure that there are no electrical
wires or plumbing in the area which
the screws could penetrate - risk of
injury and damage.
Installing the appliance
67