
User Guide and Installation Instruction
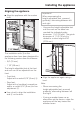
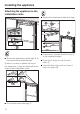
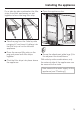


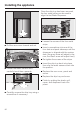
Table Of Contents
- Contents
- IMPORTANT SAFETY INSTRUCTIONS 4
- Guide to the freezer 8
- Before use 10
- Settings 11
- Temperature and door alarm 14
- Setting the temperature 15
- Using the freezer efficiently 17
- SuperCool 20
- Ice/Water Dispenser 21
- Automatic defrost 27
- Adjusting the interior fittings 28
- Cleaning and care 30
- Water filter 36
- Lead free certificate 41
- Frequently asked questions 42
- Causes of noises 48
- After sales service 49
- Caring for the environment 52
- Installation 53
- Installing the appliance 62
- Before you begin 62
- RemoteVision module installation 65
- Preparing the installation niche 66
- Sliding the appliance into the installation niche 70
- Aligning the appliance 71
- Attaching the appliance to the installation niche 72
- Preparing the custom door 74
- Attaching and aligning the custom door front 76
- Aligning the Ice/Water Dispenser 79
- Attaching the frame and the shelf 81
- Plumbing 82
- Electrical connection 85
- RemoteVision (optional accessory) 86
- Contact details 91

Preparing the custom door
^
Load the door basket.
^ Open the appliance door.
^ Unscrew the installation supports l
from the appliance door.
^ Loosen the remaining screws from
the strips m on each side of the door,
then remove.
^ Set aside the screws and side strips
m - you will need them again later.
^ Remove the light switch cover (see
arrow).
^ Measure the distance X between the
bracket from the door and the
overhead furniture/fixtures.
^ Loosen the two nuts.
Set aside the nuts - you will need
them again later.
^ With the inside facing up, lay the
custom door on a stable surface (to
avoid scratch marks, place some
plastic or a cloth on the surface).
Installing the appliance
74