
User Guide and Installation Instruction
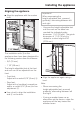
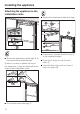
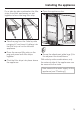
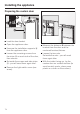


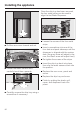
Table Of Contents
- Contents
- IMPORTANT SAFETY INSTRUCTIONS 4
- Guide to the freezer 8
- Before use 10
- Settings 11
- Temperature and door alarm 14
- Setting the temperature 15
- Using the freezer efficiently 17
- SuperCool 20
- Ice/Water Dispenser 21
- Automatic defrost 27
- Adjusting the interior fittings 28
- Cleaning and care 30
- Water filter 36
- Lead free certificate 41
- Frequently asked questions 42
- Causes of noises 48
- After sales service 49
- Caring for the environment 52
- Installation 53
- Installing the appliance 62
- Before you begin 62
- RemoteVision module installation 65
- Preparing the installation niche 66
- Sliding the appliance into the installation niche 70
- Aligning the appliance 71
- Attaching the appliance to the installation niche 72
- Preparing the custom door 74
- Attaching and aligning the custom door front 76
- Aligning the Ice/Water Dispenser 79
- Attaching the frame and the shelf 81
- Plumbing 82
- Electrical connection 85
- RemoteVision (optional accessory) 86
- Contact details 91

^ Mark the distance X on the back-side
of the custom door.
^ Also calculate and mark the center of
the custom door Y.
^ Remove the mounting frame from the
appliance door and position it
according to the markings on the
custom door.
^
Pre-drill the holes.
^
Tightly screw on the bracket using
the pre-drilled holes:
Attach the bracket to each
attachment point with at least one
screw.
^
Attach the bracket at the top with at
least 6 screws.
The bracket includes a variety of holes
for the various design options of
custom doors.
When performing work on the custom
door, always observe the following:
–
Always select the best load-bearing
surface of the custom door as the
location for screws.
–
Always select a screw length that is
shorter than the thickness of the door
front.
^
Secure the door handle to the front of
the appliance from the inside.
Installing the appliance
75