
User Guide and Installation Instruction
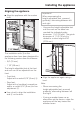
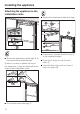
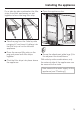
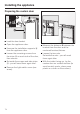


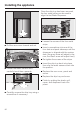
Table Of Contents
- Contents
- IMPORTANT SAFETY INSTRUCTIONS 4
- Guide to the freezer 8
- Before use 10
- Settings 11
- Temperature and door alarm 14
- Setting the temperature 15
- Using the freezer efficiently 17
- SuperCool 20
- Ice/Water Dispenser 21
- Automatic defrost 27
- Adjusting the interior fittings 28
- Cleaning and care 30
- Water filter 36
- Lead free certificate 41
- Frequently asked questions 42
- Causes of noises 48
- After sales service 49
- Caring for the environment 52
- Installation 53
- Installing the appliance 62
- Before you begin 62
- RemoteVision module installation 65
- Preparing the installation niche 66
- Sliding the appliance into the installation niche 70
- Aligning the appliance 71
- Attaching the appliance to the installation niche 72
- Preparing the custom door 74
- Attaching and aligning the custom door front 76
- Aligning the Ice/Water Dispenser 79
- Attaching the frame and the shelf 81
- Plumbing 82
- Electrical connection 85
- RemoteVision (optional accessory) 86
- Contact details 91

Attaching the toe-kick cover
The maximum height of the toe-kick
cover is 4" (102 mm) from the top of
the floor. Do not cover the ventilation
slits in the plinth. Risk of damage to
the appliance.
^
If required, cut the toe-kick cover to
the required length and height.
^
Attach the plinth to the appliance,
and put the included cover plates in
place.
^
Attach the toe-kick cover to the
plinth.
Mounting the air separator
The air separator on the inside of the
freezer door keeps the supply and
exhaust air separate. This prevents
warm exhaust air from flowing into the
machine, optimizing the energy
performance of the unit.
^ If necessary, shorten the three parts
of the air separator.
^
Insert the foam pieces back into the
sides.
^
Open the freezer door.
^
Wedge the air separator at the
bottom of the freezer door, so it
connects in place.
Installing the appliance
78