
Operating and Installation instructions
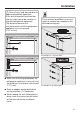
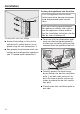
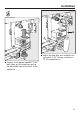
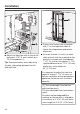
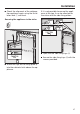
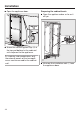
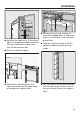

Table Of Contents
- Contents
- IMPORTANT SAFETY INSTRUCTIONS
- Caring for the environment
- Installation
- Installation location
- Installation notes
- Specifications for the plumbed water connection
- Installation dimensions
- Dimensions of the cabinet front
- Building in the appliance
- Before starting...
- Tools required
- Weight of cabinet front
- Aligning the installation niche
- Checking the installation niche
- Before installation
- Preparing the installation niche
- Pushing the appliance into the niche
- Aligning the refrigeration appliance
- Securing the appliance in the niche
- Preparing the cabinet fronts
- Securing and aligning the cabinet front
- Mounting the fixing brackets
- Securing the covers
- Mounting the cover in a side-by-side combination
- Securing the toe-kick ventilation grille and toe-kick cover
- Water connection
- Electrical connection
- Saving energy
- Guide to the appliance
- Accessories
- Before first use
- Switching on and off
- Selecting additional settings
- The correct temperature
- Using SuperFrost
- Temperature and door alarm
- Adjusting the interior fittings
- Freezing and storing food
- Making ice cubes
- Automatic defrosting
- Cleaning and care
- Water filter
- Frequently Asked Questions
- Causes of noises
- Customer Service
- Declaration of conformity
- Copyrights and licenses

Installation
*INSTALLATION*
39
Unscrew the angle trims from both
sides of the appliance door and place
the trims and screws to one side –
they will be required later.
Close the appliance door.
Measure the gapX between the
mounting frame and the upper edge
of the adjacent cabinet front.
Remove the nuts and washers
from the threaded bolts and store
them in a safe place – they will be re-
quired later.
Take the mounting frame off the
appliance door by removing it up-
wards.
For inset fronts: always pay attention
to the length of the screws when se-
curing the metal strip to the cabinet
front.