
Operating and Installation Guide


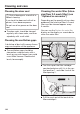
Table Of Contents
- Contents
- IMPORTANT SAFETY INSTRUCTIONS
- Caring for the environment
- Installation
- Installation location
- Installation notes
- Specifications for the plumbed water connection
- Installation dimensions
- Dimensions of the cabinet front
- Building in the appliance
- Before starting...
- Tools required
- Weight of cabinet front
- Aligning the installation niche
- Checking the installation niche
- Before installation
- Preparing the installation niche
- Pushing the appliance into the niche
- Aligning the refrigeration appliance
- Securing the appliance in the niche
- Preparing the cabinet fronts
- Securing and aligning the cabinet front
- Mounting the fixing brackets
- Securing the covers
- Mounting the cover in a side-by-side combination
- Securing the toe-kick ventilation grille and toe-kick cover
- Water connection
- Electrical connection
- Saving energy
- Guide to the appliance
- Accessories
- Before first use
- Switching on and off
- Selecting additional settings
- The correct temperature
- Using SuperFrost
- Temperature and door alarm
- Adjusting the interior fittings
- Freezing and storing food
- Making ice cubes
- Automatic defrosting
- Cleaning and care
- Water filter
- Frequently Asked Questions
- Causes of noises
- Customer Service
- Declaration of conformity
- Copyrights and licenses

Making ice cubes
95
For the automatic ice cube maker to
operate, it must be connected to a
water supply (see “Installation – Water
supply”).
Risk to health due to contami-
nated water.
Consuming polluted water can lead
to illnesses.
The first 3batches of ice cubes
made after the ice cube maker is
started up must not be consumed,
as the water will have been used for
the initial rinsing of the water supply
line.
This applies to the initial commis-
sioning as well as when using the
appliance again after it has been
turned off for a long while.
Turning on the ice maker
Make sure that the ice cube container
is correctly located underneath the
ice maker.
In Settings mode , use the and
sensor controls to select the Dis-
penser Unit and select OK to confirm
your selection.
Use the and sensor controls to
select On and select OK to confirm
your selection.
Once the freezer zone has cooled down
to its set temperature, the ice maker will
fill with water.
As soon as the water is frozen, the ice
cubes drop out of the ice maker into the
ice cube container.
Ice cube production is halted automati-
cally as soon as the ice cube container
is full.
The ice maker can make up to approx.
3 lb (1.3kg) of ice cubes in 24hours.
The amount of ice cubes made by the
appliance depends on the temperature
in the freezer zone. The lower the
temperature, the more ice cubes
are produced.
After the setting up the appliance for
the first time, it can take up to
10hours for the first ice cubes to drop
out of the ice maker and collect in the
ice cube container.
Risk of damage due to blocking
of the ice maker.
The ice maker could become
blocked and, as a result, be dam-
aged.
Do not place any bottles or food into
the ice cube container to chill them
quickly.
Empty the ice cube container at reg-
ular intervals, or at least if you have
not produced any ice for more than a
week. This will ensure that you al-
ways have fresh ice and the ice
cubes will not form a clump.
Ice cube production does not stop
when the ice cube container has
been removed. Ice cubes can fall
into the freezer basket underneath.
Only remove the ice cube container
for the shortest possible time or
switch off the ice maker before re-
moving it.